Some voters may live in areas that do not have a street address, such as in a dormitory, on a military base, or in a health care facility. These locations are generally some type of group quarters rather than a residential address.
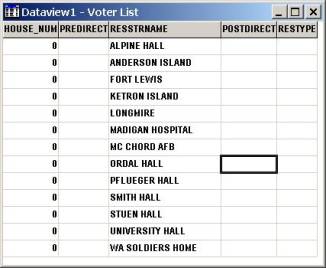
If you know the location of the points that could not be found and you have a large number of voters at these locations, it may be more efficient to create an additional layer that contains the locations of the unaddressed places. You can then use the new layer as a reference so that Maptitude automatically pin maps voters to the correct location.
Creating a New Geographic Layer
| To Do This… | Do This… |
| Add a field | Click Add Field to add a new field to the list. |
| Delete a field | Click on the field you want to delete, then click Drop Field. |
| Change the field order | Click on a field, then click Move Up or Move Down. |
| Change a field name | Click on a field and type a name in the Name box. |
| Use a display name | Click on a field and type a label in the Display Name box. |
| Change a field type | Click on a field, then choose a type from the Type drop-down list. |
| Change a field width | Click on a field and type the width in the Width box. |
| Change the number of decimals | Click on a field and type the number of decimal places in the Decimals box. |
| Set a default value in new records | Click on a field and type a value in the Default box. |
| Change a field format | Click on a field, then choose a format from the Format drop-down list. |
| Change a field description | Click on a field, then type a description in the Description box. |
| Index a field | Click on the field and check the Index box. |
| Change the aggregation method | Click Aggregation to display the Default |
Maptitude creates an empty geographic file for the map layer. You are now ready to use the editing tools to add features to the layer. The section "Editing Point Features" in Chapter 18 of the Maptitude User’s Guide contains comprehensive information about adding new point features. As you add points to the new layer, be sure to edit the point attributes. The value you enter in the Name field should match the name of the street in your voter file that was not found. After you have completed adding points for your group quarters, you can move on to identifying the voters that were not located and assigning them locations.
Identifying the Voters that were not Located and Assigning them Locations
The next task is to identify all of the voters who were not located. Once they are identified, you can pin map them to the locations you added in the file above.
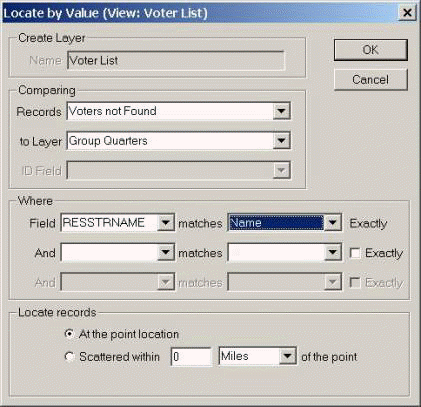
Maptitude for Precinct and Election Management locates the selected voters. We are now ready for the final step, Updating the Located Field in the Voters File.
Updating the Located Field in the Voters File and Updating Voter Counts
The final step is to tell Maptitude for Precinct and Election Management that the voters who live in group quarters have been located.
Your voters have been successfully located and updated for Maptitude for Precinct and Election Management. If additional voters register from any of these locations, it will be necessary to repeat the sections "Identifying the Voters that were not Located and Assigning them Locations" and "Updating the Located Field in the Voters File and Updating Voter Counts" after running P&E Mgt-Locate Voters.