
The healthcare layers that are provided as a free download for users of the latest version of Maptitude contain a lot of data points. While it is useful to have so much information available, it can often be too much information as the data you are searching for can be drowned out in the noise from other healthcare locations.
This article will go over how you can filter the healthcare layers to just the type of location you want to see and then create a new layer of just those locations that you can add to a map without having to add all the other healthcare locations with it.
Step 1: Add the Healthcare Layer(s) to the map
First, we will need to add the layers we want to search from to a map.
To search for individual Healthcare Individuals, choose the layer ccHealthcareProvider.cdf. This layer will contain records for individual healthcare professionals so they will often have multiple records at the same location.
To search for Healthcare Organizations, choose ccHealthcareOrganization.cdf. This layer shows you the locations of healthcare organizations so is less likely to have multiple records at the same location.
- Open a map of the United States
- Go to Map>Layers… and click Add Layer
- Browse for where the Healthcare Layers were installed (usually C:/ccdata/2019 Healthcare Data)
- Choose the layer(s) you want to add and click Open
Step 2: Create a selection set
The exact steps taken in this section will depend entirely on how you want to filter the data, but the filtering can be done in two main ways:
- Based on their location – e.g. all the locations in Denver, CO and the surrounding area
- Based on the data – e.g. all locations that have Dentist as their Primary taxonomy
Or you can do both at once. In this example, I will create a filter on the Healthcare Provider layer for all Dermatologists in Dallas, TX and the surrounding area.
- Make Healthcare Provider the working layer
- Zoom the map to the area that you would like to look for look in. For this example, I zoom the map to contain Dallas, TX and the surrounding area
- Click
 in the selection toolbar.
 - Check the Select from visible features only box
- From the Field List dropdown, select [Primary Taxonomy Description]
- Type in contains “Derma”
- In the Set Name dropdown, give this set of points a name e.g. Dallas Dermatologists
- Click OK
The software will create a selection set for all healthcare locations in the current map that satisfy the condition you entered and will highlight these locations in red on the map. In this case, I used the condition
[Primary Taxonomy Description] contains “Derma”
So that it captured a range of taxonomy codes that had to do with Dermatology. If you want just one specific taxonomy code you could do a condition such as:
[Primary Taxonomy] = “207N00000X”
There is a lot of data that can be used as the basis for your selection set. See our tutorial video here for more help with making a selection set.
Step 3: Exporting to a new layer
Now we have made the selection set, we want to make it into its own layer so we don’t have to do the selection process every time we open a new map. These steps will let you save the selection set to its own layer – we recommend saving into the folder containing all the healthcare layers so that the data is all saved in the same place.
- Make sure the layer on which you made the selection set is still the working layer
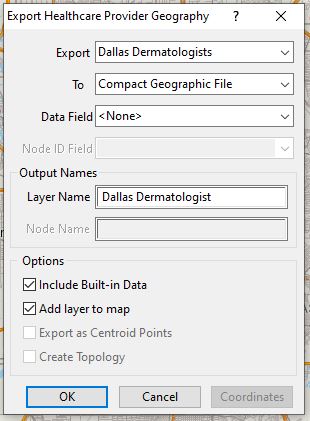
- Go to File>Export>Geography
- In the Export dropdown, choose the selection set to export, e.g. Dallas Dermatologists
- In the Layer Name entry, type in a name for the layer, e.g. Dallas Dermatologists
- Check Add layer to map
- Click OK
This will prompt you to save the layer – choose a folder to save into and a filename for the layer. Click Save and you will save the layer to its own file and it will add this layer to the map. You can now turn off the Healthcare Provider layer and just look at the filtered layer you just created.
Step 4: Adding the layer to a new map
Now this filtered list of locations is its own layer, similar to the layers initially downloaded. You can add this layer to a new map in the same way as we added the whole Healthcare Provider layer initially.
- Open any map
- Go to Map>Layers… and click Add Layer
- Browse for where the layer you just made was installed (usually C:/ccdata/2019 Healthcare Data)
- Choose the layer(s) you want to add and click Open