Maptitude Help / Managing Geographic Files / Connecting Points
Connecting Points
You can build lines from groups of points, created with a GPS receiver or by other methods, using the Tools>Editing>Point to Line Conversion command.
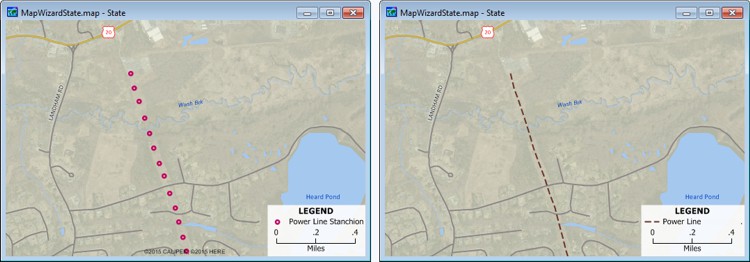
With this command you have a great amount of control over how to identify groups of points and how to organize the points into lines. You can:
- Use all of the points, or just a selection set
- Add the lines to an existing standard (.dbd) line geographic file in the current map, create a new line geographic file that will be added as a layer in the current map, or add the lines as annotations
- Connect the points based on increasing or decreasing values in any numeric field, by latitude, or by longitude
- Connect only points that have a matching value in a field, such as a street name
- Limit lines to a maximum number of points, to a maximum length, or both
- Omit lines that would have less than a minimum number of points, less than a minimum length, or both
- Set the largest gap that will be spanned when connecting points
 To Connect Points
- If you are going to add lines to an existing standard (.DBD) line geographic file, make sure that it is opened as a layer in the current map.
- Choose the point layer that will be used for connecting points from the drop-down list on the Standard toolbar. If you want to use just some of the points, create a selection set for those points.
- Choose Tools>Editing>Point to Line Conversion to display the Point to Line Conversion dialog box.
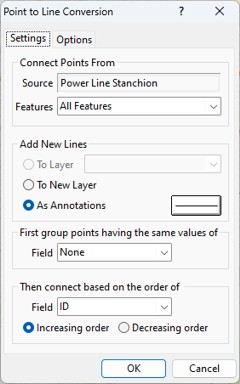
- Choose whether to use all features in the point layer or a selection set from the Features drop-down list.
- Choose where to add the lines as follows:
| To do this... | Do this... |
|---|---|
| Add the lines to an existing layer | Choose To Layer in the radio list and choose the layer from the drop-down list |
| Create a new line layer | Choose To New Layer in the radio list |
| Add the line as a freehand annotation | Choose As Annotation from the radio list and click the sample to set the line style |
 |
TIP: By default, only one line will be created with each input being converted into a shape point along the line. If you wish to convert each point into a node and to create a line segment between each point, make sure you check “Limit number of points to” and then enter 0 under the Options tab. |
- Choose a field for ordering the connection from the Field drop-down list and choose whether to sort the field in increasing or decreasing order.
- If you want to set options to control how lines are created, click the Options tab to display the Options page, and make choices as follows:
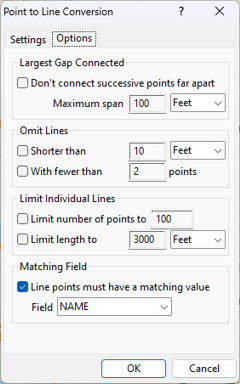
- To set a maximum gap to connect, check the Don't connect successive points far apart box, enter the maximum span in the edit box, and choose the units from the drop-down list.
- To omit short lines, check the Shorter than box, enter the minimum span in the edit box, and choose the units from the drop-down list.
- To omit lines with few points, check the With fewer than box and enter the minimum number of points in the edit box.
- To limit the number of points in a line, check the Limit number of points box and enter the maximum number in the edit box.
- To limit the length of a line, check the Limit length to box, enter a maximum length in the edit box, and choose the units from the drop-down list.
- To prevent lines from connecting to points that do not have matching values for a field, check the Line points must have a matching value box and choose a field from the drop-down list.
- Click OK.
Maptitude connects the points and displays the new lines.
©2026 Caliper Corporation