Maptitude Help / Managing Geographic Files / Creating Grids
Creating Grids
Grids offer a way of dividing a map into areas of specified dimensions. A grid is drawn along X and Y axes, and is made up of a certain number of cells with a certain width and height, or grid spacing.
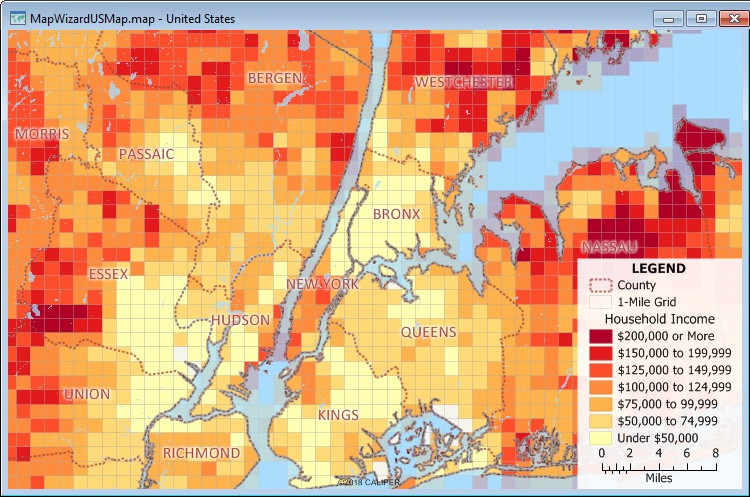
The geographic files that come with Maptitude include 5-, 10-, 20-, and 30-degree grid lines for you to use in your maps. You can also create your own area, line, or point grids. For example, you can create grids to:
- Find the demographic characteristics of every 25-square-mile area in a state
- Create sample areas for use with a GPS device in gathering natural resource data
- Mark points on a map a fixed distance apart
You can add shape points to area and line grids. Add one or more shape points to each line or each area boundary to more accurately display grids with large cells or grids on projections where lines of longitude or latitude curve.
You create a grid on a map using the Tools>Editing>New Grid Layer command. To use this command, you enter information about the location and spacing of the grid you want to create.
If you create a grid based on longitude and latitude, grid spacing is expressed in degrees. Otherwise, grid spacing is expressed in the current map units.
Maptitude offers three methods. You can create a grid:
- That covers the area displayed in the map window with a set number of cells along the X and Y axes
- That covers the area displayed in the map window, with cells of fixed size along the X and Y axes
- Anywhere by entering an origin coordinate, the fixed grid spacing along the X and Y axes, and a set number of cells along the X and Y axes
In the third method, the origin coordinate is a distance from the origin of the map projection or coordinate system.
An area grid is saved into a compact (.cdf) area geographic file. A point or line grid is saved into a standard (.dbd) geographic file.

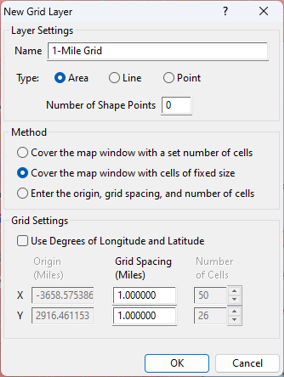
- Enter a name for the new grid layer in the Name edit box.
- Choose whether to create an area, line, or point grid layer from the Type radio list. For an area or a line grid you may also add shape points which will more accurately represent the grid for very large grid cells.
- Choose a method to use to create the grid as follows:
| To create a grid... | Do this... |
|---|---|
| In the map window with a set number of cells | Choose the first method, then type the number of cells along the X and Y axes in the Number of Cells editable spinners. |
| In the map window with cells of fixed size | Choose the second method, then type the size of the cells along the X and Y axes in the Grid Spacing edit boxes. |
| Anywhere on the map | Choose the third method, then type an origin coordinate in the Origin edit boxes, the type the size of the cells along the X and Y axes in the Grid Spacing edit boxes, and the number of cells along the X and Y axes in the Number of Cells editable spinners. |
- Check the Use degrees of Longitude and Latitude box to base the grid on longitude and latitude or leave it unchecked to use the map units.
- Click OK.
Maptitude creates the grid and draws the map with the grid.
©2026 Caliper Corporation