Maptitude Help / Routing, Directions, and GPS / Finding Routes
Finding Routes
The best route can mean different things to different people. To some people, the best route is the one that is shortest in terms of mileage. To others, the best route is the fastest route, or the most scenic route. A salesperson who spends time on the road might want to set up an itinerary for less driving time and more time with customers. To a chemical company transporting hazardous chemicals, the best route is one that uses the safest roads (less risk of an accident) and avoids areas where lots of people live or work (in case of an accident, the consequences are less severe).
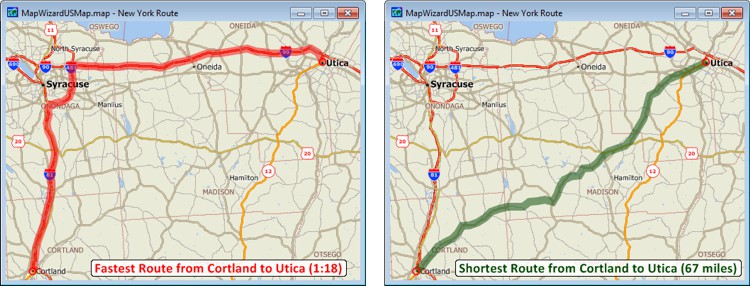
If your version of Maptitude includes the HERE® street layer, you can use it to find shortest and fastest routes. You also can find routes on other types of line layers, such as railroads or bicycle paths.
 |
Your use of any routing features is subject to the following disclaimer: |
Finding Your Best Route
Finding your best route first involves first choosing the stops that are to be included. Use any combination of the following three methods to choose the stops (up to 200):
- Manually click on the map at the stop locations.
- Type an address in the fields at the top of the Routing and Directions Manager. You can type a street number and street name or the names of intersecting streets, plus the city and state and/or postal code.
- Choose a point layer and selection set (e.g., using a point layer of your customer locations, create a selection set of the customers you want to visit).
If you want to put stops at a lot of addresses, rather than typing them all in individually using the second method above, it will probably be better to first create a table with a record for each address and use Create-a-Map Wizard or the Locating tools to create a point layer from the table. Then use the third method to choose the stops using the resulting point layer.
Once you have placed the stops you can find a route to service them. You have several options for finding the route:
- You can choose whether to base the routes on the fastest or shortest route.
- You can choose to add the first stop to the end if you want a route that returns to the origin.
- You can keep the stops in the order that you chose them and find the fastest or shortest route.
- You can manually rearrange the stops and find the fastest or shortest route for the order you chose.
- You can choose whether to exclude ferries or other selected segments
- You can have Maptitude optimize the order to visit the stops to cut down on the amount of travel among the stops. When you choose this method, you also have the option of preserving the first and/or last stops.
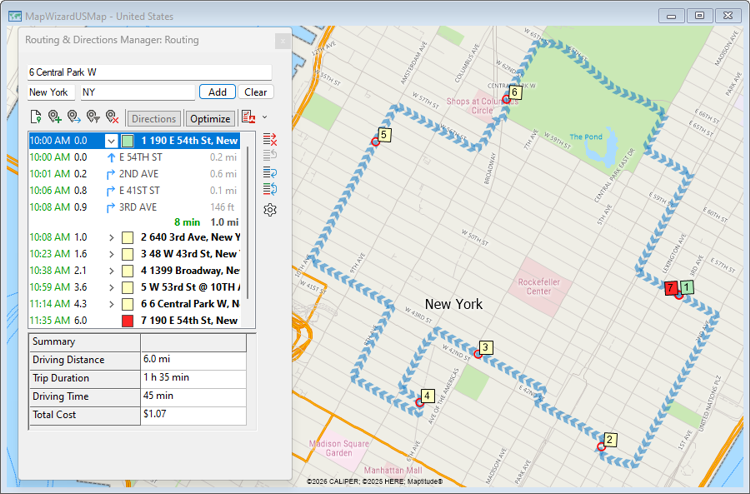
Once Maptitude has found your route, you can:
- Click
 in the Routing and Directions Manager to see the directions from one stop to the next.
 - Go back and change the order of one or more stops and recalculate the route.
- Create a PDF report with a route summary and directions.
- Print the map or add it to a layout.
- Save the workspace with any routes that you have created
 |
NOTE: Maptitude saves routes in the workspace. Maptitude 2022 and earlier saved routes in separate files. Route files saved in older versions of Maptitude can be imported into Maptitude workspaces. |
 |
For a video tutorial see: (Internet connection required) |
- Maptitude uses the supplied street layer for finding routes. If your map does not contain the street layer, then choose the line layer on which you want to route from the drop-down list on the Standard toolbar.
- Choose Tools>Routing & Directions>Routing & Directions Manager or click
 Routing Manager in the analysis tools drop-down on the Standard toolbar to display the Create or Open a Route dialog box.
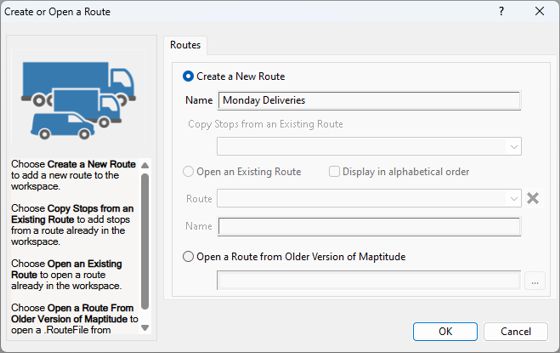
- Choose the Create a New Route option from the radio list and enter a name for the new route. If you want to copy stops from an existing route in the workspace, choose the route from the Copy Stops from an Existing Route drop-down list.
- Click OK. Maptitude displays the Routing and Directions Manager.
- In the Routing and Directions Manager, click
 to display the Route Options dialog box.
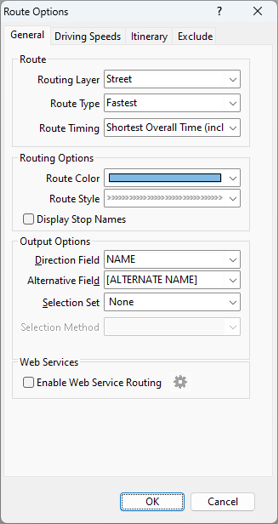
 - Click the General tab and make choices as follows:
| To do this... | Do this... |
|---|---|
| Optimize the route by time (fastest) | Choose Fastest from the Route Type drop-down list. |
| Optimize the route by distance (shortest) | Choose Shortest from the Route Type drop-down list. |
| Optimize a fastest route by minimizing both active drive time and waiting time | Choose Shortest Overall Time from the Route Timing drop-down list. In this case, if the schedule for the next stop requires a long wait time, the vehicle may visit other stops, even if the overall driving time is increased. |
| Optimize a fastest route by minimizing shortest active drive time | Choose Shortest Drive Time from the Route Timing drop-down list. In this case, if the schedule for the next stop requires a long wait time, the vehicle will wait for the duration until the next scheduled stop to maintain the shortest overall driving time. This may result in more time spent waiting at stops and longer overall times. |
| Change the color used to display the route | Choose a color from the Route Color drop-down list. |
| Change the line style used to display the route | Choose a line style from the Route Style drop-down list. |
| Choose how to label the stops | Check Display Stop Names to show stop names on the map or leave it unchecked to show the stop numbers. |
| Specify the fields used for driving directions | Choose the field containing the street name and alternative street name from the Direction Field and Alternative Field drop-down lists respectively. |
| Create a selection set of the street segments in the route | Choose or type a selection set name in the Selection Set editable drop-down list and choose a selection method from the drop-down list. |
| Compare to routes created by a web service | Click  to display the Web Service License dialog box and then click to display the Web Service License dialog box and then click  , add a web service, click Save, and click Close to add a web service, then check the Enable Web Service Routing box. , add a web service, click Save, and click Close to add a web service, then check the Enable Web Service Routing box. |
If you want, you can set additional options as follows:
| To do this... | Do this... |
|---|---|
| Adjust speeds for the street layer | Click the Driving Speeds tab and choose the Factors option in the radio list to use the sliders to make the speeds faster or slower for the different road classes or choose the Target Speeds option in the radio list to enter target speeds for some different road classes. The sliders correspond to speeds factors 1/5, 1/3, 1/2, 1, 1.176, 1.538, and 2. Driving speeds can only be adjusted when using the 2016 or later version of the HERE street file. |
| Set a driving schedule | Click the Itinerary tab and choose a start and end time. If you want you can prevent Maptitude from creating an automatic overnight stop just before what could reasonably be the last stop of the day by choosing an amount of time you are willing to continue driving each day from the Flexibility drop-down list. |
| Set a fixed time to spend at each stop | Click the Itinerary tab, check the Stay at each stop for box, and specify the stop duration. |
| Build in rest time | Click the Itinerary tab, check the Automatic Rest box, specify the length and frequency of rests, and choose whether the frequency is based on total route time or just driving time. |
| Change the cost variables | Click the Itinerary tab and choose whether to calculate driving costs based on fuel price (and enter values for fuel price and consumption) or flat rate (and enter a rate). |
| Exclude travel on some links | Click the Exclude tab and check the All Ferries box to exclude traveling on ferries and/or check the Selected Links box and choose a selection set that contains the links to exclude from the Selection Set drop-down list. |
- Click OK to return to the Routing and Directions Manager.
- Add stops using any combination of the following methods:
 to display the Add Stops dialog box. Choose a layer and selection set from the drop-down lists. If the layer contains a field with the order in which to visit the stops, choose it from the Order By drop-down list. If the layer contains a field with the duration of each stop, check the
 - To make changes to stops:
| To do this... | Do this... |
|---|---|
| Schedule a stop arrival time, duration, or departure time | Right-click on a stop in the stop list in the Routing and Directions Manager and choose Schedule Stop to display the Stop Schedule dialog box. You can choose a Depart At time for the first stop, an Arrive At time for the last stop, and those choices plus a Stop For time for all other stops. Click OK when you are done. |
| Rename a stop | Right-click on a stop in the stop list in the Routing and Directions Manager and choose Rename to display the Rename Stop dialog box. Type a new name in the New Name edit box and click OK. |
| Choose the starting stop | Right-click on a stop in the stop list in the Routing and Directions Manager and choose Choose as Start. Maptitude moves the stop to the start of the list. To have the route return to the starting stop, right-click on the starting stop and choose Choose as End. Click Yes to confirm that you want the first stop to also be the last stop. Maptitude adds a duplicate of the stop at the end of the list of stops and marks it as the ending stop. |
| Choose the ending stop | Right-click on a stop in the stop list in the Routing and Directions Manager and choose Choose as End. Maptitude moves the stop to the end of the list. If the stop you chose was the starting stop, Maptitude displays a Confirm dialog box. Click No to make it the last stop or click Yes to make a duplicate of the first stop so your route can return to the starting stop. |
| Move a stop up the list | Highlight any stop but the first and click  . . |
| Move a stop down the list | Highlight any stop but the last and click  . . |
| Reverse the order of the stops | Click  . . |
| Remove a stop | Right-click on a stop in the stop list in the Routing and Directions Manager and chooseRemove Stop. Maptitude removes the stop from the list. |
| Remove all of the stops | Click  to display the Confirm dialog box, then click OK. Return to Step 7 to begin adding new stops. to display the Confirm dialog box, then click OK. Return to Step 7 to begin adding new stops. |
- Choose how to have Maptitude calculate the route:
| Click... | To do this... |
|---|---|
| Directions | Maptitude finds a route that visits the stops in the order they appear in the Routing and Directions Manager. |
| Optimize | Maptitude determines the best order to visit the stops to minimize travel time or distance. |
Maptitude draws the route on the map and displays in the Routing and Directions Manager the itinerary for the route along with a summary of the driving time, distance, duration (including rest time), and cost.
- Make any additional choices in the Routing & Directions Manager as follows:
| To do this... | Do this... |
|---|---|
| See the directions from one stop to the next | Click . |
| See a stop labeled on the map | Click on a stop or on a step in the directions. Click again to remove the label. |
| Add a new line layer to the map that contains the route and stops | Click  Create Layer from Route in the drop-down tools in the Routing and Directions Manager Create Layer from Route in the drop-down tools in the Routing and Directions Manager |
| Move a stop | Click  and then click on a stop and drag it to a new location. and then click on a stop and drag it to a new location. |
| Add one or more stops | Click and on the route between stops and drag to a new location, or use one of the methods described in step 8 and click Directions or Optimize again to update the route. |
| Compare the route to a web service route | Choose the service from the Choose with Web Service drop-down list and click Compare. |
- If you want to create a report of the route, choose one of the PDF directions reports or export to Excel using the drop-down tools in the Routing and Directions Manager:
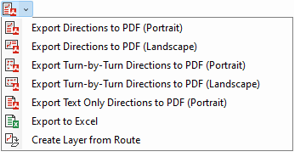
Save your workspace to save the route. To add additional routes to the workspace, click  and return to step 3.
 To Load a Route
- If the Routing and Directions Manager is open click , otherwise choose Tools>Routing & Directions>Routing & Directions Manager or click Routing Manager in the analysis tools drop-down on the Standard toolbar to display the Create or Open a Route dialog box.
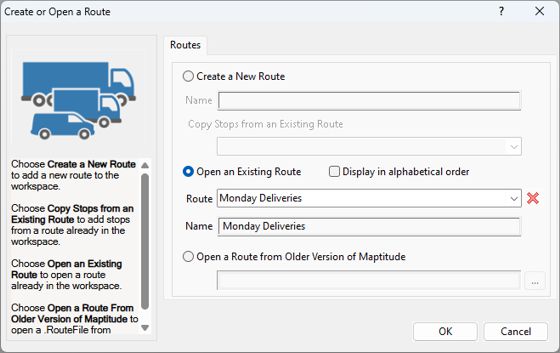
- Make choices as follows:
| To do this... | Do this... |
|---|---|
| Open a route in the workspace | Choose the Open an Existing Route option from the radio list, choose a route from the drop-down list, and click OK. By default, the routes are sorted in the order that they were created. You can check the Display in alphabetical order box to sort the routes alphabetically by name instead. |
| Open a route from Maptitude 2022 or earlier | Choose the Open a Route from Older Version of Maptitude option from the radio list, browse for a .RouteFile and click Open, and click OK. |
Maptitude removes any current route and its stops, and loads the saved route and its stops.
To Manage the Routes Saved in a Workspace
- If the Routing and Directions Manager is open click , otherwise choose Tools>Routing & Directions>Routing & Directions Manager or click Routing Manager in the analysis tools drop-down on the Standard toolbar to display the Create or Open a Route dialog box.
- Choose the Open an Existing Route option from the radio list.
- Make choices as follows:
| To do this... | Do this... |
|---|---|
| Rename a route | Choose a route from the drop-down list, enter a new name in the Name edit box, and click OK. Maptitude renames the route and displays it on the map. |
| Delete a route | Choose a route from the drop-down list, click  , and click Yes in the Confirm dialog box. , and click Yes in the Confirm dialog box. |
Try It Yourself: Finding the Best Route
1. Choose File>New Workspace or click  on the Standard toolbar, choose New map of {country name}, then use Create-a-Map Wizard to create a map of the city where you live.
2. Choose Tools>Routing & Directions>Routing & Directions Manager or click Routing Manager in the analysis tools drop-down on the Standard toolbar to display the Create or Open a Route dialog box.
3. Choose Create a New Route from the radio list and click OK to display the Routing and Directions Manager.
4. Enter your address in the boxes at the top of the Routing and Directions Manager and click Add.
5. Click  in the Routing and Directions Manager and then click at a location somewhere north of your first stop, then click somewhere south, west, and east of your first stop for a total of five stops.
6. Click Directions. Maptitude finds the fastest route from your home address to the four stops, keeping the stops in the order that you chose them, and displays the route on the map. Notice the total driving time and driving distance for the route shown at the bottom of the Routing and Directions Manager.
7. Click Optimize. Maptitude finds the best order to visit the stops and displays the route on the map. Notice that the total driving time and driving distance have decreased.
8. Right-click on the first stop in the scroll list, your address, and choose Choose as End.
9. Click Yes to make a duplicate stop at your home address for the last stop.
10. Click Optimize again. Maptitude finds the best order to visit the stops and return to your home.
11. Click in the Routing and Directions Manager next to one or more stops to see the directions.
12. Click Routing Manager in the analysis tools drop-down on the Standard toolbar to close the Routing and Directions Manager and turn off the route.
13. Click Routing Manager in the analysis tools drop-down on the Standard toolbar to display the Create or Open a Route dialog box again.
14. Choose Open an Existing Route from the radio list, choose the route you just created from the drop-down list, and click OK. Maptitude again displays the route that you created.
15. Choose File>Close Workspace and click Don't Save to close the workspace without saving changes.
©2026 Caliper Corporation