Maptitude Help / Managing Geographic Files / Rubbersheeting Geographic Files
Rubbersheeting Geographic Files
If you need to make adjustments to the positions and shapes of many map features in a geographic file, you can use rubbersheeting. Imagine putting pins in a distorted map and moving those pins to their correct location to remove the distortion. The areas between the pins will be stretched and moved as well. The more pins (control points) you use, the more detailed the correction can be. The Tools>Editing>Advanced>Rubbersheet command displays a toolbar that lets you set control points, identify their true location, and save the results in a new geographic file. You must use at least three control points to rubbersheet a layer.
 To Rubbersheet a Geographic File
- Choose a layer from the drop-down list on the Standard toolbar.
- Choose Tools>Editing>Advanced>Rubbersheet to display the Rubbersheet toolbar.
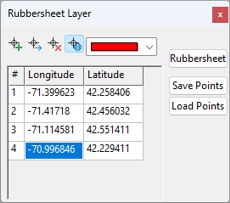
- Place your control points as follows:
| To do this... | Do this... |
|---|---|
| Place a control point | Click  and click on the layer where you want a control point. Maptitude draws a symbol and number on the control point, and adds it to the list in the toolbar. and click on the layer where you want a control point. Maptitude draws a symbol and number on the control point, and adds it to the list in the toolbar. |
| Move a control point | Click in the list on the control point you want to move, click  , and click on the new location for the control point. Maptitude draws the control point in the new location. , and click on the new location for the control point. Maptitude draws the control point in the new location. |
| Delete a control point | Click in the list on the control point you want to delete, and click  . Maptitude removes the control point and renumbers the remaining control points. . Maptitude removes the control point and renumbers the remaining control points. |
| Change the color | Choose a color from the drop-down list. Maptitude draws the control points in the chosen color. |
To load existing control points, click Load Points to display the Load Coordinates dialog box, choose a Coordinates File, and click Open.
To save your control points, click Save Points to display the Save Coordinates As dialog box, choose a folder and type the name of the new Coordinates File, and click Save.
- Enter the true location of each control point as follows:
| To do this... | Do this... |
|---|---|
| Type in the location | Enter the coordinates of the control point in the respective cells in the Longitude and Latitude columns. If you want to use the local coordinates, check the Local box. |
| Click on the location | Click in the list on the control point you want to locate, click  , then click on a map to mark the true location. , then click on a map to mark the true location. |
- Click Rubbersheet.
Maptitude rubbersheets the geographic file, and adds the new geographic file as a layer in the map.
©2026 Caliper Corporation