Maptitude Help / Sharing Your Maps / Saving Maptitude Windows as Graphic Files
Saving Maptitude Windows as Graphic Files
You can save maps as static images, HTML Files, or animated GIF files to use in documents, websites, and presentations.
Saving Windows in Graphic Format Files
Maptitude lets you save any map, dataview, chart, 3D theme, 3D view, or layout as a graphic file that can be used with other programs. Supported graphic formats for each type of window are as follows:
| BMP | JPEG | PNG | GIF | TIFF | EMF | WMF | |
| Maps | • | • | • | • | • | • | – |
| Layouts | • | • | • | • | • | • | – |
| Dataviews | • | • | • | • | • | – | – |
| 3D Themes | • | • | • | • | • | – | – |
| 3D Views | • | • | • | • | • | – | – |
| Charts | • | • | • | – | – | • | • |
 |
For a video tutorial see: (Internet connection required) |
 To Save a Window as a Graphic File
1. Choose File>Export>Image to display the Save As dialog box.
2. Choose the format you want from the Save As Type drop-down list:
3. Type the file name and click Save.
Maptitude saves the window as a graphics file in the chosen format.
 |
TIP: You can also choose Edit>Copy Map to copy an image of your map to the Windows clipboard. |
Saving Maptitude Maps in HTML Files
Maptitude lets you save a map as an HTML file with an associated JPEG file. When you save a map as an HTML file you have the option of using a template HTML file. When you use a template, all instances of the text “<!--MAP_IMAGE-->” in your template will be replaced with the file name of the JPEG image file, and all instances of the text “<!--MAP_TITLE-->” will be replaced with a title that you specify.
To Save a Map in an HTML File
- Choose File>Export>Image to display the Save As dialog box.
- Choose HTML Document from the Files of Type drop-down list.
- Type the file name and click Save. Maptitude displays the HTML Document Settings dialog box.
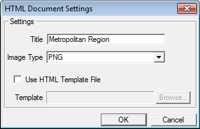
- Type a title for the map in the Title box.
- To use a template for the HTML output, check the Use HTML Template File box and click Browse to display the Choose HTML Template File dialog box. Browse for the template and click Open to return to the HTML Document Settings dialog box.
- Click OK.
Maptitude saves the HTML file and a JPEG image of the map.
Saving Maptitude Maps in Animated GIF Files
Maptitude lets you save a series of map, 3D theme, chart, or dataview images as an animated GIF file using the Animated GIF toolbar. Creating an animated GIF is an effective way for showing your map data for a time series. For example, create a thematic map showing your 1st quarter sales and add that as the first image in your animated GIF, then add successive images for your 2nd, 3rd, and 4th quarter sales. You can then view the resulting GIF to see the four images in series.
|
TIP: Animated GIFs often look best when the images are all the same size. Use the Windows>Cascade command or maximize separate windows to make different windows the same size. |
To Save Maps in an Animated GIF File
- Create a map as you want it to appear at the start of your animated GIF.
- Choose File>Share>Animated GIF to display the Animated GIF toolbar.
- Click
 to add the map as the first frame in the GIF.
 - Make changes to your map and click again to add an additional frame. Continue to add frames in this manner until you are done.
- Choose how long to display each frame in hundredths of a second using the Delay spinner.
- Click
 to display the Save As dialog box.
 - Choose a folder in which to save the GIF, enter a file name, and click Save.
Maptitude saves the animated GIF file in the folder you specified.
©2026 Caliper Corporation