Maptitude Help / Changing and Customizing Maps / Using the Drawing Tools
Using the Drawing Tools
Maptitude lets you embellish your maps by adding text, symbols, lines, circles, rectangles, and other graphics. The items you draw on the map are called freehand items. Freehand items are saved as part of the map file.
 |
For a video tutorial see: (Internet connection required) |
Adding Freehand Items to a Map
The Standard toolbar includes a drop-down of drawing tools that you use to add freehand items to a map.
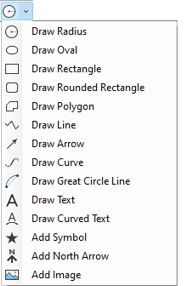
Here is a quick summary of the drawing tools and how they work:


When you are dragging a rectangle, rounded rectangle, or oval, you can press the space bar to drag from the opposite corner. You can hold the Ctrl key to drag a rectangle, rounded rectangle, or oval from its center.
When you are drawing a line or shape, you can press the scroll wheel on your mouse to pan the map.
A freehand circle or radius will be a true circle on the current projection. A freehand great circle line will follow the shortest distance between the start and end points, and will be a curve on most projections. Great circles that cross the 180/-180 degree meridian will be broken into two parts.
 |
NOTE: You can change the default styles for freehand items by choosing the Edit>Preferences command and going to the Freehand/Layout tab in the User Preferences dialog box. |
Working with Freehand Items
Once you add a freehand item to a map, you can edit, move, resize, or delete it. You can also align any number of freehand items either horizontally or vertically. To modify a freehand item, you must first select it with the Pointer  tool. To align freehand items, you must first select all the items you want to align with the Pointer tool.
With the exception of freehand symbols and North arrows, freehand items scale with the map as you zoom in and out. You can change this behavior for freehand text, so that the text retains the point size you set when you placed it.
When you choose to keep the text size fixed, you can also choose a position for the text. If the position of text relative to a map feature is important, you should set that position to ensure that the label displays properly when you change the scale of the map.
- Click on the Standard toolbar to activate the Pointer tool.
- Select freehand items as shown in the table:
When you select a freehand item, square blocks appear at the corners and sides of the item. These blocks are called editing handles. Text and symbol items also have a rotation handle, which you use to rotate the item.

 |
TIP: You can also select items by clicking with the right mouse button. When you do, Maptitude displays a context-sensitive menu for working with the selected item(s) |
 To Change the Size of a Freehand Item
- Click on the Standard toolbar to activate the Pointer tool, and select a freehand item.
- Click and drag one of the editing handles to make the item the desired size. Hold the Shift key while dragging to keep the aspect ratio of width to height constant when resizing circles or rectangles.
To Control the Size and Position of Freehand Text
- Click on the Standard toolbar to activate the Pointer tool, and double-click on a freehand text item to display the Freehand Text dialog box.
—OR—
Right-click on a freehand item and choose Properties to display the Freehand Text dialog box.
- Click the Size/Alignment tab to display the Size/Alignment page.
- Click the Keep Text Size Fixed radio button.
- Choose a position for freehand text from the Position radio buttons.
- Click OK.
From now on, Maptitude will retain the point size of the text when you zoom in and out. You cannot rotate a text item whose size is fixed.
To Rotate a Text or Symbol Item With the Rotation Handle
Text and symbol items can be rotated to any desired angle. Rotated items normally align themselves to the nearest 5-degree angle. This makes it easy to place text vertically, horizontally, or diagonally. To rotate items more precisely, press and hold the Ctrl key and then drag the rotation handle. If the size is fixed for a text item, you cannot rotate it.
- Click on the Standard toolbar to activate the Pointer tool, and select a freehand item.
- Click and drag the rotation handle to rotate the item.
To Rotate Text
- Click on the Standard toolbar to activate the Pointer tool, and double-click on a freehand text item to display the Freehand Text dialog box.
—OR—
Right-click on a freehand item and choose Properties to display the Freehand Text dialog box.
- Click the Size/Alignment tab to display the Size/Alignment page.
- You cannot rotate fixed size text. If the text size is fixed, click the Change text size when the map scale changes radio button.
- Use the spinners or enter an angle in the Angle edit box.
Once you have changed the angle you can switch the text back to fixed size.
- Click OK.
Freehand items can be moved around the map individually or in groups.
- Click on the Standard toolbar to activate the Pointer tool, and select one or more freehand items.
- Position the cursor over one of the selected items (but not on one of the handles).
- Click and drag the items to a new location while holding the Shift key.
Most freehand items can be edited in place to change the style or other attributes of the item. To edit a freehand item:
- Right-click on a freehand item and choose Properties to display a dialog box for editing the items.
—OR—
Click on the Standard toolbar to activate the Pointer tool, select one or more freehand items, of similar type and double-click on any of the selected items to display a dialog box for editing the items. For example, you can edit the style of two rectangles and an oval in a single step, but you cannot edit the style of a text item and two rectangles in a single step.
- Change settings as described in the table below. Note: The contents of the dialog box depend on the type of items that are selected.
| For this type of item... | You can change... |
|---|---|
| Text | The font, style, color, frame style, size, position, and the text to display |
| Curved Text | The font, style, color, and the text to display |
| Rectangle, Rounded Rectangle, Oval, Shape | The border pattern, width, and color, the fill pattern and color, transparency, and opacity |
| Radius | The border pattern, width, and color, the fill pattern and color, transparency, and opacity, whether or not to draw the radius line and radius label, and the font, size, and style of the radius label |
| Line or Great Circle Line | The line pattern, width, color, and opacity; you can also add direction arrows or a label with the length of the line |
| Curved Line | The line pattern, width, color, and opacity; you can also add direction arrows |
| Arrow | The line pattern, width, color, opacity, and to which ends to apply arrows; you can also add a label with the length of the line |
| Bitmap | The bitmap file |
| Symbol | The font, icon, size, color, style, and opacity |
| Image | The image file |
| North Arrow | The style and color |
- Click OK.
Maptitude draws the item with the changes.
- Click on the Standard toolbar to activate the Pointer tool, and select two or more freehand items.
- Choose Edit>Drawing>Align, or right-click on a selected freehand item and choose Align, to display the Align Items dialog box.
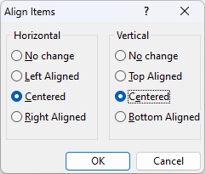
- Choose the horizontal and vertical alignment using the Horizontal and Vertical radio lists.
- Click OK.
Maptitude aligns the items and draws them in their new location. The alignment is based on the first freehand item that you selected.
To Change the Order of Freehand Items
- Click on the Standard toolbar to activate the Pointer tool, and select one or more freehand items.
- Choose Edit>Drawing>Pull to Front to move the selected items in front of all the rest, or choose Edit>Drawing>Push to Back to move the selected items behind all the rest.
—OR—
- Right-click on a freehand item and choose Pull to Front, to move the selected items in front of all the rest, or Push to Back, to move the freehand item behind all the rest.
Maptitude draws the freehand items in the new order.
To Make Copies of Freehand Items
- Click on the Standard toolbar to activate the Pointer tool, and select one or more freehand items.
- Choose Edit>Drawing>Duplicate.
—OR—
- Right-click on a freehand item and choose Duplicate.
Maptitude makes a duplicate copy of the selected items, and selects the duplicate items.
To Copy Freehand Items from One Map to Another
- Click on the Standard toolbar to activate the Pointer tool, and select one or more freehand items.
- Right-click on a freehand item and choose Copy.
- Click on another map or choose Window>[Map Name] to make it the active window.
- Right-click on the map and choose Paste.
Maptitude pastes a copy of the item(s) you copied at the same location on the map.
- Click on the Standard toolbar to activate the Pointer tool, and select one or more freehand items.
- Choose Edit>Drawing>Delete or press the Del key.
- If you choose Edit>Drawing>Delete, Maptitude will display a Confirm dialog box. Click Yes to delete the freehand item or items.
—OR—
- Right-click on a freehand item and choose Delete. Maptitude displays a dialog box to confirm the deletion.
- Click Yes to delete the freehand item.
The selected freehand items are deleted from the map.
North Arrows
North arrows differ from other freehand items. When you place a North arrow on a map, it stays the same size and in the same relative location in the map, even if you change the map scale or center. The angle of the North arrow may change so that it is pointing North at that location based on the map projection.
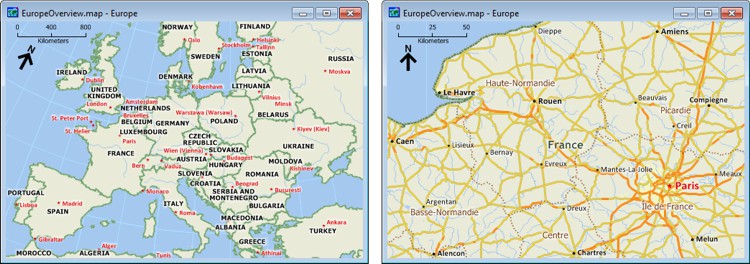
You can move or resize a North arrow like any other freehand item.
Try It Yourself: Embellishing a Map with the Drawing Tools
1. Choose File>New Workspace or click  on the Standard toolbar, choose New map of {country name}, and click OK.
2. Choose World Country from the scroll list, type "United Kingdom" in the Country edit box, and click Finish. Maptitude displays a map of the United Kingdom.
3. Click  in the Drawing Tools drop-down on the Standard toolbar to activate the Draw Text tool, then click and drag a rectangle over the water between England and France to add freehand text. Type “English Channel” and press the Enter key.
4. Click on the Standard toolbar to activate the Pointer tool.
5. Double-click on the text, change the style to italic, change the color to blue, and click OK.
6. Click on the text, then click and drag an editing handle to change the size of the text.
7. Click and drag the rotation handle to rotate the text.
8. Click on the text and drag it so that it is centered on the English Channel.
9. Click  in the Drawing Tools drop-down on the Standard toolbar to activate the North Arrow tool, then click and drag a small rectangle in the lower left corner of the map.
10. Choose an arrow and click OK. Maptitude adds the chosen arrow to the map.
11. Choose File>Close Workspace and click Don't Save to close the workspace without saving any changes.
©2026 Caliper Corporation