The goal of redistricting is to create districts from smaller areas such as
precincts or counties in such a way that all of the districts have the same
population or are within a very small deviation. This Quick Start Guide shows
the typical steps that you will use to create districts.
Creating a Maptitude Online Redistricting User Account
- On the Maptitude Online Redistricting login page, click the New User link.
- Create a New User account with a login name and password.
NOTE: Your user name must be one word and your password must have at least 8 characters. Your user name will appear at the top of any maps you print or email.
- Enter your email address to receive an account activation link.
- Activate your account by clicking the link in the email you receive.
After activating your account, login to Maptitude Online Redistricting.
Creating a New Plan
- Click the New Plan button in the Plan Manager:

- Choose a starting point for your plan as follows:

| To do this... |
Do this... |
|
Create a plan from a pre-defined plan
|
Click the Initial tab and
choose a plan type and hierarchy from the scroll list |
| Create a plan based on a shared plan |
Click the Shared tab and
choose a plan from the scroll list |
- Click Create.
- Type a name for your plan and click OK.
Maptitude opens a map with and displays the district boundaries. You are ready to start changing the districts.
Modifying the Districts in the Plan
About the Maptitude for Online Redistricting Map Window
The map window contains several components:
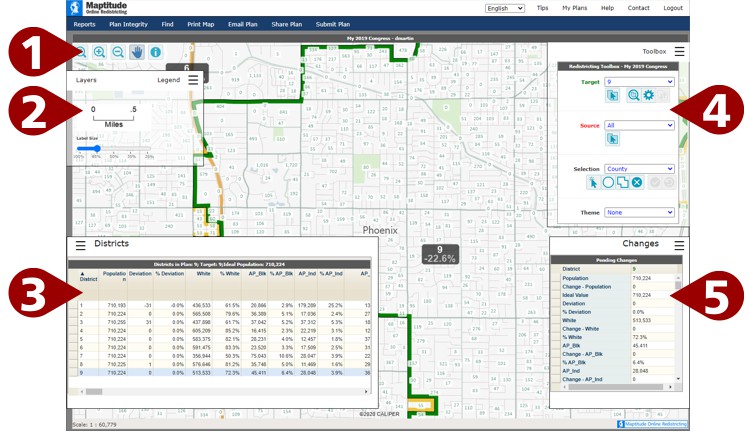
| 1 |
Map tools are used to change the map scale and get information about the features in a map:
| Tool |
How to Use It |
 |
Click to show the initial map scale. |
 |
Click on the map to zoom in or click and drag a rectangle to zoom to a specific area. |
 |
Click on the map to zoom out or click and drag a rectangle to reduce the map scope to a specific area. |
 |
Click and drag to pan the map in any direction without changing the scale. |
 |
Click on the map to display information about the features at the location where you clicked in a
separate Info window. Click the tabs to see information for different layers. |
You can also use your mouse's scroll wheel to zoom in and out. |
| 2 |
Layers/Legends box is where you can choose what layers are visible in the map and see a legend for the map:
-
Click Layers to see the layers on the map and at what scales they will display. Use the checkboxes to choose which background layers to display.
-
Click Legend to see the map legend. Use the slider to change the size of labels and widths of lines.
Click  to show or hide the Layes/Legends box. to show or hide the Layes/Legends box.
|
| 3 |
Districts box displays a
table with demographic information about the districts. The title bar of the
table tells you how many districts are in the plan and the ideal
value for eachdistrict. Click to
show or hide the District box. |
| 4 |
Redistricting toolbox contains the tools for
modifying districts in the plan. See "To Modify the Districts"
below for details on using the Redistricting toolbox. Click to
show or hide the Redistricting Toolbox box. |
| 5 |
Changes box displays a table with the
pending changes to one or more districts based on modifications
made with the Redistricting tools. Click to
show or hide the Changes box. |
To Modify the Districts
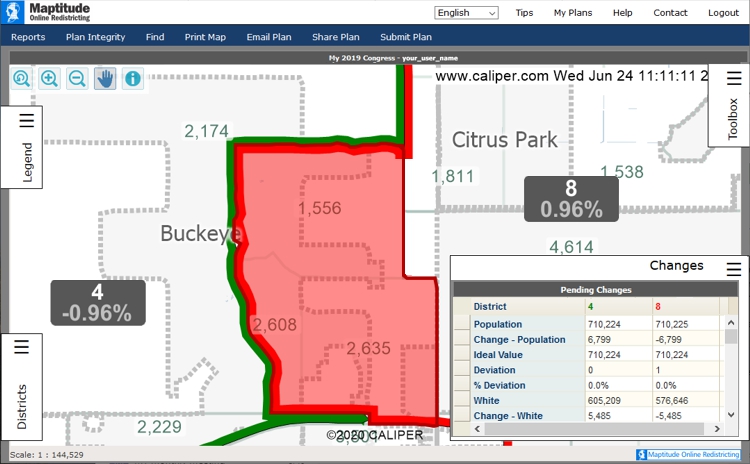
By looking at the map and Districts table, you can see which districts need adjusting.
In the example below, you can see that you need to take population away from District 8 (6,800 over the ideal population value)
and you need to add population to District 4 (6,799 under the ideal population value).
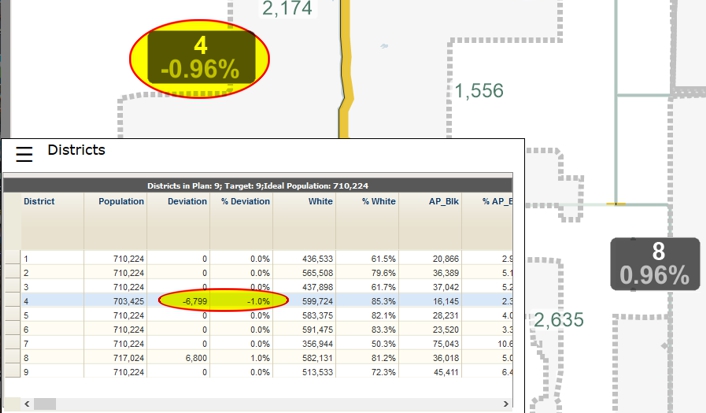
To do this, you will make District 4 the TARGET DISTRICT and District 8
the SOURCE DISTRICT. You do this in the Redistricting Toolbox:
- From the Target drop-down list, choose the district to which you will add
population. Alternatively, you can choose the Pick Target District tool
 and then click the target district on the map.
- From the Source drop-down list, choose the district from which you will remove population.
Alternatively, you can choose the Pick Source District
tool and then click the source district on the map or choose All to choose features
from any district.
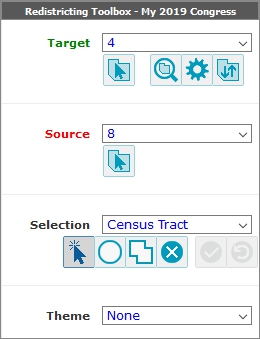
- From the Selection drop-down list, choose the level at which you will be making changes.
You can choose to move entire counties, voting districts, tracts, block groups, or even individual blocks.
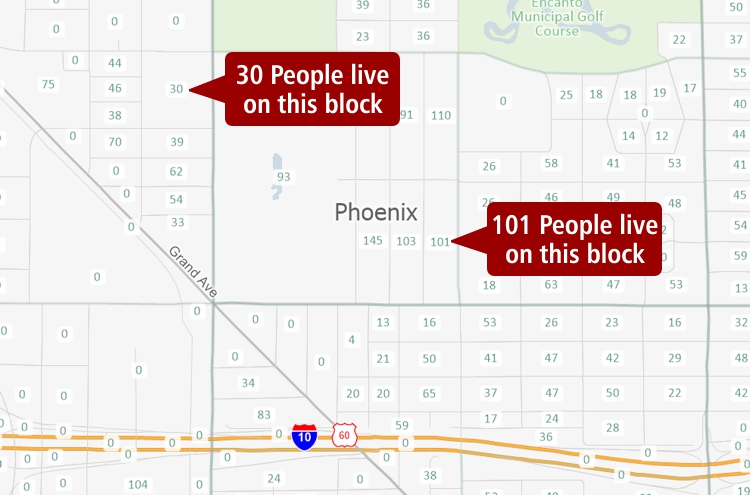
- Click
 in the Redistricting Toolbox to zoom the map to the chosen district or click the Zoom In tool
on the
map and then click and drag a rectangle on the part of the map you want to zoom to. Notice that as you zoom in,
labels that indicate population in each individual feature will display to further help you identify candidate
populations to move.
in the Redistricting Toolbox to zoom the map to the chosen district or click the Zoom In tool
on the
map and then click and drag a rectangle on the part of the map you want to zoom to. Notice that as you zoom in,
labels that indicate population in each individual feature will display to further help you identify candidate
populations to move.
- Use the Selection Tools to highlight the areas to move from the Source District to the Target District.
You have three tools from which to choose:
| Tool |
How to Use It |
 |
Click on each area to be moved individually. Every area you click is highlighted on the map. |
 |
Click on the map and drag a circle. All areas within or touching the circle are highlighted on the map. |
 |
Click a shape on the map and double-click to close it. All areas within or touching the shape are highlighted on the map. |
Notice that as you highlight areas to be moved, the Pending Changes table shows the effect on the Target and Source layers.
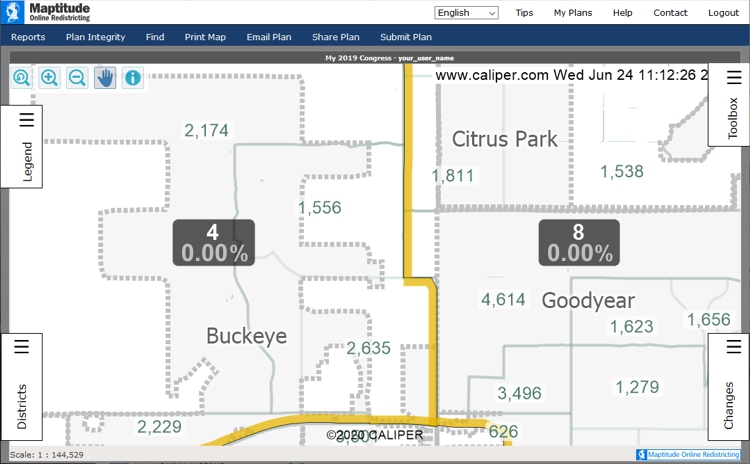
You can continue to click on additional areas to get the deviation as close to zero as you can. For example, by choosing to
move the highlighted precincts below from District 8 to District 4, the two districts will have populations within 1 of the
ideal population:
If the Pending Changes table indicates that you have put too many people into a district, you may want to remove some areas
from the highlight. Press and hold the Ctrl key on your keyboard while using any of the Selection Tools
to remove areas from your pending changes.
- Click
 in the Redistricting Toolbox to save the changes to the district. The map updates the boundary to the district and the
population values in the table.
in the Redistricting Toolbox to save the changes to the district. The map updates the boundary to the district and the
population values in the table.
You can undo the change to the districts by clicking  in the Redistricting Toolbox.
Verifying and Submitting Your Plan
When you have finalized your plan you need to check if for errors. If your plan is free from errors you can submit it to the appropriate commission.
- From the Plan Integrity menu, choose Find Unassigned Areas.
If any unassigned areas are found they will be listed in the Unassigned Areas toolbox.
- Double-click any unassigned area in the list to zoom to its
location (or highlight the area in the list and click
 in the Unassigned Areas toolbox).
- Choose a target district into which to move the unassigned area, select the area with one of the Selection Tools, and save the change.
- Click
 in
the Unassigned Areas toolbox to refresh the list and verify your changes.
in
the Unassigned Areas toolbox to refresh the list and verify your changes.
- From the Plan Integrity menu, choose Find Non-Contiguous Districts.
If any non-contiguous areas are found they will be listed in the Non-Contiguous Areas toolbox.
- Double-click any non-contiguous area in the list to zoom to its
location (or highlight the area in the list and click
in the Non-Contiguous Areas toolbox).
- Choose a target district into which to move the non-contiguous area, select the area with one of the Selection Tools, and save the change.
- Click in
the Non-Contiguous Areas toolbox to refresh the list and verify your changes.
- Click Submit Plan. Provide a description of your plan, provide contact information, and click OK.
Back to top
