Creating Territory Layers
A territory is an area that is made up of several smaller areas, all joined together. For example, sales territories or market areas might be made up of groups of ZIP Code areas, counties, or states.
You can choose the areas that make up your territories in one of two ways:
The territories are stored in a territory layer in the map, and are created from the chosen geographic layer, such as postal codes, counties, or states. It is best to start with the smallest geographical areas that will be represented within your territories. For instance, if some of your territories are built from ZIP Codes and some are built from counties, then choose ZIP Codes as the geographic layer. You can either create a territory layer when you create a new map or you can add a territory layer to an open map.
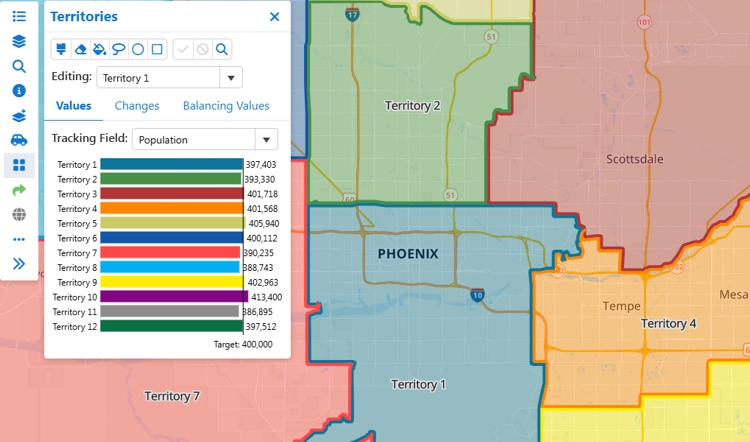
You can choose one or more fields to track from the base layer. Maptitude will sum these fields for each territory. and show you the numerical and percent deviations from the balancing values, so you can adjust your territories to be more balanced.
To Create a Territory Layer Interactively in a New Map
To Add an Interactive Territory Layer to an Open Map
 on the Sidebar.
To Create a Territory Layer from a Table
Maptitude Online displays a map of the territories. Use the Territory Manager to learn more about or modify the territories as described below in Using the Territory Manager.
To Add a Territory Layer to an Open Map from a Table
Add
Data on the Sidebar.Maptitude Online adds a territory layer to the map based on the table that you chose. Use the Territory Manager to modify territories as described below in Using the Territory Manager.
Once your map has a territory layer, you can use the Territory Manager to choose or modify an existing territory or to create a new territory.
Maptitude Online maps can have more than one territory layer in them. The Territory Manager works with one territory layer at a time. If more than one layer is in a map, Maptitude Online will prompt you to choose which territory layer to use with the Territory Manager.
To Display the Territory Manager
 Territories
on the Sidebar.
Territories
on the Sidebar. Layers
on the Sidebar, click +
to expand the territory layer, and click .
Layers
on the Sidebar, click +
to expand the territory layer, and click .To Create a New Territory Interactively on a Map
| Choose... | To do this... |
| Empty Areas | To choose from map features that are unassigned to any territories. |
| Any area & prevent overlapping territories | To choose from any map feature, and if already assigned to a territory, remove it from the other territory. |
| Any area & allow overlapping territories | To choose from any map feature, and if already assigned to a territory, assign it to an additional territory. |
| Choose... | To do this... |
Brush  tool
tool |
Use the brush tool to click and drag over some features in the base layer. You can adjust the width of the brush using the Brush Size slider. The wider the brush, the more features that will be chosen as you brush over them. |
Lasso  tool tool |
Use the lasso tool to draw a shape around the features in the base layer and double-click to close the shape. Any feature at least partially within the shape will be chosen. |
Circle  tool tool |
Click and drag a circle around features in the base layer. Any feature at least partially within the circle will be chosen. |
Rectangle  tool tool |
Click at one corner of where the rectangle should start. As you drag, a rectangle will be displayed. Click again when the rectangle is the desired size. Any feature at least partially within the rectangle will be chosen. |
The Values
tab will show you the total value for any tracking field that you chose
when you created the territory layer. The Changes
tab will show you the changes for all tracked fields of any territory
effected by the features that you highlight.
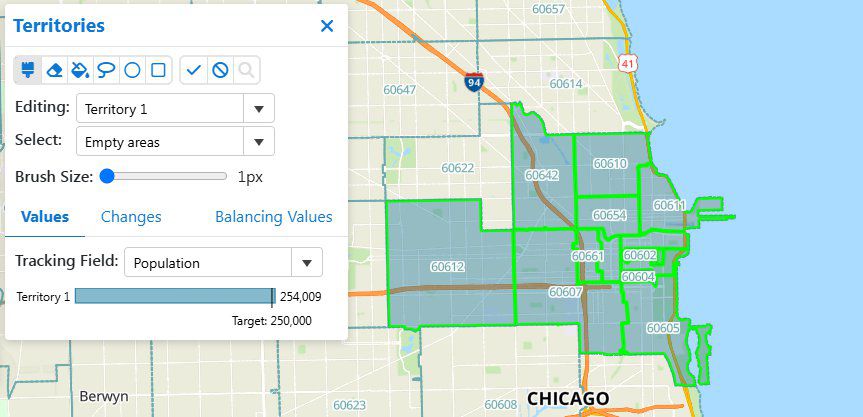
For example, by highlighting the shaded ZIP Codes, the total population
for this territory would be 254,009, just over the specified balancing
value for population.
 tool to activate it and click on one or more highlighted features.
 to save the changes or click
  to cancel
and start over.
to cancel
and start over.To Modify a Territory Interactively on a Map
| To do this... | Do this... |
To add more areas to the territory |
Use the Brush tool,
Lasso
tool, Circle tool,
or Rectangle tool
to highlight more area features. Features that will be added
are shown with a green boundary. Click
to save the changes. |
| To automatically assign unassigned holes | When you build territories from a table
there may be holes in territories because the underlying area
feature was not in the table. Similarly, you may inadvertently
omit some areas when creating territories interactively with
the territory selection tools. You can have Maptitude Online
examine unassigned features and automatically assign them
to territories provided that they are completely surrounded
by a single territory. Click the Fill  tool to assign those features to the chosen territory. Click
to save the changes.
tool to assign those features to the chosen territory. Click
to save the changes. |
| To remove areas from the territory | Use the Erase tool
to highlight features within the territory to remove. Features
that will be removed are shown with a red boundary. Click
to save the changes. Note: You can choose All Territories
from the Editing drop-down once the Eraser tool is activated
if you want to remove areas from several territories at the
same time. |
To Change the Name or Color of a Territory
 next
to the territory you want to modify.
next
to the territory you want to modify.| To do this... | Do this... |
Change the territory name |
Edit the name in the Label box. |
| Change the color to a specific value | Edit the hex value in the Color box. |
| Change the color using the color picker | Expand the Color drop-down and click on a color or use the palette to choose a hue and brightness. |
Maptitude Online updates the territory and labels it with the new name and/or displays it with the new color.
To Find a Territory on the Map
 .
.Maptitude Online displays the map zoomed in on the chosen territory.
To Change the Balancing Values
Maptitude Online updates the balancing values for the chosen fields(s). Click the Values tab to see how the territories relate to the updated balancing value(s).
To Export the Territory Assignments to Excel
Layers
on the sidebar. .
.Maptitude Online creates an Excel file containing the territory assignments and downloads it to your computer.
To Delete a Territory
 next to the territory you want to delete.