Maptitude Help / Managing Geographic Files / Clipping Geographic Files by Area
Clipping Geographic Files by Area
You can export the portion of one or more layers that is within an area of interest by clipping. When you clip geographic files Maptitude creates new geographic files that contain only your area of interest. The geographic files will have the same names as the original files, but in a folder of your choice. The result is similar to what you would see by creating a mask as described in Creating Masks, but whereas a mask hides features outside your area of interest, clipping creates geographic files that only contain features in your area of interest.
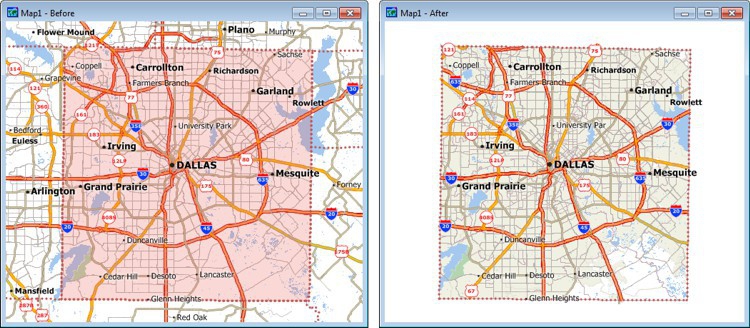
Select Dallas County from the county layer (left) to create clipped versions of the layers for just Dallas County (right)
The following table shows how each type of geographic layer is handled when it is clipped:
| Type of layer | Action |
|---|---|
| Point | All points within and on the boundary of the cutting layer are exported to a new point file. |
| Line | All lines that are entirely within the cutting layer are exported. Lines that are partially within the cutting layer are split so that the portions that are within the cutting layer are also exported. |
| Area | All areas that are entirely within the cutting layer are exported. Areas that are partially within the cutting layer are split so that the portions that are within the cutting layer are also exported. |
You can control how attributes are handled for lines and areas that are split. Maptitude will properly handle fields that it identifies as ZIP Codes or as address ranges.
 To Clip Geographic Files by Area
- If necessary, create a new folder to store the new geographic files.
- Choose an area layer from the drop-down list on the Standard toolbar, and select the features that define your area of interest.
- Choose Tools>Editing>Clip Layers to display the Clip Layers dialog box.
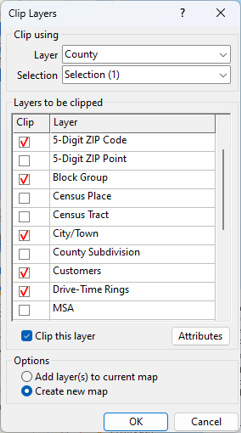
- Choose the area layer that you used in step 2 to define the area of interest from the Layer drop-down list and choose whether to use all features or a selection set from the Selection drop-down list.
- Check the box in the Clip column next to each layer that you want to include for clipping or highlight a row and check the Clip this layer box to clip several one or more highlighted layers in the list.
- Choose whether to add the layers to the current map or to create a new map from the Options radio list.
- To edit how to compute the attributes for a layer, highlight the layer in the scroll list and click Attributes to display the Attribute Aggregation Setting dialog box.
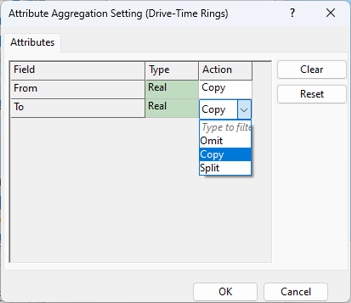
The default settings for a line or area layer are to split numeric (Int and Real) values and to copy character (String) values for features that are clipped. For a point layer, the default settings are to copy all values. Fields in a line layer that are identified as address ranges will be divided proportionally. Numbers that are codes or IDs should be copied rather than split. Make changes as follows:
| To do this... | Do this... |
|---|---|
| Split numeric fields | Highlight one or more cells in the Action column and choose Split from the drop-down list (lines and areas only) |
| Copy fields | Highlight one or more cells in the Action column and choose Copy from the drop-down list |
| Omit fields | Highlight one or more cells in the Action column and choose Omit from the drop-down list |
| Omit all fields | Click Clear |
| Restore the default settings | Click Reset |
Click OK when you are done.
- Click OK. Maptitude displays the Browse for Folder dialog box.
- Choose a folder for the new geographic files and click Select Folder.
Maptitude clips the layers, saves them to new geographic files, and displays them in the current map or a new map.
Try It Yourself: Clipping Geographic Files
1. Create a new folder (e.g., "My Clipped Layers") in the Tutorial folder using a file manager such as Windows Explorer.
2. Choose File>Open Workspace or click  on the Standard toolbar, then open the RhodeIsland workspace in the Tutorial folder. Maptitude opens a map with counties, highways, and places for Rhode Island.
3. Choose County as the working layer from the drop-down list on the Standard toolbar.
4. Click  in the Selection Tools drop-down on the Standard toolbar to activate the Select by Pointing tool.
5. Click on Providence County to select it. This will be the county used for clipping.
6. Choose Tools>Editing>Clip Layers to display the Multi-Clipper dialog box.
7. Check all of the boxes in the Clip column to clip the County, Highway, and Place layers.
8. Click OK. Maptitude displays the Browse for Folder dialog box.
9. Choose the folder you created in step 1 and click Select Folder. Maptitude displays a map with the new layers.
10. Choose File>Close Workspace and click Don't Save to close the maps without saving any changes.
©2026 Caliper Corporation