Maptitude Help / Managing Geographic Files / Creating Masks
Creating Masks
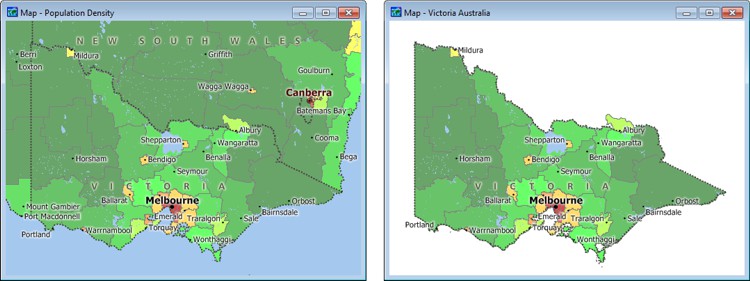
One way to display just a portion of the map is to create a mask. A mask creates an area that hides the features outside your area of interest.
You can choose whether your mask is a new area layer or a freehand item. If you choose to create a new mask layer, it is added on top of the other layers in your map. In addition, several new selection sets are created on the other layers to ensure that no labels are drawn for features outside of the area of interest. Masks that are freehand items are faster to create, but they will obscure any portions of labels that extend beyond your area of interest. You may need to move some labels after creating the mask. For more information on moving labels, see Customizing Labels.
When you create a mask from features in an area layer, the mask aligns with the borders of the features you choose. You can also create a new mask layer from features in a point or line layer, in which case the mask will be a rectangle that is a little wider than the most eastern and western features and a little taller than the most northern and southern features. You cannot create freehand masks from point or line features.
 |
TIP: Another way to display just the portion of a map that interests you is to create new geographic files for just your area of interest by clipping the nationwide files. See Clipping Geographic Files by Area for more information. |
 |
For a video tutorial see: (Internet connection required) |
 To Create a Mask
- Choose the layer on which to base the mask from the drop-down list on the Standard toolbar. If necessary, create a selection set of features in your area of interest.
- Choose Tools>Reports>Mask to display the Create a Mask dialog box.
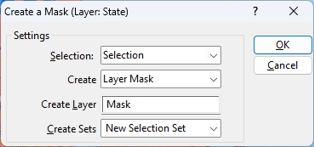
- Choose whether to base the mask on all features or a selection set from the Selection drop-down list.
- Choose the type of mask to create from the Create drop-down list. If you choose to create a layer mask, enter a name for the mask layer in the Create Layer edit box and choose or type a name for the selection sets that the procedure creates on all of the layers for the purpose of hiding the labels in the Create Sets editable drop-down list.
- Click OK.
If you are creating a layer mask, Maptitude prompts you if you want to save the map in its current state. Click Yes to save the map or click No to create the mask layer and selection sets without saving the map.
Maptitude adds the mask to the map.
Try It Yourself: Creating a Mask
1. Choose File>Open Workspace or click  on the Standard toolbar, then open the RhodeIsland workspace in the Tutorial folder. Maptitude opens a map with counties, highways, and places for Rhode Island.
2. Choose County as the working layer from the drop-down list on the Standard toolbar.
3. Click  in the Selection Tools drop-down on the Standard toolbar to activate the Select by Pointing tool.
4. Click on Kent County to select it. This will be the county used for masking.
5. Choose Tools>Reports>Mask to display the Create a Mask dialog box.
6. Choose Selection from the Selection drop-down list and Layer Mask from the Create drop-down list.
7. Click OK and click No when Maptitude asks if you want to save the workspace. Maptitude creates the mask and adds it to the map so that only Kent County is visible.
8. Choose File>Close Workspace and click Don't Save to close the workspace without saving any changes.
©2026 Caliper Corporation