Maptitude Help / Creating Maps / Using Labels
Using Labels
Labels are used to identify the features in a layer, selection set, or feature display set by their names or other characteristics. To label features, you choose a data field containing the information you want to see and a style in which the labels should be displayed. Maptitude displays labels using the most effective combination according to rules you set, such as whether labels can overlap, which labels have the highest priority, at what scales labels should display, and how labels should be aligned. Additionally, you can:
- Customize individual labels. You can adjust the location of a label, embellish the style of individual labels, call out labels, and suppress or prioritize the display of individual labels.
- Use more than one field for labels
- Copy label settings from another layer or selection set or that have been saved to a file
 |
NOTE: Many of the layers supplied with Maptitude use Feature Display settings to label groups of features. Expand the Display Manager to see the settings for the various layers. |
 |
For a video tutorial see: (Internet connection required) |
Creating Labels
When you label features, Maptitude decides exactly which features should be labeled and where the labels should be placed based on the choices that you make. Each time the map is drawn, Maptitude displays the most effective combination of labels according to the rules you set. There are a number of choices for displaying labels:
- Change the position of labels and whether to include partially visible labels
- Choose whether or not to rotate labels
- Screen out or include duplicate labels
- Prevent labels from overlapping and control the priority of labels within and across layers
- Limit the length of labels by wrapping words onto new lines
- Choose the scale at which labels will appear
- Change the background of the label, with a shadow, halo, frame or shield
- Create multiple field labels
Label Position
You can choose one of nine label positions around a point feature, or choose to align labels either above, below or along the centerline of line features. You can also choose the Smart Alignment option, which helps Maptitude label more features by trying alternate locations to reduce the conflicts between labels. Smart Alignment behaves differently for each type of layer:
| For this type of layer... | Smart alignment does this... |
|---|---|
| Point | If the label priority is such that it would not be displayed at the default position, Smart Alignment attempts to label the point at other positions. |
| Line | If the label would be placed at a bend in the line, Smart Alignment attempts to move the label to various positions along the different line segments of the feature, and positions which span multiple segments. |
| Area | If the normal location for an area label is outside the map extent, Maptitude will try to move the label into the map. Also, If the label does not fit completely within the boundaries of the area, Smart Alignment attempts to move the label to various positions within the area, prioritizing by width of the feature at different vertical positions, and proximity to the centroid. |
For area layers, you can also stretch labels so that they fill the area with which they are associated. If you choose to stretch labels, Maptitude increases the spacing between characters so that the label fits the area it describes.
Once a label is positioned, if only part of the label would be visible and the rest would be cut off by the edge of the map, you can choose to skip labels.
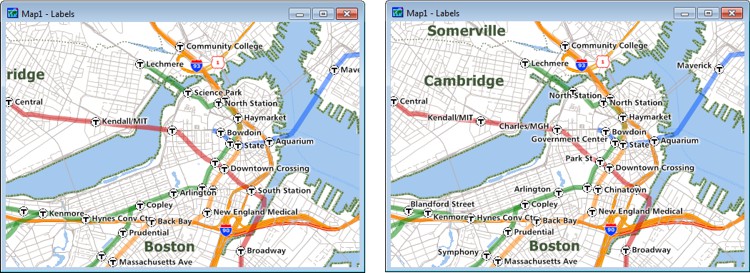
The subway station labels are to the right of the features and some city labels are cropped or not visible in the map on the left. With Smart Alignment applied to the map on the right, more subway stations are labeled and the city labels are completely visible.
Label Rotation
You can choose whether or not to rotate the labels. Rotation options depend on the type of layer:
- Labels for line features are normally angled so that they are drawn along the line features, but you may want Maptitude to draw labels with no rotation; shields cannot be rotated.
- For point and area layers you can choose to rotate labels so they are along lines of latitude or horizontal
- For point layers you can also rotate labels to a specific angle.
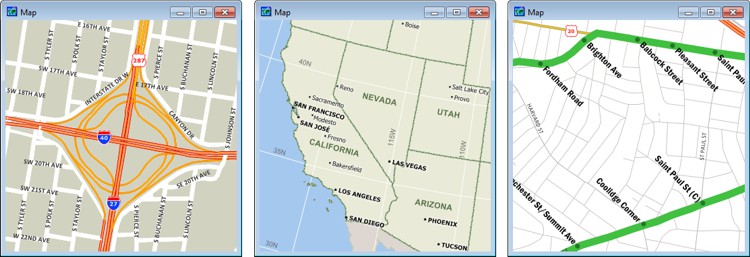
Left: Street names are rotated to align with lines and shields are not rotated; Center: City and state labels are rotated to align with the lines of latitude; Right: Subway station labels are rotated to a 45-degree angle.
Duplicate Labels
Labeling a map can be very tricky because you want to include enough labels to identify key features of the map, without including so many labels that the map is hard to read. In the following example, the map on the left includes a label for nearly every single street segment. While the labels don’t overlap, the map is still difficult to read. When Maptitude draws a map with labels, it normally screens out duplicate labels, resulting in a map like the middle one. You can also tell Maptitude to allow duplicate labels, but to space the duplicates a certain distance apart. For example, the map on the right allows duplicates labels, but spaces them at least two inches apart.
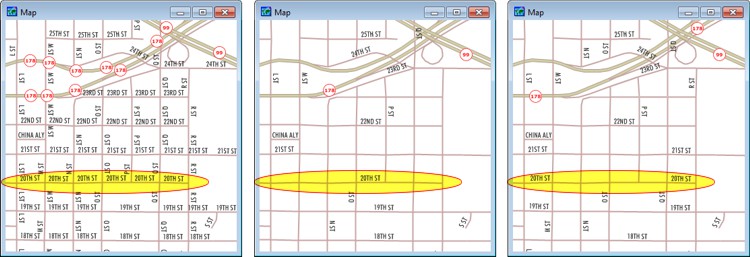
Left: Almost all street segments are labeled when using duplicate labels with no spacing; Center: Each label appears only once when duplicate labels are turned off; Right: Long streets are labeled more than once when using duplicate labels with spacing
Overlaps
Maptitude normally prevents labels from overlapping so the map is easier to read. This means that at certain map scales, some features will be labeled and others will not. You can change the way Maptitude handles overlapping labels by setting a higher priority for certain layers or features, using alternate fields to label features, or allowing labels to overlap.
Label priority settings are used to make sure that the most important features on your map are labeled when you have chosen to prevent labels from overlapping. When you use these options, Maptitude decides which features to label and which ones to skip based on the priority you set.
There are three ways that you can specify how to handle label conflicts:
- Layer priority: choose from the drop-down list: Highest priority is 1, and 9 is the lowest. For example, if a map contains Stores and Highways, you can help make sure that Stores are labeled by assigning them a higher label priority than Highways.
- Priority among features in a layer: use a data field and choose the order from the drop-down list. For example, you can help make sure that busy streets are labeled by setting priority based on higher values of flow.
- Alternate Fields: choose a data field containing a shorter label for Maptitude to try to use when the regular label will not fit. For example, the two-letter postal abbreviations for a state may fit on a map when the full name is too long to fit.
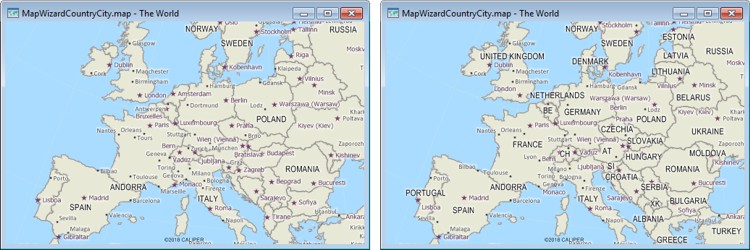
In the map on the left, city labels have the highest priority so very few country labels are visible. In the map on the right, country labels have the highest priority. Countries with a higher population have a higher priority, and an abbreviation is used when the full name does not fit.
 Line Length
When labels are particularly long, you can choose to have the labels wrap on to another line by specifying a maximum character length for a line. Multiple line labels are left-aligned if they are positioned to the right of a feature, right-aligned if they are positioned to the left, and center-aligned if they are positioned to the center of a feature. You can also set the spacing (leading) between the lines.
Autoscale with Labels
Just as you can set a layer so that it displays only at certain scales, you can set labels so they display only at certain scales. For example, you can arrange your map so that the labels turn on automatically when you zoom in past a certain scale. Doing so can help to make your map easier to read.
Backgrounds
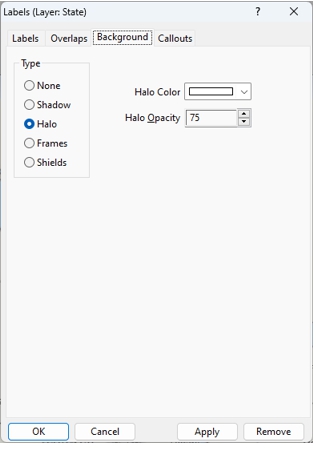
You can add a shadow or halo around each label, or you can enclose each label in a frame or shield. Doing so can help the labels stand out more clearly against features drawn behind the labels. With shields you can enclose highway numbers in the appropriate local, state or federal highway shield. Shields can only display up to four characters.
Multiple Field Labels
You can label features with values from more than one field. When you choose “Multiple Fields” as the field to use for labeling, Maptitude displays the Multiple Fields in Label dialog box, in which you can choose the fields you want to use in the label. Each field is displayed on a separate line in the label, and you can adjust the line height.
 To Label a Map Layer, Selection Set, or Feature Display Setting
- If the Display Manager is not visible, choose Map>Display Manager Toolbar.
 |
TIP: You can also get to the Labels dialog box from the Layers dialog box and the Selection Settings dialog box. |
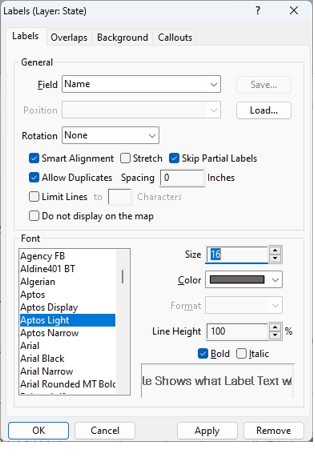
- Click the label icon next to the item you want to label. Maptitude displays the Labels dialog box.
- Make choices as follows:
| To do this... | Do this... |
|---|---|
| Choose the field to use for the label | Choose a field from the Field drop-down list. See the separate how-to below if you choose to label with multiple fields. |
| Choose where to place labels on point or line layers | Choose a location from the Position drop-down list. See Label Position above for more information. |
| Choose whether to rotate labels | Choose None to leave labels horizontal or choose one of the other rotation options. See Label Rotation above for more information. |
| Use Smart Alignment | Check the Smart Alignment box. See Label Position above for more information. |
| Wrap long labels onto additional lines | Check the Limit Lines To box, type the number of characters in the edit box, and specify the line spacing in the Line Height edit box. See Line Length above for more information. |
| Stretch area labels | Check the Stretch box. See Label Position above for more information. |
| Skip drawing partial labels | Check the Skip Partial Labels box. See Label Position above for more information. |
| Label as many features as possible | Check Allow Duplicates and type “0” in the Spacing edit box. See Duplicate Labels above for more information. |
| Allow duplicates some distance apart | Check Allow Duplicates and type the desired spacing in the Spacing edit box. See Duplicate Labels above for more information. |
| Eliminate duplicate labels | Make sure Allow Duplicates is not checked. See Duplicate Labels above for more information. |
| To remove labels and clear the settings | Click Remove |
| To remove labels and preserve the settings | Check the Do Not Display on the Map box |
If you have multiple field labels, you can choose a color for each line. Choose Multiple near the bottom of the Color drop-down list to display the Multiple Fields Colors dialog box, choose a color for each line, and click OK. After you have set different colors, you can click the button next to the Color drop-down list to make further changes. To use a single color again, choose a color from the Color drop-down list.
|
TIP: Press Ctrl Shift + on your keyboard to make all labels and point symbols larger and all lines and area borders wider, or press Ctrl Shift - to make them smaller. Press Ctrl Shift 0 to reset the sizes to the default. |
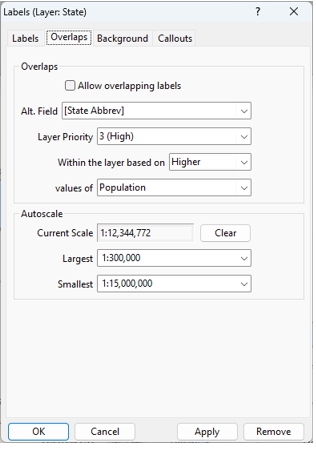
- Click the Overlaps tab to display the Overlaps page and make changes as follows:
| To do this... | Do this... |
|---|---|
| Allow the labels to overlap other labels | Check the Allow overlapping labels box |
| Choose an alternate field to use when there is not enough room for the primary label | Choose a field from the Alt. Field drop-down. For example, when labeling the state layer, if there is not enough room for "New Hampshire" you could choose to use the "NH" from the state abbreviation field. |
| Choose the priority of the labels with respect to other layers | Choose a priority from the Layer Priority drop-down list. Layers with higher label priority will be labeled before layers with lower priority. For example, setting your customer labels to the highest priority will ensure they are labeled before city names, street names, and any other layer with a lower priority. |
| Choose the priority of the labels within a layer | Choose an option from the Within the layer based on drop-down list and a field from the values of drop-down list. For example, if you are labeling your customers, choosing "Higher" and "Sales" from the respective fields will ensure that your customers with higher sales are labeled before the ones with lower sales in any location where there is not enough room for both labels. |
| Choose the scales at which a label should be visible | Choose the Largest and Smallest scales at which a label should be visible from the drop-down lists or type values in the drop-down lists. Click Clear to turn off autoscaling and allow a label to display at any scale. |
- Click the Background tab to display the Background page and make changes as follows:
- Optionally, click the Callouts tab and choose a default style for callouts. For more information on callouts, see Customizing Labels below.
- Click OK.
Maptitude draws the map based on the current label settings. When you change the map scale or center, Maptitude adjusts the labels as needed.
|
NOTE: If you choose to label a line layer with a field that contains directional data (these fields contain "AB" and "BA" in the names to indicate the values in each direction) Maptitude will display the labels from both fields on the respective sides of the links. See Size Themes for more information. |
Try It Yourself: Labeling Features in a Map
1. Choose File>Open Workspace or click  on the Standard toolbar, then open the NESouth workspace in the Tutorial folder.
2. If the Display Manager is not visible, choose Map>Display Manager Toolbar.
3. Click the label symbol in the Display Manager next to the County layer.
4. Choose [County Name] from the Field drop-down list. Maptitude sets a default position, font, size, style, and color. Click Apply to preview the labels.
5. Change the size to 12, remove the check from the Bold box, and click Apply.
6. Click the Background tab. Click the Halo radio button and click Apply. The labels are displayed with halos.
7. Click the Overlaps tab. Choose 1:1,000,000 from the Smallest drop-down list and click OK. The labels are autoscaled off.
8. Click  on the Standard toolbar to activate the Zoom In tool and click on the map to zoom in. As you zoom, the county labels come on.
9. Click  next to the Highway layer to expand it and then click next to Sets to see the highway layer selection sets.
10. Click the label symbol next to the Interstate selection set.
11. Change the font size to 9 points and click OK. The interstate labels are drawn with the new settings.
12. Choose File>Close Workspace and click Don't Save to close the workspace without saving any changes.
Customizing Labels
You can customize a label by making changes to the label with the Move Label  tool, the Rotate Label
  tool, or the Move Label with Callout
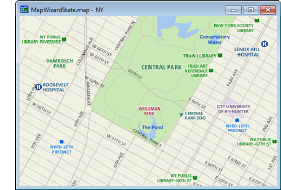
  tool located in a drop-down on the Standard toolbar. For example, in the map below, the river label is rotated and the two hospitals that are close to each other have labels with callouts:
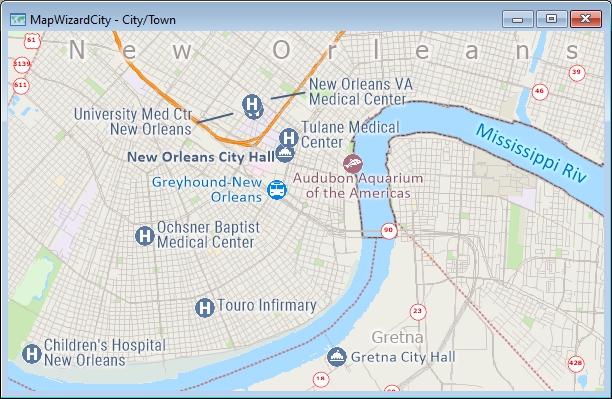
You can:
- Change the location of the label
- Rotate the label
- Change the anchor point of the label
- Align customized labels
- Change the priority of display to highest or lowest
- Add a callout line to a label and choose its style
- Change the font style of the label
- Restore the label settings, so that it is no longer customized.
You can also show all of the hidden labels, so you can customize labels so that they are no longer hidden.
- Click Move Label in the Labels drop-down on the Standard toolbar to activate the Customize Labels tool.
- To show hidden labels, choose Map>Labels>Show Hidden Labels. Maptitude places a check next to the command to indicate that hidden labels are being shown. Choose Map>Labels>Show Hidden Labels again to hide those labels.
- Make changes to the label to customize it as follows:
|
TIP: When you move a label, Maptitude will automatically set the anchor point to the typical location required based on the new position. |
- Choose Map>Labels>Undo Label Customizations to display the Undo Label Customizations dialog box.
- Choose which options to restore as follows:
| Option | What it does |
|---|---|
| Location | Check to restore all labels that you have moved to their default locations |
| Style | Check to restore all labels that you have modified to their default style |
| Callouts | Check to restore all callouts that you have modified to their default callout style. This option is disabled if you are also restoring label locations |
| Display priority | Check to restore all labels to their default display priority |
- Click OK.
Try It Yourself: Customizing Labels
1. Choose File>Open Workspace or click on the Standard toolbar, then open the Locator workspace in the Tutorial folder.
2. Click Move Label in the Labels drop-down on the Standard toolbar.
3. Click on the “Massachusetts” label and drag it to a new location.
4. Right-click on the “Rhode Island” label and choose Hide. Maptitude draws the map without the label.
5. Right-click on the “Boston” label and choose Customize Style. Increase its size, and click OK. Maptitude draws the map with the larger label.
6. Press the Shift key and drag the “Boston” label to the east. Maptitude draws the map with the label moved and a callout line pointing to the feature.
7. Click Move Label with Callout in the Labels drop-down on the Standard toolbar.
8. Click and drag another city label to the east until the left side aligns to the “Boston” label. Maptitude draws the map with the label aligned and with a callout pointing to the feature.
9. Right-click on the “Boston” label and choose Restore Default Location. Maptitude restores the label to its original location.
10. Right-click on the “Boston” label and choose Customize Style and click Reset. Maptitude draws the map with the label restored to its original style.
11. Choose Map>Labels>Undo Label Customizations and click OK to restore all of the label settings. The Massachusetts and Rhode Island labels display at their default locations.
12. Choose File>Close Workspace and click Don't Save to close the workspace without saving any changes.
Multiple Field Labels
You can label features with values from more than one field.
To Label Features with More than One Field
- In the Display Manager, click the label icon next to the item you want to label. Maptitude displays the Labels dialog box.
- Choose Multiple Fields from the Field drop-down list to display the Choose Label Fields dialog box.
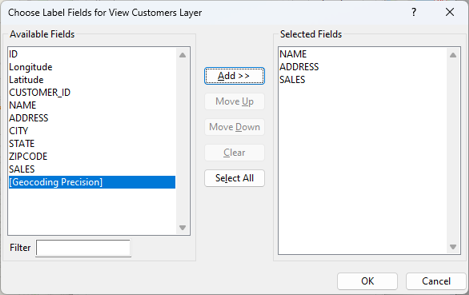
- Choose the fields you want in the label as follows:
| To do this... | Do this... |
|---|---|
| Add a field to the label | Choose one or more fields in the Available list and click Add. To find a particular field, type part of the field name in the Filter edit box to display just those fields that contain the text you entered. |
| Drop a field | Choose one or more fields in the Selected list and click Drop. |
| Add all fields | Click Select All. |
| Drop all fields | Click Clear. |
| Change the order of the fields | Choose one or more fields in the Selected list and click Move Up or Move Down. |
- Click OK to return to the Labels dialog box.
- To label the fields with different colors, choose Multiple... from the Color drop-down list. Maptitude displays the Multiple Fields Colors dialog box. Choose colors for each field from the drop-down menus and click OK.
- Choose other settings as described in steps 3-6 of To Label a Map Layer, Selection Set, or Feature Display Setting.
- Click OK.
Maptitude creates a Multiple Fields Label field and labels the map with it.
Copying Label Settings
Maptitude lets you copy the label settings from another layer in your workspace or from a settings (.stg) file. All of the settings for labels including font, size, color, autoscale settings, background, and other options can be saved and can be quickly applied to other layers, selection sets, or feature display settings.
To Choose the Default Settings File for Storing Saved Label Settings
- Choose Edit>Preferences and click the Map tab to display the Map page of the User Preferences dialog box.
- Click
 in the Default Settings File frame to display the Choose Settings File dialog box.
 - Choose an existing settings file or choose a location on your hard drive, type a file name, and click Save.
To Save Label Settings to a Settings File
- If you have not yet defined a default settings file, do so as described in “To Choose the Default Settings File for Storing Saved Label Settings” above.
- Set the label settings, options, and background as you would like to have them saved.
- Click Apply to apply the labels to the map. The Save button on the Settings page of the dialog box is enabled. If you are not on the Settings page, click the Settings tab.
- Click Save. Maptitude displays the Save Labels dialog box.
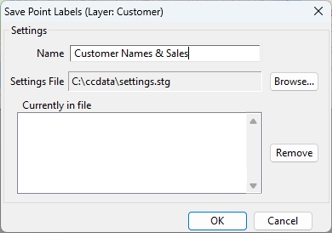
- Type a name for the label settings in the Name edit box.
- Click OK to return to the Labels dialog box.
Maptitude saves the labels to the settings file.
To Copy Label Settings or Apply Saved Label Settings
- If you want to copy label settings from another map, open the map that contains the labels you want to copy.
- Make the map to which you want to apply the labels the active map.
- Choose what to label as follows:
| To label... | Do this... |
|---|---|
| A layer | Click the label symbol next to the layer in the Display Manager to display the Labels dialog box. |
| A feature display setting | Click the label symbol next to the feature display setting in the Display Manager or choose the layer that contains the feature display from the drop-down list on the Standard toolbar, choose Tools>Editing>Feature Display, choose a setting from the scroll list, and click Labels to display the Feature Display Labels dialog box. |
| A selection set | Click the label symbol next to the selection set in the Display Manager or choose the layer that contains the selection set from the drop-down list on the Standard toolbar, chooseSelection>Settingsto display the Selection Sets dialog box, highlight the selection set in the scroll list, and click Labels to display the Labels dialog box. |
- Click Load to display the Load Labels dialog box.
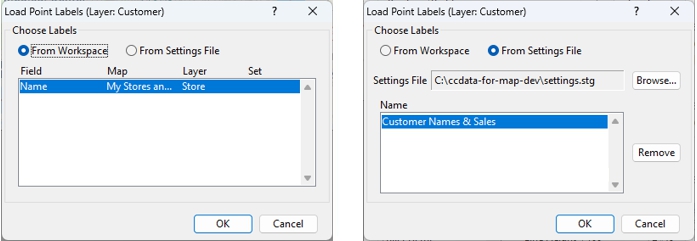
- Make choices as follows:
| To do this... | Do this... |
|---|---|
| To copy labels from a layer or selection set | Click the From Workspace radio button and highlight the label to copy in the scroll list |
| To load a saved label | Click the From Settings File radio button and highlight a label in the scroll list |
- Click OK to close the Load Labels dialog box.
If the layer you are labeling does not contain the field on which the labels you are copying is based, Maptitude displays the Match Label Fields dialog box.
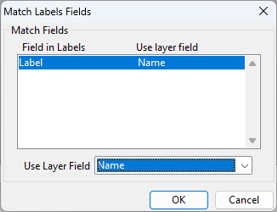
The scroll list shows the field that is used for labeling that is not in the current layer. Choose a corresponding field from the Use Layer Field drop-down list and click OK to close the Match Label Fields dialog box.
- Click OK.
Maptitude adds labels to the layer, selection set, or feature display with the chosen settings.
To Remove Labels from the Settings File
- Click Load to display the Load Labels dialog box and click the From Settings File radio button.
— OR —
Click Save to display the Save Labels dialog box.
- Highlight the label you want to delete in the scroll list.
- Click Remove. Maptitude displays a Confirm dialog box.
- Click Yes. Maptitude removes the chosen label settings from the settings file.
- Click OK to close the Load Labels or Save Labels dialog box.
- Click Cancel.
Maptitude closes the Labels dialog box.
©2026 Caliper Corporation