Maptitude Help / Using Themes to Present Information / Size Themes
Size Themes
A size theme (also called a scaled-symbol theme) uses symbols of different sizes or lines of different widths to show the value of a data field. Size themes can be created on point, line, or area layers.
You create a size theme by choosing the layer you want to map, then choosing the numeric data field that you want to see. MapWizard will take care of the rest. If you want, you can control the minimum and maximum size of the symbols or lines, and indicate the values to which these sizes should correspond. Symbol sizes and line widths are always set in points.
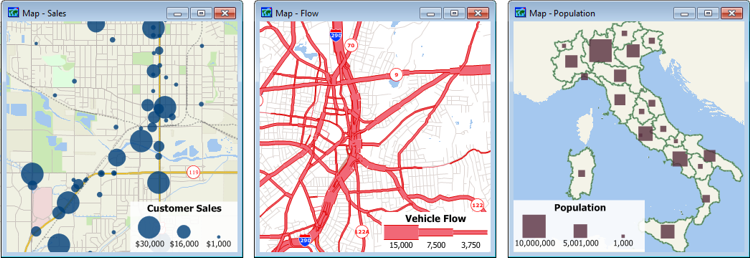
A size theme on a customer point layer (left) where larger symbols indicate higher sales. A size theme of vehicle flow on a street layer (center) where wider streets indicate more vehicles using them. A size theme on an area layer (right) where larger symbols indicate a higher population within that area.
The style of a size theme depends on the type of layer. On a point layer, Maptitude uses the symbol and color you have chosen for the layer, and adjusts the size of the symbol based on the value of the field you choose. Similarly, on a line layer, Maptitude uses the line style and color you have chosen for the layer and adjusts the width of the lines based on the value of the field you choose. To change the appearance of a size theme on a point or line layer you must change the style of the layer. On an area layer, Maptitude displays a symbol at the center of the area, and adjusts the size of the symbol based on the value of the field you choose. You can customize the color and symbol that are used to show the size theme on an area layer.
There is also an option for line layers to create themes that let you see data that vary by direction. For example, you can create a theme that shows the number of cars traveling in each direction on a street or the inbound and outbound passengers on commuter rail links. To create a dual-bandwidth theme, your layer must contain two fields that indicate the value of the field in each direction along the link. One field contains the value for the link in its “forward” topological direction, and the other contains the value for the link in its “backward” topological direction. The name of one of these fields must contain “AB” and the name of the other must contain “BA.” When you choose one of these fields as the field to use in a scaled-symbol theme, Maptitude automatically finds the matching field and displays dual bandwidths. You can limit the fields in the scroll list to the available dual-bandwidth theme fields by checking the Dual Fields box.
 |
TIP: If you are applying a size theme to a point layer and your points are clustered close together, you may want to set the style of the layer to be semi-opaque so that overlapping symbols are clearer. |
 |
For a video tutorial see: (Internet connection required) |
- Choose the layer you want from the layer list on the Standard toolbar.
- Choose Map>Thematic Mapping>Size or click
 Size Theme in the thematic mapping drop-down on the Standard toolbar to display the Size Theme dialog box.
 - Make choices as follows:
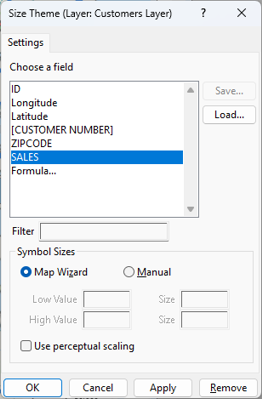
| To do this... | Do this... |
|---|---|
| Choose the field to use | Highlight one of the fields in the scroll list. Optionally, enter text in the Filter box to filter the list of fields. |
| Let Maptitude determine the symbol sizes | Choose MapWizard from the radio list. |
| Specify the size of the symbols | Choose Manual from the radio list and enter a value for the low value and size (in pixels) and high value and size (in pixels). Features with values below the low value will not have a symbol drawn. Features with values at or above the high value will have a chart of the maximum size that you set. |
| Apply Flannery perceptual scaling | Check the Use perceptual scaling box. |
 |
NOTE: To learn about using the Save and Load buttons, see Saving Theme Settings. |
- If the current layer is an area layer, click the Style tab to display the Style page and make choices as follows:
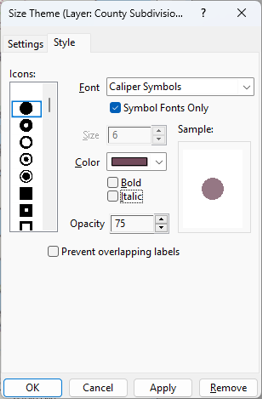
| To do this... | Do this... |
|---|---|
| Choose a font that contains the symbol | Choose a font from the Font drop-down. Check the Symbol Fonts Only box to limit the fonts listed in the drop-down list. |
| Choose a symbol | Choose a symbol from the Icons scroll list. |
| Change the symbol color | Choose a color from the Color drop-down. |
| Change the symbol opacity | Enter a value or use the up and down buttons in the Opacity box. |
| Prevent map labels from displaying over symbols | Check the Prevent overlapping labels box. Note, areas that are dense with symbols will have few, if any, labels on the map. |
If the current layer is a line layer and you chose dual fields, click the Style tab to display the Style page and make choices as follows:
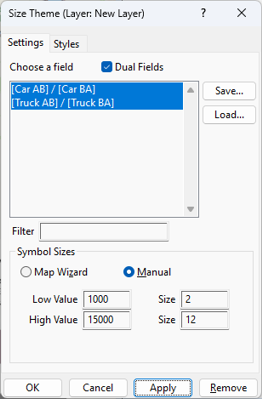
| To do this... | Do this... |
|---|---|
| Change the style of a class | Highlight a class in the scroll list and click Style, change the settings, and click OK. For more information on styles, see Using Styles. |
| Copy a style to other fields | Highlight a class in the scroll list and click Copy Style. |
| Change the text for a class | Highlight a class in the scroll list and edit the text in the Legend Text box. |
| Revert the legend to default legend text | Click Reset Text. |
| To browse through the included color sets | Click <<Previous or Next>>. |
- Click OK.
Maptitude draws the map with the size theme, and displays a legend.
 To Create a Size Theme from a Dataview
- Choose the numeric data field you want to map by clicking on the column heading. Maptitude highlights the selected column.
- Choose Map>Thematic Mapping>Size.
Maptitude creates a new map that uses a size theme to illustrate the values of the chosen field.
 |
To create a theme from a dataview, the data must be connected to a map, otherwise the thematic mapping commands are disabled. To join data to a map use Create-a-Map Wizard or see Joining Your Data to a Map. |
To Temporarily Hide a Size Theme
- In the Display Manager, click
 next to the theme.
Maptitude hides the theme on the map and displays a  symbol next to the theme in the Display Manager. Click to turn the theme back on.
- Choose Map>Thematic Mapping>Size or click Size Theme in the thematic mapping drop-down on the Standard toolbar to display the Size Theme dialog box.
- Click Remove.
Maptitude draws the map without the size theme.
Try It Yourself: Creating Size Themes
1. Choose File>Open Workspace or click  on the Standard toolbar, then open the RhodeIsland workspace in the Tutorial folder.
2. Right-click on Highway in the Display Manager and choose Make Working Layer.
3. Click Size Theme in the thematic mapping drop-down on the Standard toolbar.
4. Choose Lanes from the scroll list and click OK to see a size theme showing the number of lanes for each highway segment.
5. Right-click on Place in the Display Manager and choose Make Working Layer.
6. Click again.
7. Choose Population from the scroll list and click OK to see a size theme showing the relative population for the cities and towns in Rhode Island.
8. Choose File>Close Workspace and click Don't Save to close the workspace without saving any changes.
©2026 Caliper Corporation