Maptitude Help / Creating Maps / Using Styles
Using Styles
Maptitude uses the term style to talk about the colors, patterns, symbols, and lines that are used to draw map features. You change the style of a layer, selection set, or feature display using the Style dialog box. The Style dialog box looks different for point, line, and area layers because you have different choices for each type of layer.
- For point layer features you can choose to use either a symbol font character or an image file. You can specify the color, size, and opacity of symbols or use virtually any graphic file format file and choose its size.
- For line layer features you can choose a line style, color, width, and opacity.
- For area layer features you choose the border style, color, width, and opacity as well as the fill style, color, and opacity.
- You can also choose a color and style for the map background and set the opacity and contrast of image layers.
 |
TIP: If you define any custom colors in the Color dialog box, they will be saved and accessible every time that you run Maptitude. If you choose Edit>Preferences>Reset, your custom colors will be deleted. |
 |
NOTE: Many of the layers supplied with Maptitude use feature display settings to style groups of features. Expand the Display Manager to see the Feature Display settings for the various layers. |
 |
For a video tutorial see: (Internet connection required) |
Styles for Point and Grid Layers
Features in a point layer are drawn with your choice of symbol type:
- Font character from a Windows TrueType font: you can choose the font, the symbol or other character, the color, the size, and a few other settings.
- Color image: you can choose the image file, which can be an Icon (.ico), Enhanced Metafile (.emf), Windows bitmap (.bmp), JPEG (.jpg), portable network graphics (.png), GIF (.gif) or TIFF (.tif), and you choose the size. Maptitude includes many image files in the BMP\POINT ICONS folder in the Maptitude program folder.
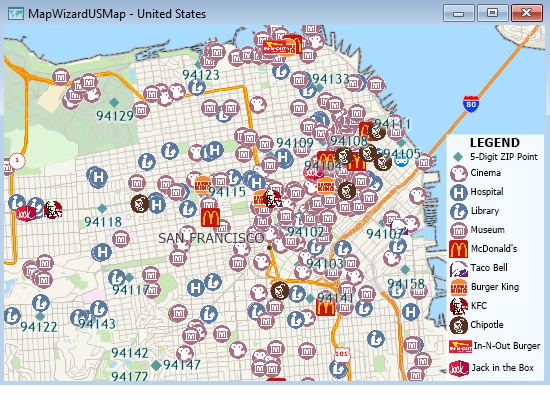
Point features in this map are shown with different styles
For features in a grid layer you can also choose to autosize the grid icons so that they will get larger as you zoom in and smaller as you zoom out, rather than stay a fixed size as with a point layer. If you choose a solid square symbol as the icon, it will fill each grid cell at any scale. For more information on grid layers, see Grid Layers.
 To Change the Style of a Point or Grid Layer Feature
- If the Display Manager is not visible, choose Map>Display Manager Toolbar.
- Click the style sample of the point feature you want to modify to display the Style dialog box.
- Choose either Font Character or Color Image from the Type radio buttons. Maptitude shows the appropriate settings.
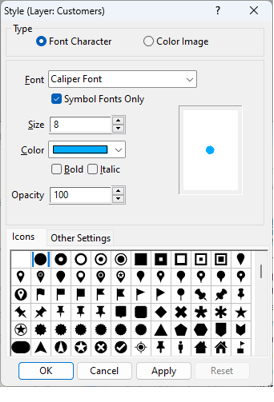
- If you chose Font Character, choose the style settings as follows:
| To do this... | Do this... |
|---|---|
| Choose a font | Choose Caliper Font to use any of the symbols included with Maptitude or choose any other installed font from the Font drop-down list. Check the Symbol Fonts Only box to limit the drop-down list to only symbol fonts. |
| Change the symbol size | Type a size in points in the Size box or use the up and down arrow buttons. The preview shows your changes. |
| Change the symbol color | Choose a color from the drop-down list or choose Custom from the bottom of the drop-down list to display the Color dialog box and define a custom color. The preview shows your changes. |
| Change the symbol opacity | Type a value between 1 and 100 in the Opacity box or use the up and down arrow buttons. The preview shows your changes. |
| Change the symbol | Choose any symbol under the Icons tab. |
| Prevent labels from overlapping the symbols | Click the Other Settings tab and check the Prevent overlapping labels box. |
| Change the size of the symbol with the map scale (point grid layers only) | Click the Other Settings tab and check the Autosize grid icons box. |
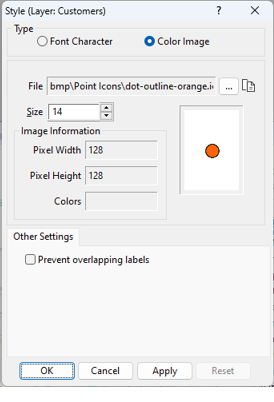
If you chose Color Image, choose the style settings as follows:
| To do this... | Do this... |
|---|---|
| Choose a different file | Click  , browse for an image file, and click Open. The preview shows your file with the current settings. , browse for an image file, and click Open. The preview shows your file with the current settings. |
| Change the image size | Type a size in points in the Size box or use the up and down arrow buttons. The preview shows your changes. |
| Prevent labels from overlapping the images | Check the Prevent overlapping labels box. |
|
TIP: Press Ctrl Shift + on your keyboard to make all point symbols and labels larger and all lines and area borders wider, or press Ctrl Shift - to make them smaller. Press Ctrl Shift 0 to reset the sizes to the default. |
- Click OK.
Maptitude draws the point layer with the new style settings.
Try It Yourself: Changing the Style of Point Features
1. Choose File>Open Workspace or click  on the Standard toolbar, then open the RhodeIsland workspace in the Tutorial folder.
2. If the Display Manager is not visible, choose Map>Display Manager Toolbar.
3. Click the style sample for the Place layer in the Display Manager to display the Style dialog box for point features.
4. Change the symbol to a solid circle, change the size to 4 points, and choose a different color.
5. Click OK. Maptitude redraws the map with the new point style.
6. Choose File>Close Workspace and click Don't Save to close the workspace without saving any changes.
Styles for Line Layers
Features in a line layer are drawn using one of over 200 predefined line patterns. You choose the pattern, width, color, and opacity.
To Change the Style of a Line Layer
- If the Display Manager is not visible, choose Map>Display Manager Toolbar.
- Click the style sample of the line feature you want to modify to display the Style dialog box.
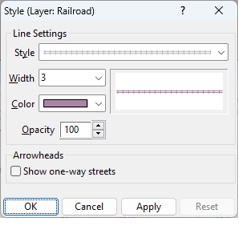
- From the drop-downs, choose a line style, a line width, and a color and set the opacity of the line.
| To do this... | Do this... |
|---|---|
| Change the line style | Choose a line from the Style drop-down list. The preview shows your changes. |
| Change the width | Choose a width in points from the Width drop-down list. The preview shows your changes. |
| Change the color | Choose a color from the Color drop-down list or choose Custom from the bottom of the drop-down list to display the Color dialog box and define a custom color. The preview shows your changes. |
| Change the opacity | Type a value between 1 and 100 in the Opacity box or use the up and down arrow buttons. The preview shows your changes. |
|
TIP: Press Ctrl Shift + on your keyboard to make all point symbols and labels larger and all lines and area borders wider, or press Ctrl Shift - to make them smaller. Press Ctrl Shift 0 to reset the sizes to the default. |
- Click OK.
Maptitude draws the line layer with the new style settings.
Try It Yourself: Changing the Style of Line Features
1. Choose File>Open Workspace or click on the Standard toolbar, then open the RhodeIsland workspace in the Tutorial folder.
2. If the Display Manager is not visible, choose Map>Display Manager Toolbar.
3. Right-click on any item in the Display Manager and choose Expand All.
4. Click the line sample for the Interstate selection set in the Display Manager to display the Style dialog box for line features.
5. Choose the red cased line style ( ) from about halfway down the scroll list, change the width to 2 points, change the color to orange, and click OK. Maptitude redraws the map with the Interstates shown using the new line style.
6. Choose File>Close Workspace and click Don't Save to close the workspace without saving any changes.
Styles for Area Layers
Features in an area layer are drawn with a border style and a fill style. You choose the pattern, width, and color for the border, and the pattern, color, and opacity for the interior of the area.
You can select from several fill styles for areas, including None. If you choose None, backgrounds, layers and features drawn before that layer will show through. If you choose a solid or patterned fill style for your area layer, backgrounds and features drawn before that layer will not show through unless you can change the fill opacity or you choose to make a pattern fill transparent. The opacity value you specify determines how much you can see through the layer. Setting higher levels of opacity makes the underlying layers less visible.
Maptitude also includes several color pattern fills in the BMP\FILLS folder in the Maptitude program folder. In addition, you can create your own custom color pattern fills styles from any BMP, GIF, ICO, JPEG, PNG, or TIFF image file.
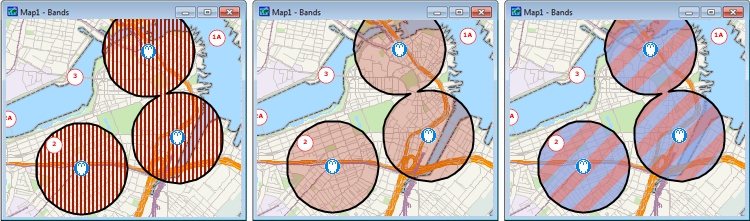
An area layer with a transparent pattern fill (left), a solid fill with 25% opacity (center), and an image fill with 75% opacity (right)
To Change the Style of an Area Layer
- If the Display Manager is not visible, choose Map>Display Manager Toolbar.
- Click the style sample of the area feature you want to modify to display the Style dialog box.
- From the drop-downs, choose a border style, width, and color and choose a fill style and color.
- Set the border and fill opacity. If you are using a pattern fill, you can check the Transparent box to make the background transparent.
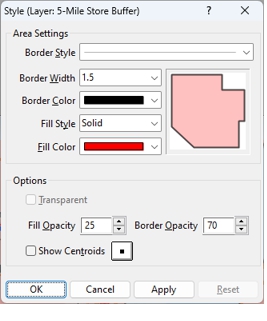
| To do this... | Do this... |
|---|---|
| Change the border style | Choose a line from the Border Style drop-down list. The preview shows your changes. |
| Change the border width | Choose a width in points from the Border Width drop-down list. The preview shows your changes. |
| Change the border color | Choose a color from the Border Color drop-down list or choose Custom from the bottom of the drop-down list to display the Color dialog box and define a custom color. The preview shows your changes. |
| Change the fill style | Choose a style from the Fill Style drop-down list. If you choose one of the pattern fills, you can check the Transparent box to make the pattern background transparent. The preview shows you changes. |
| Change the fill color | Choose a color from the Fill Color drop-down list or choose Custom from the bottom of the drop-down list to display the Color dialog box and define a custom color. The preview shows your changes. |
| Change the opacity | Type a value between 1 and 100 in the Fill Opacity and Border Opacity boxes or use the up and down arrow buttons. The preview shows your changes. |
| Display a symbol on the map at the center of the area | Check the Show Centroids box. Click the symbol button to choose a different symbol. |
|
TIP: Press Ctrl Shift + on your keyboard to make all point symbols and labels larger and all lines and area borders wider, or press Ctrl Shift - to make them smaller. Press Ctrl Shift 0 to reset the sizes to the default. |
- Click OK.
Maptitude draws the area layer with the new style settings.
To Use a Custom Fill Style for an Area Layer
- If the Display Manager is not visible, choose Map>Display Manager Toolbar.
- Click the style sample of the area feature you want to modify to display the Style dialog box.
- Choose Image from the bottom of the fill style drop-down list to display the Choose Fill Style Image dialog box.
- Choose a file type from the Files of Type drop-down list
- Browse for the file and click Open. Maptitude displays the Image Fill Style Settings dialog box.
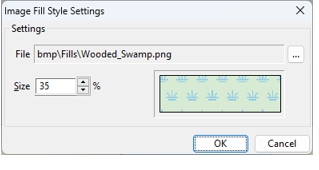
- Make choices as follows:
| To do this... | Do this... |
|---|---|
| Adjust the size of the image | Enter a value in the Size box or use the up and down arrow buttons. The preview shows your changes. |
| Change the image | Click , browse for an image file, and click Open. The preview shows your file with the current settings. |
- Click OK.
- Make any additional choices as described in “To Change the Style of an Area Layer” above and click OK.
Maptitude draws the area layer with the new style settings.
Try It Yourself: Changing the Style of Area Features
1. Choose File>Open Workspace or click on the Standard toolbar, then open the RhodeIsland workspace in the Tutorial folder.
2. If the Display Manager is not visible, choose Map>Display Manager Toolbar.
3. Click the style sample for the County layer in the Display Manager to display the Style dialog box for area features.
4. Change the border style to a dashed line, change the fill style to None, change the border opacity to 75, and click OK. Maptitude redraws the map with the new area style.
5. Choose File>Close Workspace and click Don't Save to close the workspace without saving any changes.
Style of the Map Background
You can set the background style to enhance the appearance of your maps. For example, you could use a solid blue background to show water or a pastel background to make other features in a map stand out.
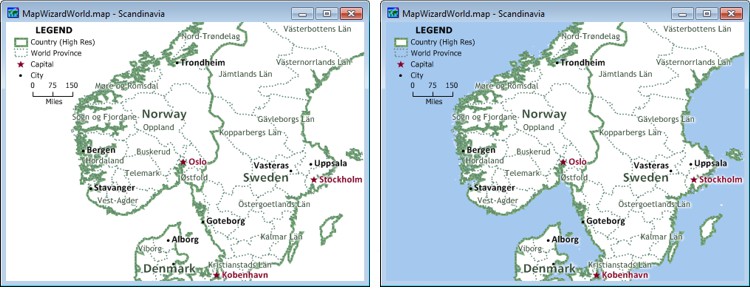
The map on the left has no background style whereas the background and the countries both have solid fills in the map on the right.
If you draw an area layer that has no fill pattern over a background that does have a pattern, the background pattern will show through the area layer. Therefore, when you use a background color or pattern, you also may want to use a fill pattern and fill color for one or more of the area layers in your map.
|
TIP: You can also use satellite and aerial imagery as your map background by choosing Map>Imagery and then choosing one of the available imagery options such as Virtual Earth Map. See Using Images as Map Layers for more information. |
To Change the Background Style
- Right-click on the map window and choose Properties. Maptitude displays the Map Properties dialog box.
- Choose a background style and color from the drop-downs.
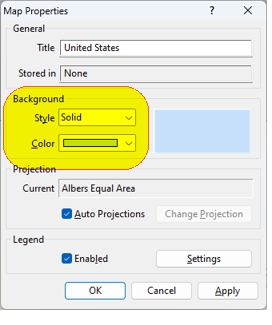
- Click OK.
Maptitude draws the map with the new background style.
|
TIP: You can also get to the Map Properties dialog box by clicking |
 on the Standard toolbar and then clicking
  in the Properties column of the map you want to modify.
©2026 Caliper Corporation