Maptitude Help / Changing and Customizing Maps / Using Images as Map Layers
Using Images as Map Layers
Satellite and aerial images can improve the appearance of your maps, add to the depth of information displayed there, and provide a basis for editing and updating your map files. When you add images to a map, Maptitude adds the images to the list of layers in the map, making sure to display them on top of any area layers that have pattern or solid fills that might otherwise obscure the images. You can change the order in which layers are drawn using the Layers dialog box.
Images provide reference information you can use to edit other geographic files. For example, if you want to create a line layer of power lines or create a new area file of building footprints, you can add an aerial photograph to your map and then use the map editing tools to trace over the features. See Creating and Editing Geographic Files for more information on creating a geographic files
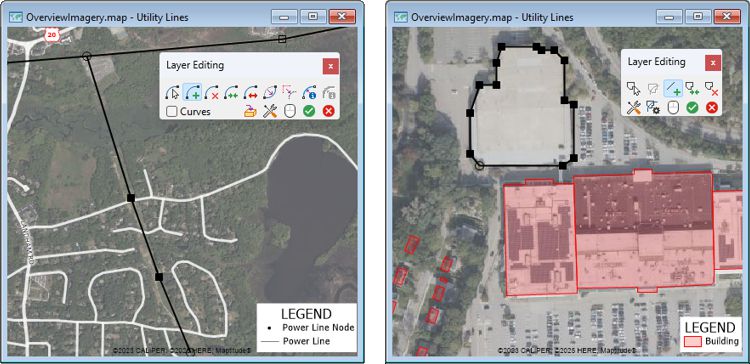
When you use image files in a map, there are several restrictions:
- You cannot change the map projection while using image files in a map. The map projection always stays the same as the projection of the image.
- You can include any number of images in a map, but they should be based on the same map projection. If you choose to add an image with a different projection, Maptitude will ask you whether to copy the additional image to a new image, with the same projection as the map, or to continue with the image, even if it may display incorrectly.
If you have an internet connection, you can use the Map>Imagery command to display imagery from several web map services (Virtual Earth Map, OpenStreetMap, Google, and USGS) or you can use a Web Mapping Service.
Maptitude can also display image files that you have stored on your computer including SPOT satellite images, digital orthophotos, MrSID files, TIFF files, PNG files, JPEG files, and ECW files. Most of these image formats have the information that Maptitude needs to display them at the correct location. Maptitude has tools for registering images without this information.
 |
For a video tutorial see: (Internet connection required) |
Adding Internet-Based Imagery to a Map
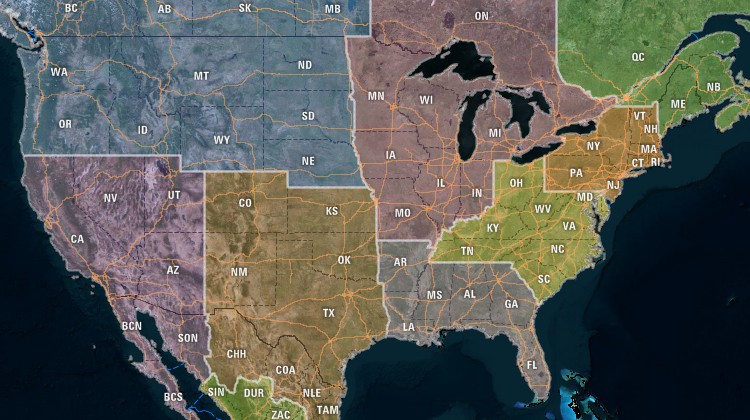
The easiest way to add imagery to your maps is by using the Map>Imagery command to access map and imagery layers offered by servers such as Microsoft (Virtual Earth), Google, and OpenStreetMap. Images accessed this way have the added benefit of automatically downloading as you pan or move around the map. Likewise, if you zoom in or out, imagery of a different resolution may be loaded. Imagery will also be cached locally for faster access. You can configure the cache folder by choosing Edit>Preferences and making changes on the System tab.
 |
NOTE: An Internet connection is required and it is your responsibility to make sure you have the rights to any imagery that you access. |
 To Add Internet-Based Imagery to a Map
- Choose Map>Imagery. A sub-menu lists available imagery layers that can be retrieved from the Internet.
- Choose a layer from the sub-menu.
Maptitude adds the chosen imagery layer to the map. To remove the image layer from a map, choose it again from the Map>Imagery sub-menu.
 |
TIP: You can change the style and opacity of image layers. See To Change the Style of an Image Layer. |
Try It Yourself: Adding Internet Imagery to a Map
1. Choose File>New Workspace or click  on the Standard toolbar, choose New map of {country name}, then use Create-a-Map Wizard to create a map of your address.
2. Choose Map>Imagery>Virtual Earth Map. Maptitude adds the image to the map. You may want to hide the landmark area and/or water area layers if they are visible.
3. Click  to activate the Zoom In tool and zoom anywhere on the map.
4. Click  to activate the Pan tool and pan the map.
5. Choose Map>Imagery>Virtual Earth Map. Maptitude removes the image from the map.
6. Choose File>Close Workspace and click Don't Save to close the workspace without saving any changes.
Using Google Earth or Google Maps Images
If you have installed Version 4.0 or later of Google Earth on your computer and you have Internet access, you can use the Tools>Raster>Google Earth Toolbar command to get a black and white image from Google Earth to add as a new layer in your map. To install Google Earth, follow the instructions at (http://earth.google.com/download-earth.html).
 |
You must observe the license for Google Earth, which specifies that the software “is made available to you for your personal, non-commercial use only.” You must also observe the proprietary data clause in the license for Maptitude, which specifies that “the Data may be used only with the Software.” |
Maptitude will warn you if there is a difference between the projection used for the Maptitude map and the projection of the Google Earth map. Before the Google Earth map is added to the Maptitude map, the Google Earth map is reset with north at the top and with no tilt. When the Maptitude map is added as a layer on the Google Earth map, Google Earth will automatically zoom to the extent of the Maptitude map.
You can also save a map to KML. Maptitude exports point, line, and area layers and also tries to apply as much styling and labeling as KML supports. For more information, see Saving, Closing, and Opening Maps and Workspaces.
- If necessary, change the scale of the map to get the area for which you want the Google Earth image.
- Choose Tools>Raster>Google Earth Toolbar to display the Google Earth toolbar. If Google Earth is not running, Maptitude starts Google Earth.
- Make choices as follows:
| To do this... | Do this... |
|---|---|
| Get the Google Earth image | Click  . Maptitude sets the Google Earth map to the Maptitude map extent, and requests, receives, and displays the image. . Maptitude sets the Google Earth map to the Maptitude map extent, and requests, receives, and displays the image. |
| Drop the Google Earth image | Click  . Maptitude drops the image from the map. . Maptitude drops the image from the map. |
| Save the Google Earth image | Click  . Maptitude displays the Save Image As dialog box. Choose a folder, type a file name, and click Save. Maptitude saves the image in the JPEG format in a .jpgfile with an accompanying JPEG World (.jpw) file. . Maptitude displays the Save Image As dialog box. Choose a folder, type a file name, and click Save. Maptitude saves the image in the JPEG format in a .jpgfile with an accompanying JPEG World (.jpw) file. |
| Add Maptitude map to Google Earth map | Click  . Maptitude creates an image of the map and switches to Google Earth, which shows the Maptitude map as a layer on the Google Earth map. . Maptitude creates an image of the map and switches to Google Earth, which shows the Maptitude map as a layer on the Google Earth map. |
| Set Google Earth to Maptitude map extent | Click  . Maptitude sets the Google Earth map to the Maptitude map extent, and switches you to Google Earth. . Maptitude sets the Google Earth map to the Maptitude map extent, and switches you to Google Earth. |
| Set Maptitude to Google Earth map extent | Click  . Maptitude sets the map extent to be the same as the Google Earth map. . Maptitude sets the map extent to be the same as the Google Earth map. |
- When you are done, choose Tools>Raster>Google Earth Toolbar or click the close button in the top right corner of the toolbar.
Google Maps Integration
You can also quickly open a Google street, terrain, satellite, or street view map from a Maptitude map using the Google Maps toolbar. The tools in the Google Maps toolbar open a tab in a web browser automatically zoomed to the same area currently visible in the map window or to a street view of a location that you click on the Maptitude map. An internet connection is required to use the tools in the Google Maps toolbar.
To Use a Google Maps Toolbar
- Use the Zoom, Pan, and/or Find tools to display your area of interest.
- Choose Tools>Raster>Google Maps Toolbar to display the Google Maps toolbar.
- Make choices as follows:
| To do this... | Do this... |
|---|---|
| View the area visible in the Maptitude map in a Google Streets map | Click  |
| View the area visible in the Maptitude map in a Google Terrain map | Click  |
| View the area visible in the Maptitude map in a Google Satellite map | Click  |
| View a location on the map in a Google Street view | Click  and then click on a street in the Maptitude map and then click on a street in the Maptitude map |
- When you are done, choose Tools>Raster>Google Maps Toolbar or click the close button in the top right corner of the toolbar.
Using Web Mapping Service Images
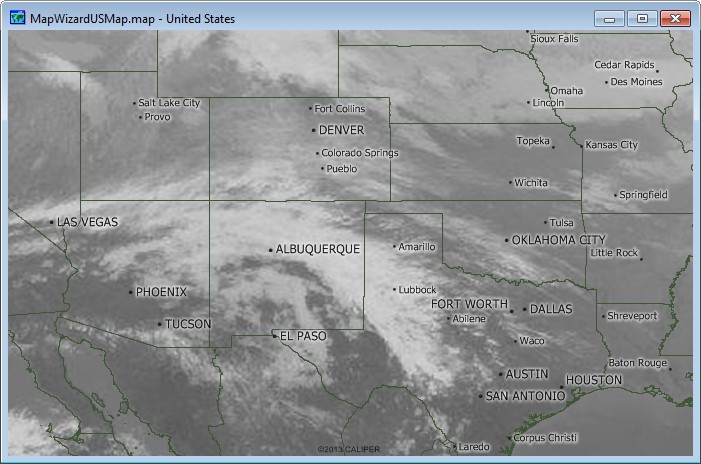
The OpenGIS Web Map Service Interface Standard (WMS) provides a simple HTTP interface for requesting georegistered map images from one or more distributed geospatial databases. If you have Internet access, you can use the Tools>Raster>Web Map Services Toolbar command to add WMS images as layers in your map. There are many WMS servers that you can add, and each WMS server can have one or more layers. You can choose the layers that you want to have available to add to your map.
To Use a WMS Image
- If necessary, change the scale of the map to get the area for which you want the WMS image.
- Choose Tools>Raster>Web Map Services Toolbar to display the Web Map Services toolbar. If you have not yet set up any web map services, Maptitude will display the WMS Server and Layer Chooser dialog box. See “To Choose WMS Servers and Layers” below for more information. If you have already set up web map service, Maptitude displays the Web Map Services toolbar.
- Make choices as follows:
| To do this... | Do this... |
|---|---|
| Get the image | If necessary, choose a layer from the Layer drop-down list, then click . Maptitude requests, receives, and displays the image. |
| Drop the image | Click . Maptitude drops the image from the map. |
| Get information about the image | Click  . Maptitude displays the Image Layer Information window, with the bounding box and other information returned from the service. Close the window when you are done. . Maptitude displays the Image Layer Information window, with the bounding box and other information returned from the service. Close the window when you are done. |
| Save the image | Click . Maptitude displays the Save Image As dialog box. Choose a folder, type a file name, and click Save. Maptitude saves the image in the JPEG format in a .jpgfile with an accompanying JPEG World (.jpw) file. |
| Zoom the map to the image extent | Click  . Maptitude redraws the map to show the whole image. . Maptitude redraws the map to show the whole image. |
| Remove a WMS layer from the layer list | Choose a layer from the Layer drop-down list and click  . Maptitude displays a message to make sure you want to remove the layer. Click Yes. Maptitude removes the WMS layer from the layer list. . Maptitude displays a message to make sure you want to remove the layer. Click Yes. Maptitude removes the WMS layer from the layer list. |
| Add a WMS layer to the layer list | Click  . Maptitude displays the WMS Server and Layer Chooser dialog box. For more information, see “To Choose WMS Servers and Layers” below. . Maptitude displays the WMS Server and Layer Chooser dialog box. For more information, see “To Choose WMS Servers and Layers” below. |
- When you are done, choose Tools>Raster>Web Map Services Toolbar or click the close button in the top right corner of the toolbar.
To Choose WMS Servers and Layers
- Click in the WMS Image toolbar. Maptitude displays the WMS Server and Layer Chooser dialog box.
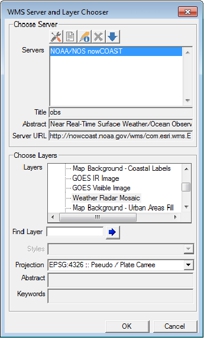
- Make choices as follows in the Choose Server frame:
| To do this... | Do this... |
|---|---|
| Add an available provider | Click  to display the Choose WMS Service Providers dialog box. To add providers, highlight one or more in the Available Providers scroll list and click Add>>. To find servers with a word or phrase in their names, enter text in the Filter edit box. To drop providers, highlight one or more in the Selected Providers scroll list and click <<Drop. To rearrange the selected providers, highlight one or more in the Selected Providers scroll list and click Move Up or Move Down. Click Clear to clear the Selected Providers scroll list. Click Select all to add all providers to the Selected Providers scroll list. Click OK when you are done. Maptitude updates the Servers scroll list. to display the Choose WMS Service Providers dialog box. To add providers, highlight one or more in the Available Providers scroll list and click Add>>. To find servers with a word or phrase in their names, enter text in the Filter edit box. To drop providers, highlight one or more in the Selected Providers scroll list and click <<Drop. To rearrange the selected providers, highlight one or more in the Selected Providers scroll list and click Move Up or Move Down. Click Clear to clear the Selected Providers scroll list. Click Select all to add all providers to the Selected Providers scroll list. Click OK when you are done. Maptitude updates the Servers scroll list. |
| Add a new provider | Click  to display the Add a New WMS Server dialog box. Type the URL for the GetCapabilities request of the server, the name and title of the server, and the abstract in the appropriate edit boxes. Click OK when you are done. Maptitude updates the Servers scroll list. to display the Add a New WMS Server dialog box. Type the URL for the GetCapabilities request of the server, the name and title of the server, and the abstract in the appropriate edit boxes. Click OK when you are done. Maptitude updates the Servers scroll list. |
| Edit a server | Highlight a server in the Servers scroll list and click  . Maptitude displays the Edit a WMS Server dialog box. Make the necessary changes and click OK when you are done. Maptitude updates the Servers scroll list. . Maptitude displays the Edit a WMS Server dialog box. Make the necessary changes and click OK when you are done. Maptitude updates the Servers scroll list. |
| Choose a server | Highlight a server in the Servers scroll list. Maptitude updates the Title, Abstract, and Server URL text boxes. |
| Delete a server | Highlight a server in the Servers scroll list and click  . Maptitude displays a dialog box asking if you are sure. Click Yes. Maptitude deletes the server from the Servers scroll list. . Maptitude displays a dialog box asking if you are sure. Click Yes. Maptitude deletes the server from the Servers scroll list. |
| Refresh the layers for a server | Highlight a server in the Servers scroll list and click  . Maptitude refreshes the layers for the server. . Maptitude refreshes the layers for the server. |
- Make choices as follows in the Choose Layers frame:
| To do this... | Do this... |
|---|---|
| Choose a layer | If necessary, click in the Download Layer Info frame to get the layer information from the server. Open the tree of layers and highlight the layer. To find layers with a word or phrase in their names, type the word or phrase in the Find Layer edit box and click  to move to the next matching layer. Maptitude updates the values in the Styles and Projection drop-down lists and the Abstract and Keywords text boxes. to move to the next matching layer. Maptitude updates the values in the Styles and Projection drop-down lists and the Abstract and Keywords text boxes. |
| Choose a style | If the layer has styles, choose a style from the Styles drop-down list. |
| Choose a projection | Choose a projection from the Projection drop-down list. They are in order by their EPSG number. |
- Click OK.
Maptitude adds the layer to the Layer drop-down list in the WMS Image toolbar.
Using Image Files
Maptitude can display the following types of images that you have stored on your computer. Except where noted, Maptitude can display these images without any preparation or setup work.
- SPOTView and SPOT MetroView satellite images.
- Digital Orthophotos and Digital Orthophoto Quarter Quad (DOQQ) images.
- TIFF and GeoTIFF (geographically registered TIFF format files) format files. To use your own TIFF files in a map you must tell Maptitude the correct location for the image. This process is called registering the image. Use the Register Image toolbar to register a picture or image stored in a TIFF file. For more information, see Registering an Image. Maptitude recognizes GeoTIFF images and treats them like any other registered TIFF file. You do not need to register a GeoTIFF file.
- Enhanced Compressed Wavelet (ECW) compressed image files. When an ECW file is displayed, the image resolution is appropriate for the scale of the map. As you zoom in, more detail is revealed.
- Multiresolution Seamless Image Database (MrSID) files. MrSID files provide seamless wavelet-based compression of very large images. As you zoom in, more detail is revealed. The image file (.sid) contains a header with registration and metadata information. Maptitude supports MrSID Generation 3 and 4 format. To use a MrSID file in a map with other geographic layers, it must be accompanied by a MrSID/World (.sdw) file. This file contains registration information for the MrSID image, and Caliper registration information is added at the end of the file. The first time that you open a .sid file and its .sdw file, they must be in a folder to which you have write access so that Maptitude can add the necessary registration information. For more information, see Registering an Image.
- Joint Photographers Expert Group (JPEG) files. To use a JPEG file in a map with other geographic layers, it must be accompanied by a JPEG/World (.jpw) file. This file contains registration information for the JPEG image, and Caliper registration information is added at the end of the file. The first time that you open a .jpg file and its .jpw file, they must be in a folder to which you have write access so that Maptitude can add the necessary registration information. For more information, see Registering an Image.
- JPEG2000 files. JPEG2000 a lossless format with wavelet-based compression and, like the ECW and MrSID formats, provides increasing levels of resolution as needed (to some limit) as you zoom to larger scales. JPEG2000 files can contain georeferencing information, but they are sometimes accompanied by a JPEG2000/World (.j2w) file. This file contains registration information for the JPEG2000 image. The .jp2 file and its .j2w file must be in the same folder.
- Portable Network Graphics (PNG) files. To use a PNG file in a map with other geographic layers, it must be accompanied by a PNG/World (.pgw) file. This file contains registration information for the PNG image, and Caliper registration information is added at the end of the file. The first time that you open a .png file and its .pgw file, they must be in a folder to which you have write access so that Maptitude can add the necessary registration information. For more information, see Registering an Image.
If you have a large group of images with the same map projection, such as a mosaic of aerial photos for a city or state, you can use the Image Librarian to create an Image Library. When you add an Image Library as a single map layer, any of the images listed in the Image Library can be displayed as necessary. An Image Library is much more efficient than having individual layers for each image, because the Image Library can be scanned quickly to find out which images to display at the current map scale. You also will have just a single entry in the layer list for each Image Library, rather than one for each image.
You can display images, including Image Libraries, in a new map window, or you can add them as new layers to existing maps. You can also change the style of an image layer.
- Choose Map>Layers, click
 on the Standard toolbar, or right-click and choose Layers to display the Layers dialog box.
 - Click Add Layer. Maptitude displays the File Open dialog box.
- Choose one of the supported image file types or image library.
- Choose one or more files and click Open.
If an image does not have the same projection as the map, Maptitude displays a dialog box asking whether to copy the image to a new image or to continue with the image, even if it may display incorrectly. Click the appropriate radio button and click OK.
Maptitude adds the images to the list of layers in the map, making sure to display them on top of any area layers that have pattern or solid fills that might otherwise obscure the images.
- Click Close in the Layers dialog box.
Maptitude refreshes the map with the image layers. If your image is not registered it will not align with other map layers. See Registering an Image for more information on how to display an image at its true location.
Try It Yourself: Using an Image in a Map
1. Choose File>Open or click  on the Standard toolbar, then open the TIFFImage workspace in the Tutorial folder. Maptitude displays a map of Hartford.
2. Choose Map-Layers or click on the Standard toolbar. Maptitude displays the Layers dialog box.
3. Click Add Layer to display the File Open dialog box.
4. Choose TIFF Image as the file type, choose the file hartford.tif in the Tutorial folder, and click Open.
5. Click Close to close the Layers dialog box. The roads are now displayed on top of the scanned map.
6. Choose File>Close Workspace and click Don't Save to close the workspace without saving any changes.
Changing the Style of an Image Layer
To Change the Style of an Image Layer
- If the Display Manager is not visible, choose Map>Display Manager Toolbar.
- In the Display Manager, click
 next to the image you want to modify to display the Style dialog box.
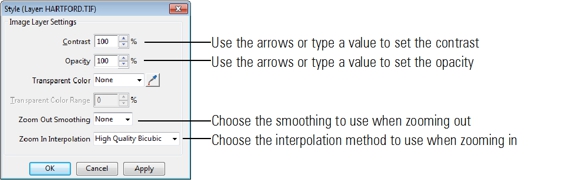
- Use the spinners or type a value in the Contrast box to set the contrast.
- Use the spinners or type a value in the Opacity box to set the opacity.
- To make a particular color or range of colors transparent, do the following:
• Click  in the Style dialog box to display the Map Color Picker dialog box.
• Click on the color you want to make transparent and click OK.
• Use the arrows or type a value in the Transparent Color Range box to specify the color tolerance based on the color similarity. A value of 0 will make only the chosen color transparent and increasing the value will make similar hues transparent. A value of 100 will make the whole image transparent.
- Choose the smoothing to use when zooming out and the interpolation method to use when zooming in from the respective drop-down lists.
- Click OK.
Maptitude draws the image layer with the new style setting.
©2026 Caliper Corporation