Maptitude Help / Using Imagery: Advanced Topics / Registering an Image
Registering an Image
When you first use a TIFF, JPEG, MrSID, or PNG image that is not registered, you must indicate its true location on the map. Maptitude needs write access to the folder containing the image file to create or update a world file, which contains the registration information. Also, for a TIFF image, Maptitude stores the registration information as part of the image file.
If the image file is accompanied by a world file, Maptitude uses the file to register the image. Otherwise, you must use the Register Image toolbar to mark three or more control points on the image and indicate their true locations (longitude and latitude), either by entering the coordinates or by clicking on a map.
Maptitude can use the world files that accompany TIFF (.tfw), JPEG (.jpw), MrSID (.sdw), and PNG (.pgw) images. Maptitude adds registration information that is not normally part of a world file, and updates the registration information in a world file when you reregister an image.
Registering an Image with a World File
When you open an unregistered image file, Maptitude checks for the existence of a world file with the same file name, and a .tfw (TIFF), .jpw (JPEG ), .pgw (PNG), or .sdw (MrSID) extension. If this file exists, it will contain information that can be used to register the image. It will not include information about the coordinate system for the image, so you must choose a coordinate system when you register the image.
 To Register an Image with a World File
- Choose File>Open or click
 on the Standard toolbar to display the File Open dialog box.
 - Choose TIFF Image, JPEG Image, Portable Network Graphics, or MrSID Image as the file type.
- Choose a file and click Open. Maptitude detects the presence of the world file and displays the Registering an Image with a World File dialog box.
- Choose a class of coordinate systems from the Class drop-down list.
- Choose a coordinate system zone from the Zone drop-down list.
- Choose a unit of measurement from the Units drop-down list.
- Click OK.
Maptitude updates the world file and registers the image.
To Reregister an Image with a World File
- Choose the image to reregister from the drop-down list on the Standard toolbar.
- Choose Tools>Raster>Registration to display the Register Image toolbar.
- To reregister using the world file for a TIFF image, click TFW to display the Registering an Image with a World File dialog box, choose a coordinate system, and click OK.
To reregister using the registration information in a TIFF image, or the world file for a JPEG, PNG or MrSID image, click Projection to display the Image Projection dialog box, choose a projection or coordinate.
- Click OK.
Maptitude updates the world file with the new coordinate system and registers the image. Also, for a TIFF image, Maptitude stores the registration information as part of the image file.
Registering an Image Using Control Points
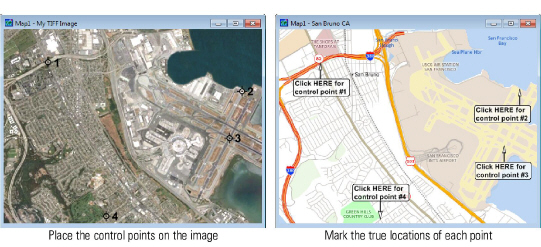
To register an image using control points, you display the image in a map window, set the projection of your Maptitude map to match the projection of the image, mark three or more points on the image, and tell Maptitude the true location of each of these points. The points you mark are called control points, and you mark them using the control point tools in the Register Image toolbar. You get the best results with more control points (between 5 and 10) and you can improve the registration by spreading them out across the image. While you are marking the control points, you can use other tools and commands to zoom in or out, or to pan around the image.
If your image contains a grid or a set of tick marks that identify the actual coordinates of several points, use these as your control points. Otherwise, choose points you can match with points on another map layer, such as area boundaries, major intersections, and coastline or waterway boundaries.
To identify the true location of a control point, you either type the coordinates of the control point directly in the Register Image toolbar or switch to any map window, click  in the Register Image toolbar, and click on the location that corresponds to the control point. For example:
If you type the coordinates of control points into the dialog box, you can also specify the coordinate system you want to use. For example, if you register an image with a UTM projection, you can choose to enter coordinates in longitude and latitude or in meters. For details on map projections and coordinate systems, see Projections and Coordinate Systems.
If you provide four or more control points, Maptitude can determine whether the true coordinates are consistent for each one. If the true coordinates are not consistent, Maptitude acts as follows:
| If the accuracy of... | Maptitude... |
|---|---|
| All control points are OK | Registers the image using all control points |
| One control point is far off | Registers the image with the other control points |
| Several control points are far off | Does not register the image |
When you register an image, it must be oriented so that North for the projection is at the top of the image. If your image is small-scale (that is, it covers a large geographic area), you will need to know if the image uses a map projection. For example, if the image was created by scanning a paper map, you will need to know the projection that was used in the paper map. If your image is large-scale (that is, it covers a small geographic area), you can indicate that no projection was used, and it shouldn’t affect the accuracy of the registration.
When an image is used as a layer in a map, Maptitude locks the map projection to the projection for the image. Automatic and manual projections are disabled while the image is active.
 |
NOTE: You must be able to write to the image file. You cannot register an image file that is on a CD-ROM disk or is write-protected. |
To Register an Image Using Control Points
- Choose File>Open or click on the Standard toolbar to display the File Open dialog box.
- Choose TIFF Image, JPEG Image, Portable Network Graphics, or MrSID Image as the file type.
- Choose a file and click Open. Maptitude displays the Image Projection dialog box.
- Choose a projection, or a coordinate system if you wish to enter coordinates in units other than longitude and latitude, as follows:
| To do this... | Do this... |
|---|---|
| Choose a projection | Choose a class of projection from the Class drop-down list and the projection used in the image from the Projection drop-down list. |
| Choose a coordinate system | Click the Coordinate System tab. Choose a coordinate system from the Class and Zone drop-down lists and the units from the X and Y In drop-down list. |
- Click OK. Maptitude creates a new map consisting of one layer that contains the image, and displays the Register Image toolbar.
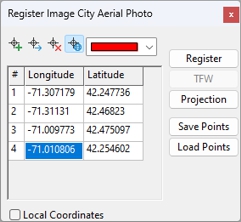
- Place your control points as follows:
 and click on the image. Maptitude draws a symbol and number on the control point, and adds the control point to the list.
 , and click on the new location for the control point. Maptitude draws the control point in the new location.
 . Maptitude removes the control point and renumbers the remaining control points.
To load existing control points, click Load Points to display the Load Coordinates dialog box, choose a Coordinates File, and click Open.
To save your control points, click Save Points to display the Save Coordinates As dialog box, choose a folder and type the name of the new Coordinates File, and click Save.
- Enter the true location of each control point as follows:
| To do this... | Do this... |
|---|---|
| Type in the location | Enter the coordinates of the control point in the respective cells in the Longitude and Latitude columns. If you want to use the local coordinates, check the Local box. |
| Click on the location | Click in the list on the control point you want to locate, click , then click on a map to mark the true location. |
- When you have placed the control points and entered the true locations for each one, click Register to register the image.
Maptitude registers the image and saves the registration information in the world file. Also, for a TIFF image, Maptitude stores the registration information as part of the image file. You can now use the image in any of your maps and layouts. If you want to update the registration information you can reregister the image.
To Reregister an Image Using Control Points
- Choose the image to reregister from the drop-down list on the Standard toolbar.
- Choose Tools>Raster>Registration to display the Register Image toolbar.
- If you want to change the projection, click Projection to display the Image Projection dialog box, choose the projection used in the image, and click OK.
- Register the image as described in steps 6, 7, and 8 of the procedure To Register an Image Using Control Points above.
©2026 Caliper Corporation