Maptitude Help / Managing Geographic Files / Coloring a Map
Coloring a Map
The Area Coloring command assigns color codes to areas, or uses existing color codes, and creates a color theme that displays the layer with areas next to each other having different colors. You can also store the number of areas adjacent to each area.
When in 1852 the English mapmaker Francis Guthrie was coloring maps so that no two adjacent regions had the same color, he noticed that he only needed four colors. It took until 1976 for there to be a formal proof of his conjecture that this was always true for simple areas. Because geographic areas can have multiple pieces and islands, and can touch at corner nodes, it can take more than four colors to make assignments that clearly distinguish areas. Maptitude uses Freimer’s cartographic graphs to model the adjacency between areas, and Brelaz’s Dsatur algorithm to assign the colors.
There are several adjacency methods that you can use for coloring a map:
| Method | What it does |
|---|---|
| Edge | Assigns a color to every area, making sure that no areas that share a common border have the same color. The number of neighboring areas will be the total number of areas sharing a border with each feature. |
| Node | Assigns a color to every area, making sure that no areas that share a common border or node have the same color. The number of neighboring areas will be the total number of areas sharing a border or node with each feature. |
| Island | Assigns a color to every area, making sure that no areas that share a common border or node, or are separated by a body of water, have the same color. The number of neighboring areas will be the total number of areas sharing a border or node with, or are within the threshold distance of, each feature. |
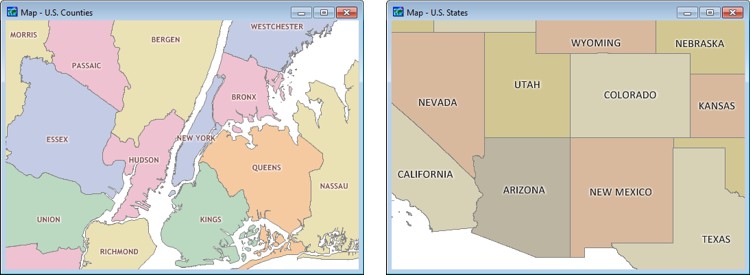
Left: Counties colored with the island option. Counties separated by water are still considered adjacent and have different colors. Right: States colored with the node option. None of the "Four Corners" states is the same color.
 To Color a Map’s Areas
- Choose an area layer to color from the drop-down list on the Standard toolbar.
- Choose Tools>Editing>Area Coloring to display the Area Coloring dialog box.
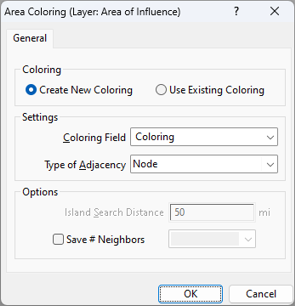
- Choose Create New Coloring from the radio list.
- Choose a field to store the color values or type the name of a new field in the Coloring Field editable drop-down list.
- Choose an adjacency method from the Type of Adjacency drop-down list. If you choose the Island method, enter a maximum distance for considering islands adjacent in the Island Search Distance edit box.
- Check the Save # Neighbors box to fill a field with the number of features that neighbor each record and choose the field, or type the name of a new field, to store the neighbor values.
- Click OK.
Maptitude determines the color value for every feature, fills the color field with the values, and draws the map with a color theme on the area layer.
 |
NOTE: When you create new colors, Maptitude writes the color values to the layer table. This requires that the area layer not be in a read-only location. |
To change the colors, see To Change a Color or Pattern Theme. To turn off the colors, see To Turn Off a Color, Pattern, or Symbol Theme.
To Use Existing Map Coloring
- Choose an area layer that already has a color field from the drop-down list on the Standard toolbar.
- Choose Tools>Editing>Area Coloring to display the Area Coloring dialog box.
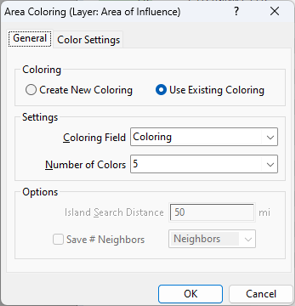
- Choose Use Existing Coloring from the radio list.
- Choose the field that contains the color values and the number of colors that are used in the color field from the drop-down lists in the Settings frame.
- Click the Color Settings tab to choose the colors to use. You can cycle through color sets by clicking Previous and Next, or choose a color from the scroll list and click Style to specify colors individually.
- Click OK.
Maptitude draws the map with a color theme on the area layer.
©2026 Caliper Corporation