Maptitude Help / Creating and Using Layouts / Creating Automated Layouts
Creating Automated Layouts
You can print layouts focused on individual features within an area layer, such as cities or sales territories, with the Tools>Reports>Automated Layouts for Areas command. You can choose which areas to print, whether to show adjacent areas, and other options in your automated layouts.
The following templates are stored in the Template folder within the program folder:
| Template | Description |
|---|---|
| District_Auto_Map.lay | Automatically displays the map and legend in portrait or landscape orientation |
| District_Landscape_Map.lay | Displays the map and legend in landscape orientation |
| District_Portrait_Map.lay | Displays the map and legend in portrait orientation |
When you choose a template, Maptitude displays a preview of the layout template in the dialog box.
 To Create Automated Layouts
- Choose an area layer from the drop-down list on the toolbar, and if necessary, select the areas for which you want to print reports.
- Choose Tools>Reports>Automated Layouts for Areas to display the Automated Layouts dialog box.
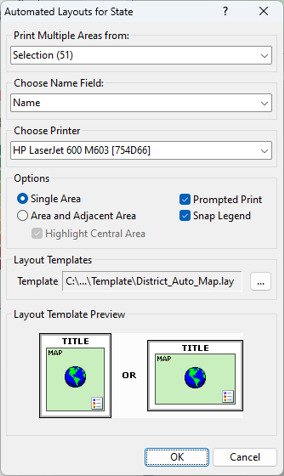
- Choose whether to create reports for all records or a selection set from the Print Multiple Areas from drop-down list.
- Choose a field to use for the printed title from the Choose Name Field drop-down list.
- Choose a printer from the Choose Printer drop-down list.
- Choose additional options as follows:
| Option | What it does |
|---|---|
| Single Area | Choose this to show just the area in each layout |
| Area and Adjacent Area | Choose to show the area and its immediate neighbors in each layout; Check the Highlight Central Area box to show the adjacent areas in a different style |
| Prompted Print | Check to preview the layouts before printing and to be given a choice as to whether or not to print each individual layout |
| Snap Legend | Check to locate the legend based on its map location or uncheck to locate the legend based on the template |
- The default template will automatically choose whether to use landscape or portrait for each area that is printed. You have the option to use a portrait-only or landscape-only template for all of the areas that are printed. To use a different template, click
 , choose a layout template, and click Open.
 - Click OK. Maptitude displays a progress bar, and prepares the first layout and displays it in a layout window. If you chose the Prompted Print option, Maptitude displays a Confirm dialog box. Click Yes to print the layout, or No to continue without printing the layout.
- Maptitude displays the Print Layout dialog box. Choose the number of copies to print and, if your map uses halos, shadows, or transparency in it, check the Optimize for Transparency box.
- Click OK.
If you did not choose the Prompted Print option, Maptitude prints the first layout and continues to print layouts for every area you chose. If you did choose the Prompted Print option, Maptitude prints the layout, prepares and displays the layout for the next area, and displays a Confirm dialog box where you can again choose whether or not to print the next layout.
Try It Yourself: Creating Automated Layouts
1. Choose File>Open Workspace or click  on the Standard toolbar, then open the RhodeIsland workspace in the Tutorial folder. You are going to preview automated layouts of counties based on this map.
2. Choose Tools>Reports>Automated Layouts for Areas to display the Automated Layouts dialog box.
3. Choose the Single Area option and make sure the Prompted Print box is checked.
4. Click OK. Maptitude displays a preview of a map for the first county.
5. Click No in the Confirm dialog box. Maptitude skips printing the layout of the first county and displays a preview of a map for the next county. Continue to click No in the Confirm dialog box boxes until you have previewed all five county layouts.
6. Choose File>Close Workspace and click Don't Save to close the workspace without saving changes.
©2026 Caliper Corporation