Maptitude Help / Managing Geographic Files / Exporting Geographic Files
Exporting Geographic Files
Maptitude makes it possible to export a map layer to many common interchange file formats:
|
|
|---|
When you export a map layer, the contents of the geographic file are written out in the desired format, so the data can subsequently be read by or imported into another software package. When you export a map layer, you can choose to export all of the features in the layer or just the features in a selection set. If you use a sorted selection set, the features will be exported in sort order. You can export a map layer with no data, with the built-in data, or with the data in any dataview associated with a map layer, including joined views. You can also choose to export data using a coordinate system other than longitude and latitude coordinates. For more information, see Using Data in Other Coordinate Systems.
Maptitude can export map layers that were created by opening ODBC tables, an Oracle Spatial layer, or an Esri Personal Geodatabase. You can save them as standard (.dbd) or compact (.cdf) geographic files.
You can choose to create the topology for non-topological area layers, including Esri Shapefile, MapInfo TAB, Oracle Spatial, SQL Server Spatial, or non-topological standard geographic files. These layers can be exported as areas to standard geographic files, but not directly to compact geographic files; you can export the standard geographic file to a compact geographic file in a later step.
Maptitude can also export a point, line, or area layer to an Oracle Spatial or SQL Server Spatial database. If there is an error while exporting to a SQL Server Spatial layer, Maptitude writes the error to a log file (in the My Documents\Caliper\Maptitude folder) and continues exporting the remaining features.
- To export a map layer with no data or with the built-in data, choose the layer to export from the layer list in the map toolbar. To export a map layer with the data in a dataview associated with the map layer, make that dataview the current window.
- Choose File>Export>Geography to display the Export Geography dialog box.
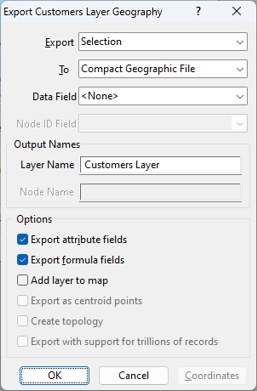
- Choose the features to export from the Export drop-down list.
- Choose the export file type from the To drop-down list.
- If you are exporting to a Maptitude format file, choose the field containing the feature IDs from the Data Field drop-down list. If you are exporting a line file, also choose the field containing the node IDs from the Node ID Field drop-down list.
- Choose any additional options as follows:
| Option | What it does |
|---|---|
| Export attribute fields | Check to include tabular data with the layer or uncheck to export just the geography with no data attributes |
| Export formula fields | Check to export any formula fields with the layer or uncheck to export just the attribute data |
| Add layer to map | Check to add the exported layer to the current map or uncheck to export the layer without adding it to the current map |
| Export as centroid points | Check to export areas as centroid points or uncheck to export area layers as they are |
| Create topology | Check to export non-topological areas with topology or uncheck to export non-topological areas as they are |
| Export with support for billions of records | Check if you need a database that supports billions of records. Note, the resulting Standard Geographic File (.DBD) will not be compatible with Maptitude 2024 and earlier. |
- To export geographic data using a coordinate system other than longitude and latitude, click Coordinates to display the Export Coordinates dialog box, choose the appropriate coordinate system, and click OK. For more information, see Using Data in Other Coordinate Systems.
- Click OK. Maptitude displays the Save As dialog box.
- Type the file name and click Save.
Maptitude exports some or all of the features in the map layer.
Exporting to Google Earth
You can export one or more layers to Google Earth KML or KMZ. When you export a map to Google Earth, Maptitude exports point, line, and area layers and also tries to apply as much styling and labeling as KML supports. You can also choose the attributes to be included in the feature description, and launch Google Earth to display the results.
 To Export One or More Layers Google Earth KML
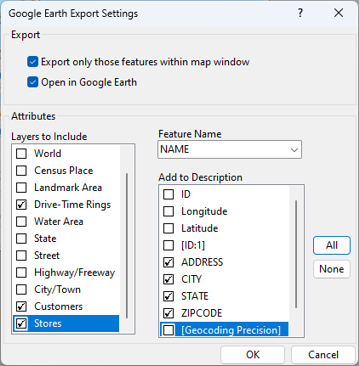
- Choose which layers to export by checking boxes in the Layers to Include scroll list.
- For each layer that you choose in step 3, choose the field that contains the feature name from the Feature Name drop-down list and choose other fields to display in the feature description by checking them in the Add to Description scroll list; click All to check all the fields or None to remove the checks from all the fields.
- Check Export only those features within the map window to export just the portions of the layers that are visible on the map, or uncheck to export all features in the layers.
- Check Open in Google Earth to automatically open Google Earth with the layers and features you are exporting.
- Click OK. Maptitude displays the Save as Google Earth Map dialog box.
- Choose whether to save the file as a KML or a KMZ file from the Save as Type drop-down list.
- Enter a name for the file and click Save.
Maptitude saves the chosen layers to a Google Earth file and opens it in Google Earth if you chose the option to do so.
©2026 Caliper Corporation