Maptitude Help / Creating and Editing Geographic Files / Geographic File Formats
Geographic File Formats
Maptitude geographic files come in two formats, with two file extensions:
- A compact, read-only format (.CDF) that displays very quickly
- A standard, editable format (.DBD) that takes more disk space and displays less quickly
Both formats enforce topology by default. This avoids the issues common to formats such as Shapefiles, that include slivers, overlaps, and open polygons.
When you create new geographic files, they are in the standard, editable format, so you can modify them right away. When you complete your edits, you may want to convert the geographic file back to the compact, read-only format, since it takes up less space and displays more quickly.
Converting Between Standard and Compact Geographic File Formats
Maptitude lets you convert a compact format file (.cdf) to a standard format file (.dbd) when you want to edit the features in the file using the geographic editing tools.
Both standard and compact format files contain a field that you can use to store information that identifies each record, such as a customer ID or a FIPS code. In a standard format file, this field is called ID, and must contain a unique, numeric value. In a compact format file, this field is called DATA, and it can contain either numeric or string data. You can also omit the DATA field to create an even more compact file. Compact format files also have a field called ID that Maptitude uses to keep track of individual records. The contents of this field are generated automatically and do not take up any disk space.
When you export to a standard format file, Maptitude fills the ID field with the unique identifier of the geographic file you are exporting. If you would like to fill the ID field with different information, you can change this default by choosing from the list of available numeric fields, but you must make sure that the values in the field you choose are unique within the geographic file.
When you export to a compact format file, Maptitude fills the DATA field with the unique identifier of the geographic file you are exporting. You can change this default by choosing from the list of all available fields. You can fill the DATA field with numeric or string values and the values you choose do not need to be unique within the geographic file. You can also choose “None” to omit the DATA field from the file you are creating.
When you export features in a line layer, you can also choose the field that identifies each endpoint in the node layer.
 To Convert Between Geographic File Formats
- Choose the layer to convert from the drop-down list on the toolbar.
- Choose File>Export>Geography to display the Export Geography dialog box.
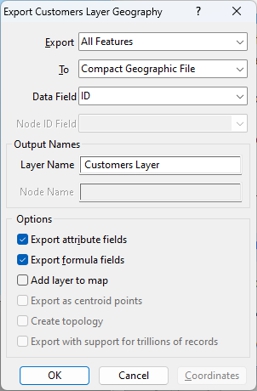
- Choose whether to export all features or only those in a selection set from the Export drop-down list.
- Choose the format for the file that you are creating from the To drop-down list.
- Choose the field containing the feature IDs from the Data Field drop-down list.
- If you are exporting line features, choose the field containing the node IDs from the Node ID Field drop-down list.
- Enter a name for the new layer in the Layer Name edit box.
- Choose options as follows:
| To do this... | Do this... |
|---|---|
| Export the geography only | Remove the check from the Include Built-in Data box |
| Include the associated tabular data in the new geographic file | Check the Include Built-in Data box |
| Add the new layer to the current map | Check the Add layer to map box |
| Export an area layer as a point layer | Check the Export as Centroid Points box |
- Click OK. Maptitude displays the Save As dialog box.
- Type the file name and click Save.
Maptitude creates a new geographic file, in the format you selected, containing the features in the chosen layer. To export areas as centroid points, see To Create a Geographic File of Centroids.
©2026 Caliper Corporation