Maptitude Help / Creating and Editing Geographic Files / Editing Area Features
Editing Area Features
You can only edit area layers that are in standard editable format, such as those that you create from scratch as described in Creating New Geographic Files. You cannot edit compact read-only format area layers such as those included in your Country Package (e.g., states, postal codes).
Areas are defined by a series of boundary lines. Each boundary line has two endpoints and any number of shape points. When you edit an area, the boundary lines are displayed with editing handles. Endpoints are shown as circles, shape points are shown as solid squares, an open square is a point that is being edited, and an open diamond marks the centroid of the area.
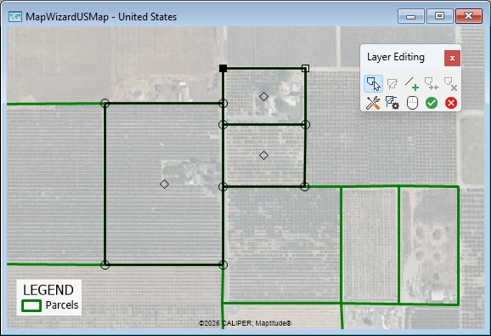
End points editing handles where area boundaries meet are shown as empty black circles, shape point editing handles are shown as solid black squares, and an empty black square indicates an editing point that is being edited. The open diamond marks the centroid of the area.
You can add areas to a layer, or split existing areas, by adding boundary lines with the Add  tool. If you add boundary lines that do not close off an area, Maptitude ignores them. If you add boundary lines that are a little too long, Maptitude trims them neatly, just where you would expect.
You can also add and edit areas using segments from a line layer so that the areas align with the segments in the line layers. You can use segments from any number of line layers in the map, such as roads, railroads, or rivers.
You can also edit areas in non-topological geographic files, including Esri Shapefiles and SQL Server Spatial. See Using the Non-Topological Area Editing Tools below for more information.
If you have set up a digitizer, you can switch to editing on the digitizer by clicking  in the Layer Editing toolbar. The button will change to
  to show that the digitizing tablet is now active. For more information on digitizers, see Using a Digitizer.
 |
TIP: You may want to make an archive before you begin editing and occasionally while you are editing to have backups. See Archiving Geographic Files for more information. |
In this topic:
- Some Special Cases - Islands and Holes
- Working with Area Centroids
- Using the Non-Topological Area Editing Tools
 To Display the Layer Editing Toolbar for Editing Area Features
- Choose an editable area layer from the drop-down list on the Standard toolbar or create a new area layer as described in Creating New Geographic Files.
- If the Layer Editing toolbar is not visible, choose Tools>Editing>Layer Editing Toolbar to display it.
- When you are done editing features, choose Tools>Editing>Layer Editing Toolbar or click the Close button in the Layer Editing toolbar to close the toolbar.
- Click
 in the Layer Editing toolbar to display the Configure Geographic Editing dialog box.
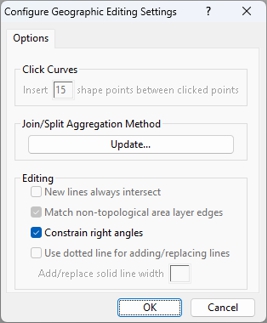
- Click Update if you want to modify how data are handled when joining or splitting areas. See To Change the Aggregation Method when Editing Map Features for more information.
- Check the Constrain right angles box if you want to make it easier to draw rectangular areas or other shapes with right-angles in them.
- Click OK.
Maptitude closes the Configure Geographic Editing dialog box.
To Add Areas or Split Areas into Parts
- Activate the Add tool in the Layer Editing toolbar by clicking on it.
- Click at the starting point of the boundary line.
- To add one or more shape points, move the mouse to the next point and click. Right-click to back up.
- To end the line, press Enter or double-click on the endpoint. Maptitude displays the boundary line in black, with editing handles at the endpoints and shape points. Maptitude also displays editing handles on nearby areas. To add more boundary lines, return to step 2.
- Click
 to save your edits, or click
  to cancel.
If you saved your edits, Maptitude creates new areas that are defined by the lines you have drawn and draws the map with the revised areas.
To Add or Split Areas Using Line Segments
- Click
 in the Layer Editing toolbar to display the Line Layer dialog box.
 - Choose a line layer and click OK.
- Activate the Select Segments tool
 by clicking on it, and select one or more segments from the line layer.
 - To choose another line layer, return to Step 1.
- Click to save your edits, or click to cancel.
Maptitude creates new areas defined by the existing area boundary lines and the segments that you selected, and draws the map with the revised areas.
- Activate the Modify tool
 in the Layer Editing toolbar by clicking on it.
 - Click on an area you want to modify. Maptitude displays editing handles at the endpoints and shape points of all the boundary lines.
- Edit the boundary lines according to the table:
If the change affects other areas, Maptitude draws them with editing handles.
- Click to save your edits, or click to cancel.
If you saved your edits, Maptitude draws the map with the modified boundaries.
- Activate the Delete tool
 in the Layer Editing toolbar by clicking on it.
 - Click on each area you want to delete. Maptitude marks the deleted areas in red.
- Click to save your edits, or click to cancel.
If you saved your edits, Maptitude draws the map without the deleted areas. When you save your edits, Maptitude removes from the geographic file any boundary lines that are no longer in use.
To Join Two or More Areas into One
- Activate the Join tool
 in the Layer Editing toolbar by clicking on it.
 - Click on the first area you want to join. Maptitude displays editing handles on the boundary.
- Click on one or more areas that you want to join with the first one. Maptitude displays editing handles on the boundary and marks in red any boundary line that separates the areas to be joined.
- Click to save your edits, or click to cancel.
If you saved your edits, Maptitude draws the map with the joined areas.
Try It Yourself: Editing Area Features
1. Choose File>New Workspace, choose the New map of {country name} option, and click OK to start Create-a-Map Wizard and make a map of the state/county/province where you live.
2. Choose Tools>Editing>New Layer. Maptitude displays the New Layer dialog box.
3. Choose the Area Layer radio button, type “My Areas” as the layer name, and click OK.
4. Click OK again to close the Attributes dialog box without making changes. Maptitude displays a new map with the area layer.
5. At the bottom of the Display Manager, click the style sample next to "My Areas" and change the style to something that stands out a little more (for example change the width to 3pt), and click OK.
6. Click in the Layer Editing toolbar, then draw three parallel horizontal lines, and draw three vertical lines that cross the horizontal lines.
7. Click to save the edits. Maptitude creates four area features, removing the portions of the lines that did not enclose an area.
8. Click , then click on the upper left area. The border of the area turns red to indicate that it will be deleted.
9. Click to delete the area.
10. Click , then click on a corner of the upper right area and drag it to a new spot. Click along a side of the area and drag a new shape point to another spot.
11. Click to cancel the edits. The area returns to its original shape.
12. Click , then click on the two lower areas. Maptitude turns the common border red to show that it will be deleted.
13. Click to save the edits. Maptitude joins the two areas into one area.
14. Choose File>Close Workspace and click Don't Save to close the workspace without saving any changes.
Some Special Cases - Islands and Holes
Some areas have holes in them, such as when a large lake is located inside an area. Other areas consist of many different parts. The State of Hawaii, for example, is made up of several islands. You can use the area editing tools to create and modify areas that have islands and holes.
- Use the Add tool in the Layer Editing toolbar to draw boundary lines that outline the hole.
- Click to split the area in two. The hole becomes one area, and the region surrounding the hole becomes the other area.
- Use the Delete tool to delete the inner area and create a hole.
- Click to save the changes.
Holes and areas are hard to distinguish from one another. The distinction is most obvious when you use a fill style or use the selection tools. With a fill style, only the area features will be filled, and when you select an area, it will be highlighted, while a hole cannot be selected.
A hole is not recognized as an enclosed area. To change a hole into an area, you must add another boundary line to form two enclosed areas that can be joined.
- Use the Add tool in the Layer Editing toolbar to add a line that splits the hole in half.
- Click to create two new areas where the hole used to be.
- Activate the Join tool by clicking on it.
- Click on the two newly formed areas.
- Click to save the changes.
The two new areas are joined to form a single area where the hole used to be.
You can join a hole to the surrounding area to make the hole “disappear.”
- Follow the procedure above to change the hole into an area.
- Activate the Join tool in the Layer Editing toolbar by clicking on it.
- Click on the surrounding area and then on the area that used to be the hole.
- Click to save the changes.
The hole “disappears” leaving one solid area.
To Create an Area with Islands
- Use the Join tool in the Layer Editing toolbar to join any islands together into a single area.
- Click to save the changes.
Even though the islands still look separate, Maptitude has linked all of them together as a single feature. The link is most obvious when you make a thematic map or use the selection tools. All the islands are drawn together in the same color or style, and when you select any part of the area, all the islands are highlighted.
To Split Off One Island into a Separate Area
When an area contains many islands, you will occasionally want to split one island away from the rest. As with holes, the inner boundary lines for joined islands are not recognized as separate features. To split off an island you must make the island into two new areas and join them.
- Use the Add tool in the Layer Editing toolbar to draw a line that splits the island in half.
- Click , and Maptitude creates two new areas, one for each half of the island. The remainder of the area is left intact.
- Use the Join tool to join the two halves back into a single, separate area.
- Click to save the changes.
Working with Area Centroids
Every area in a geographic file has an associated point location called the centroid. The centroid is a point located near the geographic center of an area, and it is used for several things:
- Labels of area features are positioned based on the centroid
- Distance calculations involving areas are based on the centroid location
- Chart themes are displayed on the centroid
Maptitude lets you edit the location of an area centroid, and save the centroid locations from one or more area features as a separate geographic file. For example, the centroid for an oddly shaped area may be very close to a border or in a narrow section of the feature so you may want to move it to a more central location in a wider part of the area.
To Display Area Centroids
- Click the style sample of an area feature in the Display Manager to display the Style dialog box.
- Check the Show Centroids box. Click the sample to change the symbol, size, or color.
- Click OK.
Maptitude displays the area centroids with the chosen symbol.
- Activate the Modify tool in the Layer Editing toolbar by clicking on it.
- Click on the area whose centroid you want to move. Maptitude displays editing handles around the boundary of the area. A small open diamond identifies the centroid of the area.
- Click on the centroid and drag it to the desired location.
- Click to save your edits, or click to cancel.
To Create a Geographic File of Centroids
- Choose an area layer to convert from the drop-down list on the Standard toolbar.
- Choose File>Export>Geography to display the Export Geography dialog box.
- Make choices as follows:
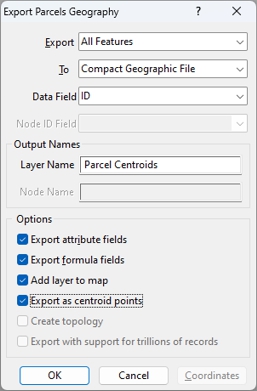
- Choose whether to export all of the area features or only those in a selection set from the Export drop-down list
- Choose the format for the centroid file you are creating from the To drop-down list
- Choose a field containing the feature IDs from the Data Field drop-down list if exporting to a Caliper format file
- Type a name for the new centroid layer in the Layer Name box
- Check the Export attribute fields box to include tabular data from the area layer and Export formula fields box to also include any formula fields in the area layer
- Check the Add layer to map box to add the new centroid layer to the current map
- Check the Export as centroid points box.
- Click OK. Maptitude displays the Save As dialog box.
- Type a file name and click Save.
Maptitude creates a new point geographic file containing the centroid locations. For more information about ID fields or about exporting tabular data, see Geographic File Formats.
Using the Non-Topological Area Editing Tools
You can edit non-topological areas such as Esri Shapefiles and SQL Server Spatial. These areas have a single boundary line around each polygon that makes up an area, and can overlap. Because they do not share common boundary lines, these areas can also have underlaps, so they do not match exactly. You can choose to snap non-topological area edges as you add areas, to avoid overlaps and underlaps. You can move whole non-topological areas, and you can create new areas by drawing a line that would split a non-topological area into parts.
To Display the Layer Editing Toolbar for Non-Topological Area Features
- Choose a non-topological editable area layer from the drop-down list on the Standard toolbar.
- Choose Tools>Editing>Layer Editing Toolbar to display the Layer Editing toolbar.
- When you are done editing features, choose Tools>Editing>Layer Editing Toolbar or click the Close button in the Layer Editing toolbar to close the toolbar.
To Add a Non-Topological Area by Drawing a Boundary
- Activate the Add new area tool
 by clicking on it.
 - Click at the starting point of the boundary line.
- To add one or more shape points, move the mouse to the next point and click. Right-click to back up.
- To end the line, press Enter or double-click on the endpoint. Maptitude displays the boundary line in black, with editing handles at the endpoints and shape points. Maptitude also fills the area with a color, so you can see any overlaps. To add more boundary lines, return to step 2.
- Click to save your edits, or click to cancel.
If you saved your edits, Maptitude creates the new area that is defined by the line you have drawn and draws the map with the new area.
To Add a Non-Topological Area by Picking a Boundary from a Line layer
- Click to display the Line Layer dialog box.
- Choose a line layer and click OK.
- Activate the Pick a boundary from a line layer tool by clicking on it, and select one or more segments from the line layer.
- To choose another line layer, return to Step 1.
- Click to save your edits, or click to cancel.
Maptitude creates a new area defined by the existing area boundary lines that you selected, and draws the map with the new area.
To Split Non-Topological Areas into Parts
- Activate the Modify area tool by clicking on it.
- Click on an area you want to split. Maptitude displays editing handles at the endpoints and shape points of the boundary line.
- Activate the Add Boundary Edge tool in the Layer Editing toolbar by clicking on it.
- Click at the starting point of the boundary line.
- To add one or more shape points, move the mouse to the next point and click. Right-click to back up.
- To end the line, press Enter or double-click on the endpoint. Maptitude displays the boundary line in black, with editing handles at the endpoints and shape points. Maptitude also displays editing handles on nearby areas. To add more boundary lines, return to step 2.
- Click to save your edits, or click to cancel.
If you saved your edits, Maptitude creates new areas that are defined by the lines you have drawn and draws the map with the revised areas.
To Modify Non-Topological Area Boundaries
- Activate the Modify area tool by clicking on it.
- Click on an area you want to modify. Maptitude displays editing handles at the endpoints and shape points of the boundary line.
- Edit the boundary line as follows:
| To do this... | Do this... |
|---|---|
| Move a point | Drag it to a new location |
| Add a shape point | Click anywhere on the line |
| Delete a shape point | Click on a shape point and press the Delete key, or drag the shape point onto an adjacent shape point |
- Click to save your edits, or click to cancel.
If you saved your edits, Maptitude draws the map with the modified boundary.
To Delete Non-Topological Areas
- Activate the Delete area tool by clicking on it.
- Click on each area you want to delete. Maptitude marks the deleted areas in red.
- Click to save your edits, or click to cancel.
If you saved your edits, Maptitude draws the map without the deleted areas. When you save your edits, Maptitude removes from the geographic file any boundary lines that are no longer in use.
To Move a Non-Topological Area
- Activate the Move an area tool
 by clicking on it.
 - Click on the area you want to move and drag it to a new location. Maptitude displays editing handles on the boundary.
- Click to save your edits, or click to cancel.
If you saved your edits, Maptitude draws the map with the moved area.
To Configure Non-Topological Area Editing
- Click
 to display the Configure Geographic Editing dialog box.
 - Make choices as follows:
| To do this... | Do this... |
|---|---|
| Change the join/split attribute settings | Click Update to display the Data Update dialog box; for more information, see Combining Attributes |
| Snap edges when adding a new area | Check the Snap non-topological area layer edges box |
- Click OK.
Maptitude closes the Configure Geographic Editing dialog box.
©2026 Caliper Corporation