Maptitude Help / Creating and Editing Geographic Files / Using a Digitizer
Using a Digitizer
You can use a digitizing tablet to add or edit features in a map layer by tracing over a paper map or other drawing. Once you set up your digitizer, you can add and edit geographic features the same way you do with a mouse.
To add or edit features from a digitizer, you must follow these steps:
- Create or open a map window
- Set up the digitizer
- Prepare and register the paper map
- Choose the editing tool you want to use
- Click
 in the Layer Editing toolbar or press the F2 key to enter data from the tablet instead of from the screen
Once your digitizer is ready and your map is registered, you can switch back and forth as often as you like between editing features on the screen and editing them on the tablet.
Setting Up a Digitizer
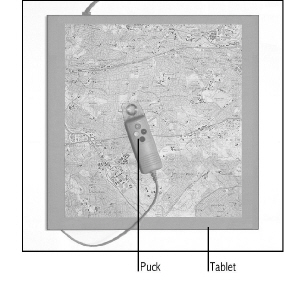 All digitizers come with setup programs and complete instructions on how to install, configure, and test them. Most setup programs let you program the buttons on the puck to act like the buttons on your mouse. Be sure that you know how to click, double click, and drag using the buttons on your digitizer.
The Maptitude digitizing interface supports all digitizing tablets with Wintab compliant drivers. This includes virtually all tablets currently manufactured for use with PCs. Consult your tablet vendor if you are unsure whether the tablet you own or wish to buy for use with Maptitude has a Wintab driver.
If the puck on your digitizer has extra buttons that you haven’t already programmed, program one of the extra buttons to act like a double-click. Then you can use the button to switch from the tablet back to the screen without having to use your computer keyboard.
Registering a Map
To digitize features from a printed map, you must tell Maptitude what part of the world the map covers. You do so by marking three or more points on the paper map, and telling Maptitude the true location of each of these points. This process is called registering the map, and the points you mark are called control points. You use the Digitizer Registration toolbar to register a map on a digitizing tablet.
Maptitude needs three or more control points to register a map. If you provide four or more control points, Maptitude can determine if the true coordinates are correct for each one.
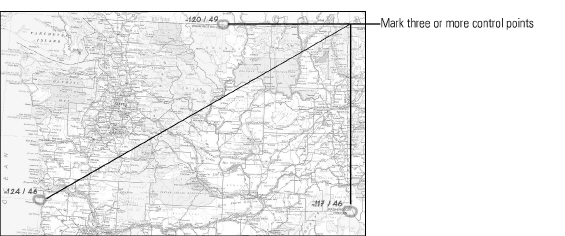
If the true coordinates are not correct, Maptitude acts according to the following table:
| If the accuracy of... | Maptitude... |
|---|---|
| All control points are OK | Registers the map using all control points |
| One control point is far off | Registers the map with the other control points |
| Several control points are far off | Does not register the map |
You can correct registration errors by:
- Adding additional control points
- Changing the true location of a control point
- Deleting a control point that is far off
You can type the true locations of control points in units other than longitude and latitude. This capability is useful if your map has a grid based on some other coordinate system. Use the Projection dialog box to set the units to meters, feet, or other units. To learn how to work with other coordinate systems, see Projections and Coordinate Systems.
 To Prepare Your Paper Map
- Place your map on the tablet and attach it carefully using drafting tape.
- Note the name of the projection that is used in the printed map. This information is usually listed in the legend of the map.
- Mark three or more control points on the map, numbering them in order (1, 2, 3,...) Marking these points now will save you time if you want to digitize from the map in the future.
You get better results with more control points (say, between five and ten) and you can improve the registration by spreading them out across the tablet. For example, you might choose one point in each corner of the tablet, plus a few others in the middle.
If your map has a grid or a set of tick marks that identify the actual coordinates of several points, use these as your control points. If your map doesn’t have a grid or tick marks, choose points that are distinctive, so you can match them with points on a map on the screen. Good choices include corners of area boundaries, major intersections, and coastline or waterway boundaries.
- Make sure a map is open, then choose Tools>Editing>Advanced>Digitizer Setup. Maptitude displays the Map Projection dialog box.
- Choose the projection used in the paper map, and click OK. Maptitude displays the Digitizer Registration toolbar.
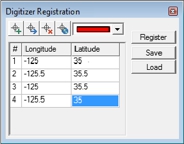
- Click
 to activate the Add Control Point tool. Maptitude switches to digitizer mode so you can work on the tablet. The cursor freezes over the tool while you add control points.
 - Using the digitizer puck, click on each of the numbered control points on the paper map.
- Press the Esc key when you are done. Maptitude adds the control points to the list.
- Enter the true location of each of the control points. First, click on the list to highlight the control point you are going to locate. Then, do one of the following:
- Activate the
 tool, and click on any map at the true location that matches the control point.
 - Type the coordinates for the control point directly into the respective Longitude and Latitude cells.
Maptitude displays a numbered symbol at the true location.
- To delete a control point, click on the control point in the list and click
 . Maptitude renumbers the remaining control points.
 - To save the true locations of the control points to a file for future use, click Save, type a file name in the File Save As dialog box, and click Save.
- Click Register.
Maptitude tries to register the map. If several control points are far off, Maptitude cannot register the map. Return to step 6 to correct the true location of control points or to step 3 to add additional control points. Otherwise, you are now ready to use the digitizer to add or edit map features.
Using a Registered Map
Once you register a map, you can continue digitizing as long as Maptitude is running and as long as the paper map stays in the same place on the tablet.
If you exit the program or remove the map from the tablet, you need to reregister the map before you can digitize more information. Registration is easier the second time around if you saved the control point registration information to a file.
To Reregister a Map
- Prepare your map on the tablet. The marked control points must be located within the borders of the tablet.
- Open the map, then choose Tools>Editing>Advanced>Digitizer Setup. Maptitude displays the Map Projection dialog box.
- Choose the projection used in the paper map, and click OK. Maptitude displays the Digitizer Registration toolbar.
- Click
 to activate the control point tool. Maptitude switches to digitizer mode so you can work on the tablet.
 - Using the digitizer puck, click on each of the numbered control points on the paper map.
- Press the Esc key when you are done. Maptitude adds the control points to the list.
- Click Load, choose the control point file containing the control points for the map from the Load Digitizer Registration From dialog box, and click Open. Maptitude displays the true locations of the control points in the control point list.
- Click Register.
Maptitude tries to register the map. If several control points are far off, Maptitude cannot register the map. Correct the control points by starting with step 6 of the procedure To Register a Map. Otherwise, you are now ready to use the digitizer to add or edit map features.
Editing Geographic Files
Once you register a map, you can edit geographic files from the tablet or on the screen. You switch from the screen to the tablet by pressing the F2 key or by clicking the button in the Layer Editing toolbar. The button will change to  to show that the digitizing tablet is now active. You switch from the tablet to the screen by pressing the F2 key. If you set up one of the buttons on the puck to act as a middle button double-click, you can also use this button to switch from the tablet back to the screen.
When the tablet is active, the on-screen cursor is locked into the map window and cannot be used to click on any menus or tools.
To Edit Geographic Files from the Tablet
Edit the features on a tablet the same way as you would on the screen. The only difference when you are using a digitizer is that you must switch back to screen mode to change tools. For example:
- From the Layer Editing toolbar, start out in screen mode. If you are in tablet mode, press F2 to switch back to screen mode.
- Click the Add tool in the Layer Editing toolbar to make it active.
- Click or press F2 to switch to the tablet.
- Add features by clicking buttons on the puck while tracing over the map on the tablet.
- To move points, press F2 to switch to the screen, click the Modify tool in the Layer Editing toolbar to make it active, and click or press F2 to return to the tablet. Move points as usual.
- To delete points, press F2 to switch to the screen, click the Delete tool in the Layer Editing toolbar to make it active, and click or press F2 to return to the tablet. Delete points as usual.
- To save your edits, press F2 to switch to the screen, and click
 . To cancel your edits, press F2 to switch to the screen, and click
  .
.
©2026 Caliper Corporation