Maptitude Help / Creating and Editing Geographic Files / Creating New Geographic Files
Creating New Geographic Files
You create a new geographic file when you want to use a mouse or digitizer to add features to a completely new map layer. When you create a new geographic file, it is always created in the standard, editable format (.dbd), so you can add features to it right away. If you are working with a compressed WRKZ workspace, the new geographic file will be embedded in the workspace.
Area geographic files can be topological, meaning that adjacent areas share common boundaries, or non-topological, meaning that areas can overlap. A boundary between two areas in a topological area layer is a single line so if you modify it, both areas are updated. In a non-topological area layer, you would need to make the changes to the boundary for both areas if you want to update both areas.
When you create a new geographic file, you can design the table that goes with the layer, indicating what types of data you want to store with each feature. When you create a line geographic file, you also have the option to save attributes for the endpoints in a table. For more information on working with tabular data, see Creating a New Table from Scratch.
 To Create a New Geographic File
- Open a workspace containing a map that is zoomed to the location where you want to add features in a new layer.
- Choose Tools>Editing>New Layer to display the New Layer dialog box.
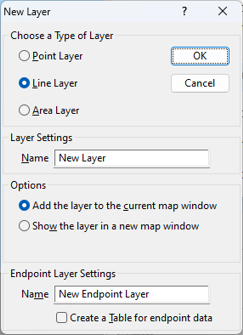
- Choose the type of layer you want to create from the Choose a Type of Layer radio list.
- Type a name for the new layer in the Layer Settings Name edit box.
- Choose whether to display the new layer in the current window or in a new map window from the Options radio list.
- If you chose to create an area layer, check the Allow areas to overlap box to create non-topological areas.
- If you chose to create a line layer, type a name for the associated node layer in the Endpoint Layer Settings Name edit box and choose whether or not to create a table for the node data.
- Click OK. Maptitude displays the Attributes for New Layer dialog box.
- Click OK to create a new geographic file with no associated data table, or design a table as described in step 4 of To Create a New Table and click OK.
If you chose to create a table for endpoint data, Maptitude displays the Attributes for New Endpoint Layer dialog box. Design a table and click OK.
Maptitude creates an empty geographic file for the map layer and displays the Layer Editing toolbar. You are now ready to use the editing tools to add features to the layer. See Editing Point Features, Editing Line Features, or Editing Area Features for more information.
©2026 Caliper Corporation