Maptitude Help / Creating and Editing Geographic Files / Editing Point Features
Editing Point Features
You can only edit point layers that are in standard editable format, such as those created when you locate records (using Create-a-Map Wizard or the Locate commands) or those that you create from scratch as described in Creating New Geographic Files. You cannot edit compact read-only format point layers such as those included in your Country Package (e.g., cities, landmarks).
Point features are normally drawn on the map using a symbol, color, and size that you choose. However, while you are editing point features, they are displayed as black squares for points that you are adding or editing and with a red X through them for points that you are deleting.
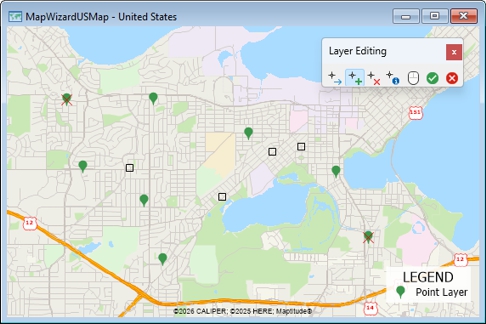
Points that you add or move to new locations are shown with as empty black squares. Points that you are deleting are marked with an X.
If you have set up a digitizer, you can switch to editing on the digitizer by clicking  in the Layer Editing toolbar. The button will change to
  to show that the digitizing tablet is now active. For more information on digitizers, see Using a Digitizer.
 To Display the Layer Editing Toolbar for Editing Point Features
- Choose an editable point layer from the drop-down list on the Standard toolbar or create a new point layer d in Creating New Geographic Files.
- If the Layer Editing toolbar is not visible, choose Tools>Editing>Layer Editing Toolbar to display it.
- When you are done editing features, choose Tools>Editing>Layer Editing Toolbar or click the Close button in the Layer Editing toolbar to close the toolbar.
To Add, Delete, or Move Points
- Use the tools in the Layer Editing toolbar as follows:
- Click
 to save your edits, or click
  to cancel.
If you saved your edits, Maptitude draws the map with the changes to the points.
 |
TIP: You may want to make an archive before you begin editing and occasionally while you are editing to have backups. See Archiving Geographic Files for more information. |
- Click
 in the Layer Editing toolbar to activate the Edit Point Attributes tool.
 - Select the point or points to display in an Edit Attributes window as follows:
| To do this... | Do this... |
|---|---|
| Select one point | Click on the point. Maptitude displays the point in the Edit Attributes window. |
| Select more points | Hold the Shift key and click on the points. Maptitude adds the points to the Edit Attributes window. |
| Deselect points | Hold the Ctrl key and click on the points. Maptitude removes the points from the Edit Attributes window. |
The last point selected has its ID field highlighted in the Edit Attributes window. To make sure you are about to edit the correct point, hold the Shift key and click on that point.
- Make changes as follows:
| To do this... | Do this... |
|---|---|
| Replace a value in a cell | Click on the cell and type a new value. |
| Edit a value in a cell | Double click on the cell and change the value. |
| Choose a field set | Right-click and choose Field Sets to display the Field Sets dialog box. Highlight an existing field set or create a new field set, and click OK. |
| Replace values in a range of cells | Click in one cell with the right mouse button, drag to another cell to highlight a range of cells, and choose Fill to display the Fill dialog box. Choose a fill method, enter the necessary values, and click OK. |
| Copy values to other selected records | Right-click on a column heading or a cell in a record and choose Copy Values to display the Confirm dialog box. Click OK to copy the values from the highlighted record to the other selected records. |
- To edit attributes for other points, return to Step 2.
- Click to save your edits, or click to cancel.
Maptitude updates the attributes for the points and displays the map with any changes.
Try It Yourself: Editing Point Features
1. Choose File>New Workspace, choose the New map of {country name} option, and click OK to start Create-a-Map Wizard and make a map of the state/county/province where you live.
2. Choose Tools>Editing>New Layer. Maptitude displays the New Layer dialog box.
3. Click the Point Layer radio button, type “My Points” as the layer name, and click OK.
4. Click OK again to close the Attributes dialog box without making changes. Maptitude adds the point layer to the map.
5. At the bottom of the Display Manager, click the style sample next to "My Points" and change it from a black circle to something that stands out a little more, like a larger blue square, and click OK.
6. Click  in the Layer Editing toolbar to activate the Add Point tool, then click several spots on the map.
7. Click to save the edits. Maptitude draws them in the style for the layer.
8. Click  to activate the Delete Point tool, then click on one of the points. Maptitude puts a red X through the point.
9. Click  to activate the Move Point tool, then drag one of the other points to a new spot.
10. Click to cancel the edits. Neither of the points is changed.
11. Choose File>Close Workspace and click Don't Save to close the workspace without saving any changes.
©2026 Caliper Corporation