Maptitude Help / Managing Geographic Files / Maintaining Geographic Files
Maintaining Geographic Files
A geographic layer is really a collection of several files stored on your computer, network, or other storage device. These geographic files contain all the information needed to display features on a map, and tabular data that describe each map feature.
The Tools>Editing>Layer Manager command displays the Geographic File dialog box, which shows you the names and total size of all the files on disk that make up a single geographic file or map layer. From the Geographic File dialog box, you can change the label for a geographic file, and copy, rename, and delete geographic files.
In this topic:
- Copying, Renaming, and Deleting Geographic Files
- Saving Settings for a Geographic File
- Reorganizing a Geographic File
- Archiving Geographic Files
Copying, Renaming, and Deleting Geographic Files
A compact format geographic file has up to seven files with the same name but different file extensions. Standard format files contain additional information so you can add, delete, or modify features in the file. A standard format geographic file may have a dozen or more files with the same name but different file extensions, so it is best not to use the Windows Explorer Copy or Rename commands with geographic files. Instead, use the Tools>Editing>Layer Manager command to copy or rename geographic files.
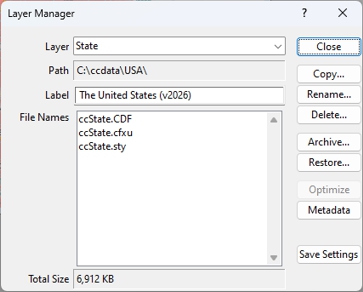
 To Change the Label for a Geographic File
- Open the geographic file whose label you wish to change, or a map that contains the file.
- Choose Tools>Editing>Layer Manager to display the Geographic File dialog box.
- Choose the layer whose label you wish to change from the Layer drop-down list.
- Edit the label in the Label edit box. If the edit box is disabled, you do not have write permission for the geographic file.
- Choose another layer from the Layer drop-down list, or click Close.
Maptitude changes the label.
- Open the geographic file you wish to copy, or a map that contains the file.
- Choose Tools>Editing>Layer Manager to display the Geographic File dialog box.
- Choose the layer to copy from the Layer drop-down list.
- Click Copy. Maptitude displays the Save Copy As dialog box.
- Type a file name for the copy of the geographic file and click Save.
Maptitude copies all of the files and creates a complete copy of the map layer in a new geographic file.
- Click Close to close the Geographic File dialog box.
To use the new file, use the File>Open command to create a new map, or choose Map>Layers, click the Add Layer button, and add the new geographic file to an existing map.
- Open the geographic file you wish to rename, or a map that contains the file.
- Choose Tools>Editing>Layer Manager to display the Geographic File dialog box.
- Choose the layer to rename from the Layer drop-down list.
- Click Rename. Maptitude displays the File Rename As dialog box.
 |
Be careful when you rename a geographic file. Any maps, dataviews, or layouts that refer to the file under its old name may no longer be usable. |
- Type a file name for the geographic file and click Save.
Maptitude renames all of the files in the geographic file with the name you typed. The file extensions for all of the files remain the same. All open maps, dataviews, and layouts are updated to use the geographic file under its new name.
- Click Close to close the Geographic File dialog box.
- Choose Tools>Editing>Layer Manager to display the Geographic File dialog box.
- Click Delete. Maptitude displays the Delete File dialog box.
|
Be careful when you delete a geographic file. Any maps, dataviews, or layouts that refer to the file will no longer be usable. |
- Choose the geographic file to delete and click Open. Maptitude asks you to confirm that you want to delete the geographic file.
- Click Yes to delete the geographic file or No to cancel. If you click Yes, Maptitude deletes all the files that are part of the geographic file.
- Click Close to close the Geographic File dialog box.
Saving Settings for a Geographic File
When a map layer is displayed in the map window, you have the option of permanently saving the settings associated with that layer in a style (.STY) file. The settings associated with a layer can include the display style for points, lines, nodes, or areas in a map layer, as well as styles for selection sets, themes, feature display settings, and labels. When you save the settings for a layer, it will display with those default settings every time the layer is opened or added to a map.
To Save Settings for a Geographic File
- Choose Tools>Editing>Layer Manager to display the Geographic File dialog box.
- Choose the layer whose settings you want to save from the Layer drop-down list. When the geographic file contains both lines and endpoints for the lines, you will see both layers listed.
- Click Save Settings to save styles with the layer. This will save any styles you set up for the layer, selection sets, themes, feature display settings, and labels. Maptitude asks you to confirm this option.
- Click Yes to save the settings or No to cancel. If you click Yes, Maptitude saves the map layer settings.
- Click Close to close the Geographic File dialog box.
The next time you add the layer to a map, it will automatically display with the saved settings.
Reorganizing a Geographic File
Maptitude stores information in geographic files so that it can be displayed quickly. When a large number of features are added to or deleted from a standard format geographic file, the information is stored less efficiently. The result is that maps will not draw as fast. To correct this, you optimize the geographic file. When you optimize the file, Maptitude rearranges the information to save space and increase the speed of drawing.
For even faster drawing, convert standard format geographic files to compact, read-only files. These files display up to ten times faster than standard format files. For more information, see Geographic File Formats.
- Open the geographic file you wish to optimize, or a map that contains the file.
- Choose Tools>Editing>Layer Manager to display the Geographic File dialog box.
- Choose the layer whose files you want to optimize from the Layer drop-down list.
- Click Optimize.
Maptitude reads and optimizes the geographic file.
- Click Close to close the Geographic File dialog box.
Archiving Geographic Files
Maptitude also includes tools you can use to create and use archives of geographic files. An archive is a compressed version of the file you can use for backup purposes.
It is a good idea to create archives of geographic files once in a while when you use the geographic editing tools. That way, you always have a backup copy available. Maptitude archives are in industry-standard ZIP format. This means you can restore archives of geographic files using other programs that read or write this format.
- Choose Tools>Editing>Layer Manager to display the Geographic File dialog box.
- Choose the geographic file to archive as follows:
| If... | Then... |
|---|---|
| No geographic files are open | Click Archive. Maptitude displays the Archive File dialog box. Choose the geographic file to archive and click Open to display the Save As dialog box. |
| A geographic file is open in a map or dataview | Choose the layer to archive from the Layer drop-down list and click Archive to display the Save As dialog box. |
- Type a file name for the archive file and click Save.
Maptitude creates an industry-standard ZIP format archive of the geographic file.
- Click Close to close the Geographic File dialog box.
 |
TIP: If you are editing a line layer, you can create an archive of that layer by clicking |
 in the Layer Editing toolbar, specifying a file name for the archive, and clicking Save.
To Restore a Geographic File from an Archive
- Choose Tools>Editing>Layer Manager to display the Geographic File dialog box.
- Click Restore. Maptitude displays the Archive File dialog box.
- Choose the archive file containing the archive of the layer you want to restore, and click Open. Maptitude displays the Browse for Folder dialog box.
- Choose where to restore the file and click OK.
Maptitude restores the archived file.
- Click Close to close the Geographic File dialog box.
©2026 Caliper Corporation