Maptitude Help / Geocoding / Locating Records by City
Locating Records by City
There are two commands for locating records by city. The Locate by City (or Locate by Suburb or Locate by Town) command uses geographic files in your installed data region to locate the records. The Locate by World City command uses the included World Gazetteer geographic file to locate records anywhere in the world.
To locate records using the Locate by City (or Locate by Suburb or Locate by Town) command, Maptitude needs to know which fields contain the city name and the state/province/district name or abbreviation. To locate records using the Locate by World City command, Maptitude needs to know which fields contain the city name, province/state/district name or code, and country name or code.
 To Locate Records by City
- Open a dataview of the records that you want to locate.
- Choose Tools>Locate>Locate by City (or Locate by Suburb or Locate by Town depending on the region) to display the Locate by City dialog box.
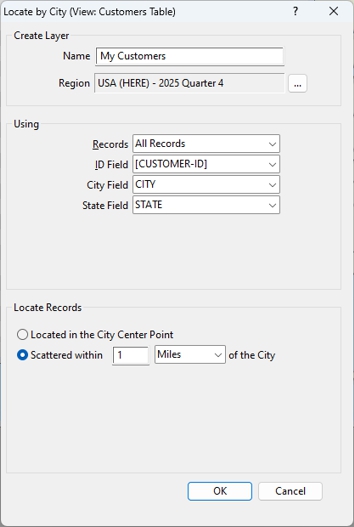
- If this is the first time that you are locating data, enter a name for the layer in the Name box.
- If your data are in a different region than the one shown, click
 to choose another installed region.
 - Choose whether to locate all records or a selection set from the Records drop-down list.
- Choose the field that contains unique IDs or choose to create new ID fields from the ID Field drop-down list.
- Choose the field(s) with city information from the City Field and State Field drop-down lists.
- Choose how to locate the records as follows:
| To locate records that are in the same city... | Do this... |
|---|---|
| At the same location on top of one another | Choose Located in the City Center point from the radio list |
| Scattered within some distance of the city center | Choose Scattered within from the radio list, enter a distance in the box, and choose the units from the drop-down list |
- Click OK. Maptitude does the following:
- Creates a new geographic file with one point for each record, or adds a point for each record to the existing geographic file.
- Displays a message telling you the number of records that were processed and the number that were successfully located.
- Adds the new point layer to an existing map (if there is one) or creates a new map containing the point layer.
- Draws the map at a scale that shows the locations of all the points.
- Creates a new selection set called “City Not Found” for records that were not found and shows the selection set in the dataview.
To Locate Records by World City
- Open a dataview of the records that you want to locate.
- Choose Tools>Locate>Locate by World City to display the Locate by World City dialog box.
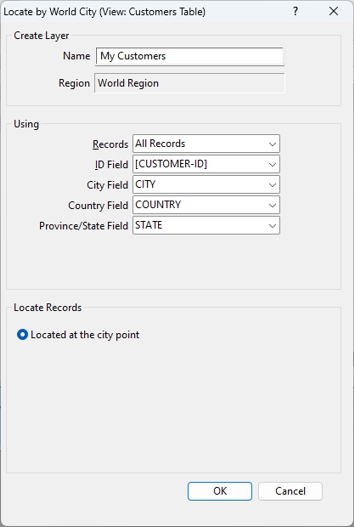
- If this is the first time that you are locating data, enter a name for the layer in the Name box.
- Choose whether to locate all records or a selection set from the Records drop-down list.
- Choose the field that contains unique IDs or choose to create new ID fields from the ID Field drop-down list.
- Choose the field that contains the city name from the City Field drop-down list.
- Choose the field that contains the country name or code from the Country Field drop-down list.
- Choose the field that contains the province/state/district from the Province/State Field drop-down list. You can also choose None if you want to locate internationally without province information, but you will get better results for some countries if you do specify a province. For example, this will help Maptitude determine whether to locate a record in Perth, Western Australia versus Perth, Tasmania or a record in Portland, Maine versus Portland, Oregon.
- Click OK. Maptitude does the following:
- Creates a new geographic file with one point for each record, or adds a point for each record to the existing geographic file.
- Displays a message telling you the number of records that were processed and the number that were successfully located.
- Adds the new point layer to an existing map (if there is one) or creates a new map containing the point layer.
- Draws the map at a scale that shows the locations of all the points.
- Creates a new selection set called “City Not Found” for records that were not found and shows the selection set in the dataview.
©2026 Caliper Corporation