Maptitude Help / Geocoding / Locating Records by Pointing
Locating Records by Pointing
The Tools>Locate>Locate by Pointing command provides another way to locate records in your data. You can indicate the location for records that have not been located, or move records to a different location, by pointing to the correct location on a map. After you choose a record to locate from the toolbar, you click on the map at the place where the record belongs and Maptitude updates the geographic file.
 |
For a video tutorial see: (Internet connection required) • Creating a Pin Map: Locating your data on a map using Locate by Address, Locate by ZIP Code, or manually by pointing |
 To Locate Records by Pointing
- Open the map you will use to point to the record locations.
- Open the dataview of records to locate, or choose the layer with the records to locate from the drop-down list on the Standard toolbar.
- Choose Tools>Locate>Locate by Pointing to display the Locate by Pointing Setup dialog box.
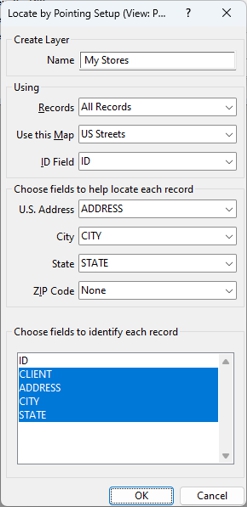
- If this is the first time that you are locating data, enter a name for the layer in the Name box.
- Choose whether to locate all records or a selection set from the Records drop-down list.
- Choose the field that contains unique IDs or choose to create new ID fields from the ID Field drop-down list.
- Choose any fields to help find recors from the Address, City, State, and ZIP Code drop-down lists.
- Choose one or more fields to identify each record in the Locating toolbar from the scroll list.
- Click OK. Maptitude displays the Locating toolbar. If this is the first time you are locating data, Maptitude adds the geographic file as a new map layer.
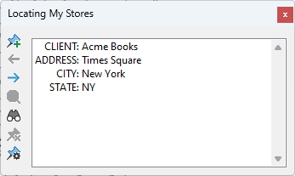
- Update your geographic file as follows:
| Button | Name | How to Use It |
|---|---|---|
 |
Locate | Click on this tool, then click on the map where the record belongs. Maptitude displays the record at the new location. |
 |
Previous | Click to move to the previous record. |
 |
Next | Click to move to the next record. |
 |
Zoom | Click to zoom to the location of the current record. |
 |
Find | Launches the Find dialog box. If you chose fields to help locate each record address information for the record will already be filled in. Click OK to have Maptitude attempt to find the location where you can then relocate the record with the Locate tool. |
 |
Delete Location | Click to delete the location. |
 |
Return to Setup | Opens the Locate by Pointing Setup dialog box. |
- When you are done, click the Close box in the upper right corner of the toolbar.
Try It Yourself: Locating Data by Pointing
1. Choose File>Open Workspace or click  on the Standard toolbar, then open the PointLocate workspace in the tutorial folder. You want to locate the clients in the dataview by pointing to the appropriate locations on the map.
2. If the dataview is not the active window, click on it or choose Window>Dataview 1-Point Locate to make it the active window.
3. Choose Tools>Locate>Locate by Pointing to display the Locate by Pointing Setup dialog box.
4. Type “My Clients” in the Name box. Choose the fields Client, Address, City, and State from the scroll list.
5. Click OK. Maptitude displays the Locating toolbar; the first record is displayed.
6. Click in the Locating toolbar and click on the map at the location of the record displayed in the toolbar. Maptitude places a symbol at that location.
7. Click . Maptitude displays the next record in the toolbar.
8. Continue to locate the records shown in the toolbar. After you locate the final record, click the Close button in the upper right corner of the toolbar to close it.
9. Choose File>Close Workspace and click Don't Save to close the workspace without saving any changes.
©2026 Caliper Corporation