Maptitude Help / Geocoding / Locating Records by Postal Code
Locating Records by Postal Code
The Tools>Locate>Locate by ZIP Code (or Locate by Postal Code) command locates the records in your data using the postal code of each record. Maptitude locates the records by using the postal code area and/or centroid files included with your region.
To locate records by postal code, Maptitude needs to know which column in the dataview contains the postal code value. Usually, Maptitude can figure this out automatically. If the column has a name that Maptitude does not recognize, you will need to choose the correct column from a drop-down list. If the column contains more than just the postal code (for example, street address and postal code, or city, state, and postal code), Maptitude will pick out the postal code automatically and ignore the rest of the information.
When you locate records by postal code, you can choose to place each record at or around the matching post office or point location, or to locate each record scattered within the corresponding postal area. If your database has records that share a common postal code, spreading them out lets you see each individual point on the map.
 |
For a video tutorial see: (Internet connection required) • Creating a Pin Map: Locating your data on a map using Locate by Address, Locate by ZIP Code, or manually by pointing |
 To Locate Records by ZIP Code or Postal Code
- Open a dataview of the records that you want to locate.
- Choose Tools>Locate>Locate by ZIP Code (or Tools>Locate>Locate by Postal Code for non-U.S. regions) to display the Locate by ZIP Code (or Locate by Postal Code) dialog box.
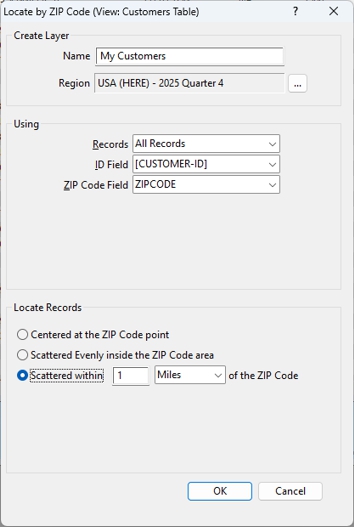
- If this is the first time that you are locating data, enter a name for the layer in the Name box.
- If your data are in a different region than the one shown, click
 to choose another installed region.
 - Choose whether to locate all records or a selection set from the Records drop-down list.
- Choose the field that contains unique IDs or choose to create new ID fields from the ID Field drop-down list.
- Choose the field with postal code information from the ZIP Code Field drop-down list.
- Choose how to locate the records within the ZIP Code as follows:
| To locate records that are in the same ZIP Code... | Do this... |
|---|---|
| At the same location on top of one another | Choose Centered at the ZIP Code point from the radio list |
| Scattered within the entire postal code area | Choose Scattered evenly inside the ZIP Code area from the radio list |
| Scattered within some distance of the postal code centroid | Choose Scattered within from the radio list, enter a distance in the box, and choose the units from the drop-down list |
- Click OK. Maptitude does the following:
- Sorts your data by postal code, reads through your data, and locates each feature based on its postal code.
- Creates a new geographic file with one point for each record, or adds a point for each record to the existing geographic file.
- Displays a message telling you the number of records that were processed and the number that were successfully located.
- Adds the new point layer to an existing map or creates a new map containing the point layer.
- Draws the map at a scale that shows the locations of all the points.
- Creates a new selection with any postal codes that were not found and shows the selection set in the dataview. You can use this selection set when you use another Locate command to locate the remaining records.
Try It Yourself: Locating Data That Have a ZIP Code
1. Choose File>Open or click  on the Standard toolbar, choose Excel Worksheet as the file type, and open the sample customer file for your region in the Tutorial folder. NOTE: This tutorial may have slight variations with some Country Packages and may not work with all Country Packages.
2. Uncheck the Import box and click OK. Maptitude displays a dataview of the customer data from the Excel file.
3. Choose Tools>Locate>Locate By ZIP Code (Postal Code) to display the Locate by ZIP Code/Postal Code dialog box.
4. Choose the Scattered within 1 Mile/Kilometer of the Postal Code Point option from the radio list.
5. Click OK. Maptitude locates the records around their respective postal locations and displays the match statistics.
6. Click OK to continue.
7. Choose File>Close Workspace and click Don't Save to close the workspace without saving any changes.
©2026 Caliper Corporation