Maptitude Help / Geocoding / Locating Records by Value
Locating Records by Value
The Tools>Locate>Locate by Value command lets you match records in your database to features in any map layer, based on the values in one or more fields. For each record in your database, Maptitude tries to find a map feature with matching values. If a matching feature is found, Maptitude locates the record based on that feature’s location. For example, if you have a table of employees that contains a field with the store ID in which they work, you could locate it to the store layer; or you could locate members of congress or parliament to a district layer based on the district name or ID.
The Locate by Value command has two methods for comparing the values in fields in your data with the values in fields in the map layer:
- Exact matching means that the values of the fields in your data must be exactly the same as the values of fields in the map layer. For example, “Newton” and “NEWTON” would not match using exact matching. The first pair of fields must match exactly. You can use a formula field with the Upper(), Lower(), or Proper() functions to get one field to have the same capitalization as the other. For more information, see Formulas, Conditions, and Functions.
- Fuzzy matching will match the values of the fields in your database to the values of fields in the map layer even if the values are slightly different. For example, “Newton Centre” and “Newton Center” would match using fuzzy matching. The second and third pairs of fields can be matched this way.
 To Locate Records by Value
- Open a map with the layer that you will use to locate the records.
- Open a dataview of the records that you want to locate.
- Choose Tools>Locate>Locate by Value to display the Locate by Value dialog box.
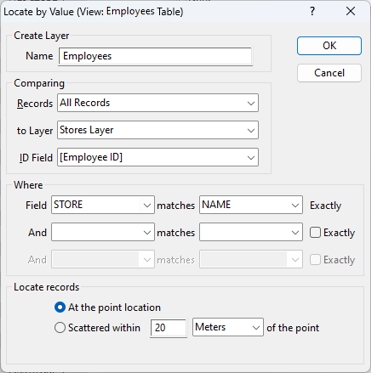
- If this is the first time that you are locating data, enter a name for the layer in the Name box.
- Choose whether to locate all records or a selection set from the Records drop-down list.
- Choose the map layer to use to locate the records from the to Layer drop-down list.
- Choose the field that contains unique IDs or choose to create new ID fields from the ID Field drop-down list.
- Choose up to three pairs of fields to match from the drop-down lists. The first pair must match exactly. Check the Exactly box for the second and third pairs for exact matching or uncheck for fuzzy matching.
- Choose how to locate the records as described in table below:
| Layer Type | Option | What it does... |
|---|---|---|
| Point | At the point | Places all records on top of one another at the location of the point. |
| Point | Scattered within... | Scatters the records within a specified distance of the map feature. |
| Line | At the middle... | Places all records on top of one another at the midpoint of the line. |
| Line | Scattered... | Scatters the records along the length of the line. |
| Area | At the center... | Places all records on top of one another at the center of the area. |
| Area | Scattered inside... | Scatters the records around the interior of the area. |
| Area | Scattered near... | Scatters the records around the center of the area. |
- Click OK. Maptitude does the following:
- Sorts your data by one or more fields and then reads through your data, locating each feature based on the values of the chosen fields.
- Creates a new geographic file with one point for each record, or adds a point for each record to the existing geographic file.
- Displays a message telling you the number of records that were processed and successfully located.
- Adds the new point layer to an existing map or creates a new map containing the point layer.
- Draws the map at a scale that shows the locations of all the points.
- Creates a new selection set called “Not Found” and shows the selection set in the dataview. You can use this selection set when you use another Locate command to locate the remaining records.
Try It Yourself: Locating Data With a Feature Name
1. Choose File>Open Workspace or click  on the Standard toolbar, then open the Customer workspace in the tutorial folder. You will be locating a list of customers, using city and state names.
2. Choose Tools>Locate>Locate By Value to display the Locate by Value dialog box.
3. Choose Place from the To Layer drop-down list.
4. Choose [Customer ID] from the ID Field drop-down list.
5. Choose City and City from the first pair of Matching drop-down lists and choose State and State from the second pair of drop-down lists.
6. Choose the Scattered Within radio button, type “2” in the text box, and choose Miles as the units.
7. Click OK. Maptitude locates the points by value and displays the match statistics.
8. Click OK to continue.
9. Click  on the Standard toolbar, then click any of the symbols to see information about the customers.
10. Choose File>Close Workspace and click Don't Save to close the workspace without saving any changes.
©2026 Caliper Corporation