Maptitude Help / Geographic Analysis Tools / Measuring Distance and Size
Measuring Distance, Size, and Angle
You can look at a map and tell very quickly which features are close to each other and which ones are far away. You can also tell which features are large and which are small. Sometimes, however, you want more exact measurements of the distance between points on a map or of the size of a certain region. For example, you might want to measure the distance between two stores or estimate the size of a park, shopping center, or granite quarry.
Maptitude knows the length of any line feature and the size of any area feature in a map layer. You can see those values using the Info tool or a dataview.
Maptitude also has specialized tools for measuring distance, area, and angles:
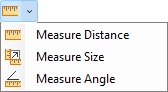
- Use the Measure Distance tool to draw a line on the screen and report the total length of that line.
- Use the Measure Size tool to draw an area on the screen and report the total size of the area and the length of its perimeter.
- Use the Measure Angle tool to draw an angle on the screen and report the angle at the vertex in degrees from -180 to 180.
These tools are accessible from the measurement tools drop-down on the Standard toolbar:
Maptitude can also tell you the distance between points using roads, highways, railroads, or other line features. See Routing, Directions, and GPS, for more information.
 |
NOTE: Maptitude normally reports distances in miles or kilometers and size in square miles or square kilometers depending on what country package you are using. You can change the map units by choosing Edit-Preferences and choosing a unit of measure from the Map Units drop-down list on the System tab. |
 |
For a video tutorial see: (Internet connection required) • Measuring Distance, Area, and Feature Proximity: Using the measuring tools to find distance or area, and determining the proximity of map features |
 To Measure the Distance Between Points
- Click
 Measure Distance in the measurement tools drop-down on the Standard toolbar to activate the Distance tool.
 - Click on the map at the starting point. Maptitude starts a line at the point you marked. Maptitude displays the elapsed length of the line in the status bar at the bottom of the screen.
- If the line is not straight, click on one or more shape points. Maptitude continues the line through each one.
- Double-click on the last point to end the line. Maptitude displays the total length of the line in the Measured Distance dialog box. You can choose different units from the drop-down list to see the values for those units and you can click Copy to copy the reported distance to the clipboard.
- Click OK to close the dialog box.
To Measure the Size of an Area
- Click
 Measure Size in the measurement tools drop-down on the Standard toolbar to activate the Size tool.
 - Click on the map at the starting point of the area. Maptitude starts a line at the point you marked.
- Click on the corners of the area. Maptitude continues the line through each one.
- Double-click to end the area. Maptitude connects the first and last point automatically. Maptitude displays the size and perimeter of the area in the Area and Perimeter dialog box. You can choose different units from the drop-down lists to see the values for those units and you can click Copy to copy the reported area or perimeter to the clipboard.
- Click OK to close the dialog box.
- Click
 Measure Angle in the measurement tools drop-down on the Standard toolbar to activate the Measure Angle tool.
 - Click on the map at a location on one arm of the angle, then click on the vertex of the angle, then click a third time on the other arm of the angle. Maptitude displays the angle in the Measured Angle dialog box. Maptitude determines the angle between the two arms in degrees between -180 and 180. If when going clockwise from the first arm to the second one, the angle is less than 180 degrees, then that number is reported. Otherwise the counterclockwise angle is reported as a negative number. You can click Copy to copy the reported distance to the clipboard.
- Click OK to close the dialog box.
©2026 Caliper Corporation