Maptitude Help / Creating Maps / Organizing Maps in a Map Library
Organizing Maps in a Map Library
You can modify the map libraries included with Maptitude.
 |
NOTE: To add your own maps to a map library, you must export the individual maps in your workspace to .MAP files by choosing File>Export>Image, entering a file name with a .MAP extension (e.g., "Corporate Sales by ZIP Code.map") in the File Name box, and clicking Save. |
- Choose Map>Demographic Map Librarian to open the Map Librarian dialog box.
- Click Libraries to display the Map Libraries dialog box.
- Make changes to the map libraries as follows:
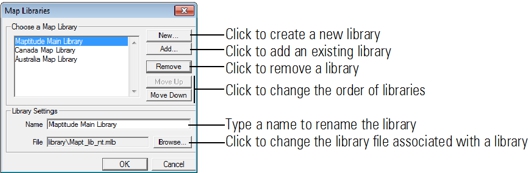
- Click OK to close the Map Libraries dialog box. Maptitude displays the Confirm dialog box.
- Click Yes to save the changes, or No to cancel the changes. Maptitude returns to the Map Librarian dialog box.
- Click Close.
Maptitude closes the Map Librarian dialog box.
 To Change the Contents of a Map Library
- Choose Map>Demographic Map Librarian to open the Map Librarian dialog box.
- Choose the map library that you want to change from the Choose a Map Library drop-down list.
- Click Contents to display the Configure Map Library dialog box.
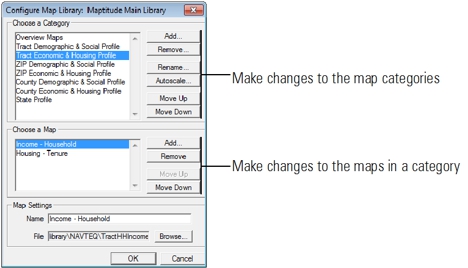
- Make changes to the map categories as follows, using the buttons next to the Choose a Category scroll list:
| To do this... | Do this... |
|---|---|
| Add a map category | Click Add to display the Add a New Category dialog box. Type the name of the new category in the Description text box, and click OK. Maptitude adds the new category at the end of the list, and highlights the new category. |
| Rename a map category | Choose a map category, and click Rename to display the Rename Map Category dialog box. Type a new name, and click OK. |
| Autoscale a map category | Choose a map category, and click Autoscale to display the Autoscale for Category dialog box. Choose the largest and smallest scale that you recommend for this category, and click OK. |
| Clear autoscaling for a map category | Choose a map category, and click Autoscale to display the Autoscale for Category dialog box. ClickClear, then click OK. |
| Change the order of categories in the list | Choose a map category and click Move Up or Move Down. |
| Remove a map category | Choose a map category, click Remove, and click Yes to confirm its removal. |
- Make changes to the maps in a category. First choose the category, then use the buttons next to the Choose a Map scroll list:
| To do this... | Do this... |
|---|---|
| Add a map | Click Add to display the Choose the Map to Add dialog box. Choose a map file, and click OK. Maptitude adds the map (named using the file name) at the end of the list, and highlights the new map. |
| Change the name of a map | Choose a map, and edit the map name in the Name text box. |
| Change the file for a map | Choose a map, and click Browse to display the Select a Map File dialog box. Choose a map file and click Open. |
| Change the order of maps in the list | Choose a map and click Move Up or Move Down. |
| Remove a map | Choose a map, click Remove, and click Yes to confirm its removal. |
- Click OK to close the Configure Map Library dialog box. Maptitude displays the Confirm dialog box.
- Click Yes to save the changes, or No to cancel the changes. Maptitude returns to the Map Librarian dialog box.
- Click Close.
Maptitude closes the Map Librarian dialog box.
©2026 Caliper Corporation