Maptitude Help / Creating and Using Layouts / Printing Layouts
Printing Layouts
You can print an entire layout or any subset of the pages in a layout. Maptitude automatically selects the correct printer, paper size, and orientation based on the layout settings.
 To Print a Layout
- Choose File>Print or click
 on the Standard toolbar to display the Print Layout dialog box.
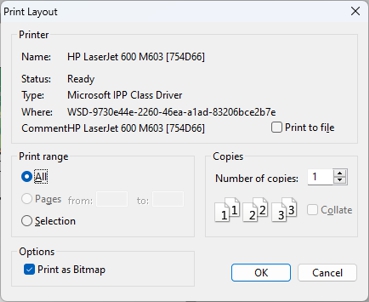
- Choose the number of copies to print.
- If the layout contains multiple pages, choose whether to print all pages or a range of pages.
- Check the Print as Bitmap to print a high resolution bitmap to best handle effects such as opacity, halos, and shadows. Remove the check to print directly to the printer. For best results when printing directly to a printer, your map should not use any of the transparency effects.
- Click OK.
Maptitude prints your layout. You can interrupt printing of the layout at any time by clicking the Cancel button.
To Print a Layout to a PDF File
- Choose File>Export>PDF. Maptitude displays the Save PDF File As dialog box.
- Enter a file name and click Save.
Try It Yourself: Creating a Layout, Part 2
1. If you have not already done Part 1 of this tutorial, go back now and do it.
2. Choose File>Open Workspace or click  on the Standard toolbar, then open the My New Layout workspace that you saved in Part 1.
3. Click  on the Standard toolbar to activate the Pointer tool.
4. Right-click on the map and choose Properties from the menu to display the Map in Layout dialog box.
5. Check the Shadow box and click OK. Maptitude adds a drop shadow to the map.
6. Right-click on the dataview and choose Properties from the menu to display the Dataview in Layout dialog box.
7. Change the font size to 11, remove the check from the Bold box, and click OK. Maptitude updates the font settings to the dataview. The dataview is still selected.
8. Click  Center Left to Right on Layout in the Alignment Tools drop-down on the Standard toolbar. Maptitude centers the dataview on the page.
9. Choose File>Print or click on the Standard toolbar and click OK. Maptitude prints the layout.
10. Choose File>Close Workspace and click Don't Save to close the layout without saving any changes.
©2026 Caliper Corporation