Maptitude Help / Filters, Queries, and Selection Sets / Selecting Features Based on Attributes
Selecting Features Based on Attributes
A question about attributes is used to find records that meet a certain condition. For example: Which ZIP Codes have a household income of over $100,000 per year or which customers spend more than $5,000 per year?
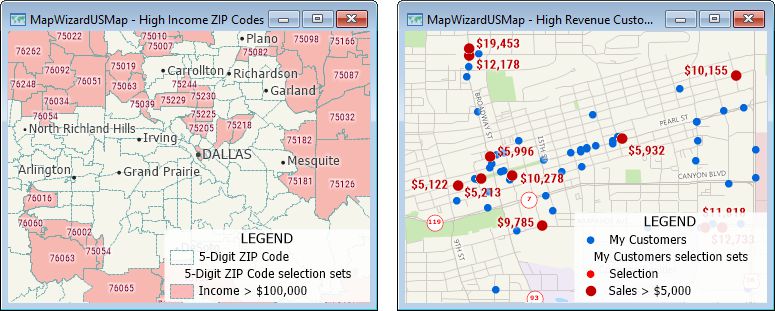
You use the Selection>Select by Condition command to select records and map features whose values meet a condition. You can choose this command from either a map or a dataview. Conditions can contain field names, arithmetic operators like +, -, *, and /, relational operators like <, >, <=, >=, and <>, and many different types of numeric and string functions. For more details on the exact syntax of conditions, see Formulas, Conditions, and Functions. Here are some samples of conditions:
| To answer this question... | Use this condition... |
|---|---|
| Which ZIPs have a high average income? | Income > 75000 |
| Which customer names start with Z? | Last_Name like "Z*" |
| Which sales territories increased their revenue by over 10%? | Revenue2027 > 1.10 * Revenue2026 |
Maptitude keeps a list of all of the conditions you use while Maptitude is running. If you want to make a slight change in a condition, or if some of your data have changed and you want to repeat a selection based on a condition, you can choose the previous condition from a drop-down list. For example, if you selected sales districts using the condition Revenue2027 > 1.1 * Revenue2026, you could change this condition to Revenue2027 > 1.25 * Revenue2016, by choosing the previous condition and editing it, without having to enter the whole condition.
You can also save the list of previously used conditions to a text file with one condition on each line. You can display, edit, or print the contents of one of these files using any text editor or word processor. You can then load the conditions every time that you use Maptitude. This can save you a lot of time and reduce the likelihood of making errors when you enter a condition.
If you are working in a map window, you can restrict a query to find only those records that are among the features that are visible on your map. For example, if you zoom a map to New York City and you want to select all the street segments that make up “BROADWAY” in Manhattan, you could select from just the streets visible on the screen. This will be much faster than selecting every street segment called “BROADWAY” from over 30,000,000 street segments in the entire U.S.
Other Commands to Select Using Attributes
The Selection>Select by List command lets you select records and features based on the list of values in a field. For example, a “Sales Rep” field could have the name of the representative for each customer. You can easily create a selection set for each representative by using the Selection>Select by List command. Each selection set will be named based on the Representative used to create it and assigned a unique color.
The Selection>Select by Related Values command lets you select features in a working layer based on a value in a field for another layer, the reference layer. Selecting features in one layer based on the attributes of features in another layer has many uses. If you want to find:
- The workers whose workplace is in one of several ZIP Codes, select those ZIP Codes and then select the workers based on the ZIP Code of their workplace.
- The counties in a state, select the state and then select the counties with that state’s name or code.
You can also select records in a dataview based on values in another dataview, or select based on any layer and dataview combination.
 |
For a video tutorial see: (Internet connection required) • Working with Maptitude Selection Sets: Using the selection tools, selecting by location, selecting by attribute, combining selection sets, and computing statistics |
 To Select Based on a Condition
- Choose the layer whose features you want to select from the drop-down list on the Standard toolbar, or choose the dataview from which you want to select records.
- Choose Selection>Select by Condition or click
 in the Selection Tools drop-down on the Standard toolbar to display the Select by Condition dialog box.
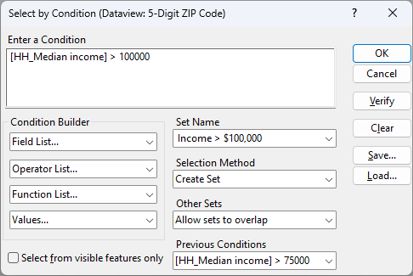
- Enter a condition. You can also use the Condition Builder to create a condition by picking the fields, operators, functions, and values you want, or choose a previous condition from the Previous Conditions drop-down list. If you use the Condition Builder or a previous condition, you can also use the keyboard to edit the condition.
 |
TIP: You can filter the field list in the Condition Builder by clicking on the drop-down list and typing several letters. Only fields containing the text you enter will display in the drop-down list. |
- Click Verify to check the syntax of your condition.
- Choose an existing selection set from, or type the name of a new selection set in, the Set Name editable drop-down list.
- Choose how to store the results from the Selection Method drop-down list as follows:
| Method | What it does... |
|---|---|
| Create a set | Creates a new selection set with the name you type |
| Add to set | Adds records to an existing selection set |
| Remove from set | Removes records from an existing selection set |
| Subset | Selects only from those records that are already in an existing selection set |
- Choose whether to prevent or allow features to be in more than one set when selecting features as follows:
| To do this... | Do this... |
|---|---|
| Prevent selection sets from overlapping by excluding features already in other sets from being selected | Choose Skip records in other sets from the radio list |
| Prevent selection sets from overlapping by removing features from other sets to which they belong and adding them to new selection sets | Choose Remove records from other sets from the radio list |
| Allow features to be in more than one set | Choose Allow sets to overlap from the radio list |
| Allow sets to overlap | Features that meet the condition will be added to the new selection set regardless of whether they are in additional sets |
| Skip records in other sets | Features that meet the condition will only be added to the new selection set if they are not already in another set |
| Remove records from other sets | Features that meet the condition will be added to the new selection set and removed from any other sets |
- To limit the search to the area visible on the map, check the Select from visible features only box or leave it unchecked to select from all features in the layer.
- Click OK.
Maptitude selects records according to your settings, and highlights the result.
Try It Yourself: Selecting Records Based on a Condition
1. Choose File>Open Workspace or click  on the Standard toolbar, then open the Lower48 workspace in the Tutorial folder.
2. Choose Selection>Select by Condition or click in the Selection Tools drop-down on the Standard toolbar to display the Select by Condition dialog box.
3. Type “Population > 5000000” in the Enter a Condition box.
4. Type “Over 5 Million” in the Set Name editable drop-down list.
5. Click OK. Maptitude highlights the selected states, both on the map and in the dataview.
6. Choose Selection>Select by Condition or click to again display the Select by Condition dialog box.
7. Type “Population > 1000000” in the Enter a Condition box, type “Over 1 Million” in the Set Name editable drop-down list, and choose Skip records in other sets from the Other Sets drop-down list.
8. Click OK. Maptitude highlights the selected states with populations over 1 million (but excludes the features in the Over 5 Million set), both on the map and in the dataview.
9. Choose File>Close Workspace and click Don't Save to close the workspace without saving any changes.
- Choose Selection>Select by Condition or click in the Selection Tools drop-down on the Standard toolbar to display the Select by Condition dialog box.
- Click Save to display the Save As dialog box.
- Type a file name and click Save.
Maptitude saves all of the previous conditions to the text (.txt) file.
To Load Conditions from a File
- Choose Selection>Select by Condition or click in the Selection Tools drop-down on the Standard toolbar to display the Select by Condition dialog box.
- Click Load to display the File Open dialog box.
- Choose the file containing the conditions and click Open.
Maptitude reads the conditions from the file and updates the Previous Conditions drop-down list.
- Choose the layer whose features you want to select from the drop-down list on the Standard toolbar, or choose the dataview from which you want to select records.
- Choose Selection>Select by List to display the Select by List dialog box.
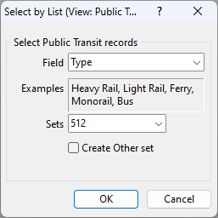
- Choose the field to use as the basis of the selection sets from the Field drop-down list.
- Check the Create Other set box to place all features that have missing values or exceed the number of sets in a selection set called "Other" or leave unchecked to leave these features unselected.
- Click OK.
Maptitude creates the selection sets for the list of values. Depending on the choice you made, if there are more values than the number of sets, Maptitude either ignores the rest or groups them in a selection set called “Other.”
Try It Yourself: Selecting Records Based on a List
1. Choose File>Open Workspace or click on the Standard toolbar, then open the ParcelZoning workspace in the Tutorial folder.
2. Choose Selection>Select by List to display the Select by List dialog box.
3. Choose Zoning from the Field drop-down list.
4. Click OK. Maptitude creates selection sets for each zoning value.
5. Choose File>Close Workspace and click Don't Save to close the workspace without saving any changes.
- Choose the layer whose features you want to select (the working layer) from the drop-down list on the Standard toolbar, or choose the dataview from which you want to select records.
- Choose Selection>Select by Related Values to display the Select by Related Values dialog box.
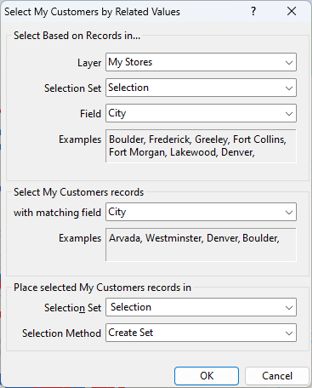
- Choose the reference layer (the layer or dataview on which to base the selection) from the Layer drop-down list and choose whether to use all features or a selection set from the first Selection Set drop-down list.
- Choose the field that has the values on which to base the selection from the Field drop-down list.
- Choose the field that contains the values to be selected from the with matching field drop-down list.
- Choose an existing selection set from, or type the name of a new selection set in, the Selection Set editable drop-down list.
- Choose how to store the results from the Selection Method drop-down list as follows:
| Method | What it does... |
|---|---|
| Create a set | Creates a new selection set with the name you type |
| Add to set | Adds records to an existing selection set |
| Remove from set | Removes records from an existing selection set |
| Subset | Selects only from those records that are already in an existing selection set |
- Click OK.
Maptitude selects records based on the values found in the reference layer, and highlights the selection set.
©2026 Caliper Corporation