Maptitude Help / Filters, Queries, and Selection Sets / Showing Selection Sets in a Dataview
Showing Selection Sets in a Dataview
There are two ways to illustrate the answer to a question in a dataview:
- Mark all the records in a selection set with a symbol; the symbols match the ones that are used to show the selected features on the map
- Change the dataview so it shows only the records in a selection set
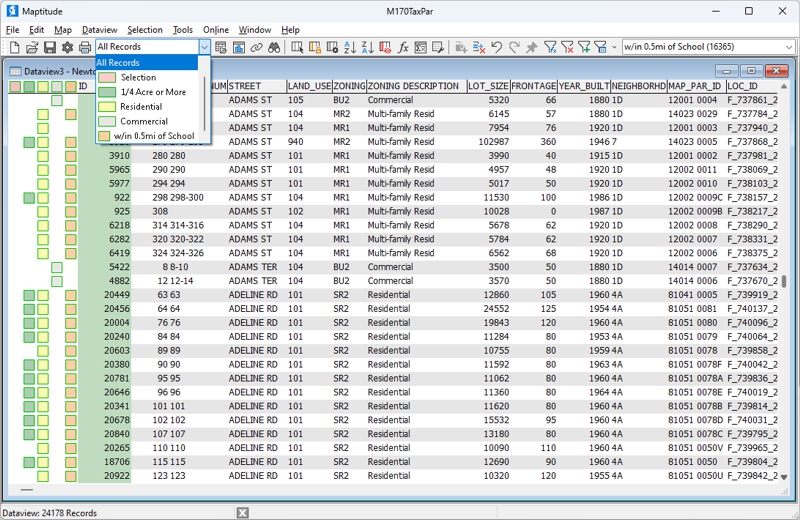
There is one column for each selection set on the left side of the dataview. Records in a selection set are marked with the style of the selection set in the respective columns. The "Records to Display" drop-down list shows all of the sets and their styles and is used to change which records are visible in the dataview.
 |
For a video tutorial see: (Internet connection required) • Working with Maptitude Selection Sets: Using the selection tools, selecting by location, selecting by attribute, combining selection sets, and computing statistics |
 To Mark Selected Records in a Dataview
- Right-click on the dataview window and choose Properties. Maptitude displays the Dataview Properties dialog box.
- Check the Mark selection sets box.
- Click OK.
Maptitude displays the dataview and marks selected records in the selection columns. You can remove the check from the Mark Selection Sets box to hide the selection set columns.
 |
TIP: You can also get to the Dataview Properties dialog box by clicking |
 on the Standard toolbar and then clicking
  in the Properties column of the dataview you want to modify.
To Choose Which Records to Show in the Dataview
- Choose the selection set whose records you want to display from the Records to Display drop-down list on the Standard toolbar, or choose “All Records” to show all records in the dataview.
To Select Records in a Dataview
- Click in a selection set column on the left of the dataview and next to the record you want to select.
Maptitude marks the record with the symbol of the selection set and adds it to the selection set. Any dataview or map containing those records is updated automatically to show the selected records.
To Select a Range of Records in a Dataview
- Click and drag to highlight several records in the dataview.
- Choose the selection set that you want to add the records to from the Current Selection drop-down list on the Standard toolbar.
- Choose Selection>Select by Highlight.
Maptitude marks the records in the dataview and adds them to the chosen selection set.
To Remove Records from a Selection Set
- Click on the mark in a selection set column on the left of the dataview and next to the record you want to remove from the selection set.
Maptitude removes the mark and removes the record from the selection set. The record is not deleted, just removed from the selection set.
Try It Yourself: Showing Selection Sets in a Dataview
1. Choose File>Open Workspace or click  on the Standard toolbar, then open the Density workspace in the Tutorial folder. The counties with high and low population densities are already in selection sets.
2. Right-click on the County layer in the Display Manager and choose New Dataview.
3. Choose the Low Pop Density selection set from the Records to Display drop-down list on the Standard toolbar. Now Maptitude shows only the low population density counties.
4. Choose the High Pop Density selection set from the Records to Display drop-down list on the Standard toolbar. Only the high population density counties are displayed.
5. Click on the red symbol to the left of ESSEX MA to remove Essex County from the High Pop Density selection set.
6. Choose All Records from the Records to Display drop-down list on the Standard toolbar. Maptitude displays all of the counties again.
7. Click on a cell in the [County Name] column and click  to sort the counties by name.
8. Move the cursor over the red symbol at the top of the center selection set column to see a popup bubble with the selection set name, High Pop Density.
9. Click in the High Pop Density selection set column next to Essex MA to add it back to the High Pop Density selection set. The red symbol is again displayed.
10. Choose File>Close Workspace and click Don't Save to close the workspace without saving any changes.
©2026 Caliper Corporation