Maptitude Help / Using Your Data: Advanced Topics / Using a Location Index
Using a Location Index
The regional street data that come with Maptitude are indexed and ready to use for finding address locations on a map. If, however, you have your own custom layer on which you want to find locations, you can create a Location index to use with it.
A Location index organizes addresses so that they can be located quickly. A Location index finds an address by using first the name and then the number of the address, with a qualifier such as a postal code or city and state/province name as an optional way to distinguish between similar names. You can then specify the index to use when you choose the Tools>Locate>Locate by Address command.
Depending on the nature of the addresses being indexed, you will need to supply more or less information to find a particular address with a Location index. Some indexes may only require a name, while others will need a number and a qualifier. Indexes can be built for your own geographic files with addresses anywhere in the world, and Maptitude can recognize different ways of structuring addresses, such as whether the number comes before or after the name.
Creating Location Indexes
Location indexes offer a way to index addresses for any place in the world. You can create Location indexes from all or selected features in point, line, and area geographic files. The index can be for up to two million features. Some uses of Location indexes are:
- Speeding location by address in metropolitan areas
- Handling places with non-numeric postal codes
- Using district names (e.g. neighborhoods or cities) as part of the address
You can index just address names, with no number, to locate bridges, public buildings, parks, etc. Alternatively, a location index can have addresses with a single number (such as for use with a point layer of office buildings that are identified by their street address), or it can have one or two address ranges.
Location indexes need to include a district field to differentiate non-unique addresses. For example, if your index covers an area that includes “100 Main Street” in several different cities or postal codes, the district field helps Maptitude determine which location to choose. The districts can be numeric (e.g. ZIP Code) or character (e.g. city name) fields. When there are two address ranges on a street segment, you will need a district field for both the left and right sides.
Optionally, you can use a second level of district field. The first level handles postal codes or city subdivisions and the other level handles city names. For the U.S. and Canada, the city name may include a two-letter state or province abbreviation.
 |
NOTE: You can choose the default location index to use by choosing Edit>Preferences, clicking |
 on the Locating tab, and choosing an index from the Street Layer or Index drop-down list on the Street Layer or Index dialog box.
 To Create a Location Index
- Choose the layer you want to index from the drop-down list on the Standard toolbar.
- Choose Tools>Locate>Index Locations to display the Index Locations dialog box.
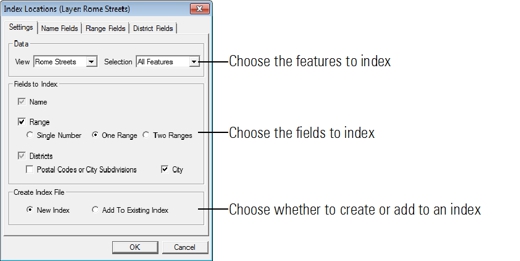
- Choose a dataview associated with the layer from the View drop-down list.
- Choose whether to index all features or only those in a selection set, from the Selection drop-down list.
- If you want to index a single number or ranges, check the Ranges box and choose the appropriate radio button.
- Check the Postal Codes or City Subdivisions and/or the City box depending on the number of levels of districts you want to index.
- Choose whether to create a new index or add to an existing index, from the Create Index File radio list.
- Click the Name Fields tab and make choices as follows:
| To do this... | Do this... |
|---|---|
| Choose a name field | Choose a field from the Name drop-down list. |
| Choose an alternate name field | Choose a field from the Alternate Name drop-down list, or choose None to not have alternate names for features. |
| Choose a format for addresses | Make a choice from the Format drop-down list. For more information, seeAccepting Different Address Formats. |
| Choose a city and state format | Choose U.S. or Canadian Cities if the city name includes a state or province two-letter abbreviation, or Cities in Other Countries if there is no abbreviation, from the City Format drop-down list. |
- If you checked the Ranges box, click the Range Fields tab and make choices as follows:
| To do this... | Do this... |
|---|---|
| Choose a field for a single number | Choose a field from the Number drop-down list |
| Choose fields for one range | Choose fields from the Start Number and End Number drop-down lists |
| Choose fields for two ranges | Choose fields from the Start Number and End Number drop-down lists in both the Left Range and the Right Range frames |
If you are indexing a line geographic file, you can make choices as follows:
| To do this... | Do this... |
|---|---|
| Indicate that ranges mix even and odd numbers | Choose a field from the Parity drop-down list that contains a value of one if ranges mix even and odd numbers, or a value of zero if numbers are not mixed |
| Offset the location based on a value in a field | Choose a field from the Offset Field drop-down list |
| Not offset the location | Choose None from the Offset Field drop-down list |
| Indicate the units in the offset field | Choose the units from the Offset Units drop-down list |
- Click the District Fields tab. If you checked the Postal Code or City Subdivision box, make choices as follows:
| To do this... | Do this... |
|---|---|
| Choose a field for a single number or one range | Choose a field from the Postal Code drop-down list |
| Choose fields for two ranges | Choose fields from the Left Postal Code and Right Postal Code drop-down lists |
If you checked the City box, make choices as follows:
| To do this... | Do this... |
|---|---|
| Choose a field for a single number or one range | Choose a field from the City drop-down list |
| Choose fields for two ranges | Choose fields from the Left City and Right City drop-down lists |
 |
TIP: You should save your location index file to the same folder where your layer is located. |
- Click OK. Maptitude displays the Save As dialog box.
- Type a file name and click Save.
Maptitude creates the Location index.
Try It Yourself: Creating and Using Location Indexes
1. Choose File>Open Workspace or click  on the Standard toolbar, then open the LocateIndex workspace in the tutorial folder. You will create an index for Rome streets and locate records with the index.
2. Right-click on Rome Streets in the Display Manager and choose Make Working Layer.
3. Choose Tools>Locate>Index Locations to display the Index Locations dialog box.
4. Choose All Features from the Selection drop-down list.
5. Check the Range box and choose One Range from the Range radio list.
6. Remove the check from the Postal Codes or City Subdivisions box and check the City box.
7. Click the Name Fields tab. Choose Street Name Followed by Number from the Address Format drop-down list and choose Cities in Other Countries from the City Format drop-down list.
8. Click the Range Fields tab and verify that Start and End are chosen in the Start Number and End Number drop-down lists.
9. Click the District Fields tab and verify that the City field is chosen in the City drop-down list.
10. Click OK to display the Save As dialog box. You should save the Location index file to the Tutorial folder because that is where the Rome street geographic file is also stored.
11. Type “romestreet” as the file name and click Save.
12. Choose Window>Dataview-romelocate or click on the romelocate dataview to make it active.
13. Choose Tools>Locate>Locate by Address to display the Locate by Address dialog box.
14. Click  next to the Streets/Index text box to display the Choose Street Layer or Location Index dialog box. Choose the romestreet.idx index file you just created from the Street/Index drop-down list. The other drop-down lists are automatically filled in.
15. Click OK to return to the Locate by Address dialog box.
16. Click the Postal Codes tab and click the Ignore Postal Codes and City Information radio button.
17. Click OK. Maptitude locates the records and displays them on the map and displays the match statistics. Click OK to continue.
18. Choose File>Close Workspace and click Don't Save to close the workspace without saving any changes.
©2026 Caliper Corporation