Maptitude Help / Geocoding / More About Locating Addresses
More About Locating Addresses
Maptitude locates records by address by taking each record and trying to find a matching record in a street layer or location index. For this reason, locating records by their addresses is sometimes known as “address matching” or “geocoding.” Maptitude indexes streets by postal code in a Streets file to locate the streets more quickly.
Maptitude locates addresses by rating how close the address in your data is to the addresses on each street feature. If the rating is high enough, a new point is added along the matching street. Sometimes no potential matches have a high enough rating, and the record in your database cannot be located on the map. Sometimes several potential matches have a similar rating, and Maptitude cannot be certain which to choose. Maptitude has settings you can use to handle some of these situations. For example, you can:
• Use a different street layer
• Accept different address formats
• Check nearby postal codes for possible matches
• Locate records without postal codes
• Change the rating that is required for a match
• Change how far locations are offset from the street
Using a Different Street Layer
The Locate by Address command can be used with any Streets file stored in a compact (.cdf) or standard (.dbd) format geographic file. For example, you can use the File>Export>Geography command to create a small Streets file from a portion of the national file, and use that file for locating addresses just as you would use included Streets file. You can also create and edit your own line geographic files from scratch and use them for locating addresses.
A CDF line geographic file that you use with the Locate by Address command can be either a regular CDF or a Streets CDF file. The advantage of using a regular CDF is that the attributes such as Name, Left ZIP, Right ZIP, and street ranges can be edited.
The only requirements for using a line geographic file with the Locate by Address command are that it must be a layer in a map and the layer must contain the following fields:
| Field | Format | Contents |
|---|---|---|
| Name | Indexed Character | The name of the street, including the type and any prefix or suffix |
| Alternative Name | Character | An optional field with an alternative name to use for the street |
| Left ZIP | Indexed Numeric | The ZIP Code or numeric postal code on the left side of the street |
| Right ZIP | Numeric | The ZIP Code or numeric postal code on the right side of the street |
| Start Left | Numeric | The starting address number on the left side of the street |
| End Left | Numeric | The ending address number of the left side of the street |
| Start Right | Numeric | The starting address number on the right side of the street |
| End Right | Numeric | The ending address number of the right side of the street |
| Parity | Numeric | A flag for streets with addresses on only one side. A value of one indicates that both odd and even addresses appear on the same side of the street. A value of zero indicates that odd and even addresses are not mixed. |
You will always get the best results when the Left ZIP and Right ZIP columns are filled. If the layer does not have Parity or Alternate Name columns you can create them and leave the values empty.
You can use the Dataview>Table>Modify command to change the field names and formats, and to index the necessary fields. See Modifying the Structure of a Table for more information on changing a field’s name, format, or index.
When you create your own file and enter your own street names and other information, you must be careful to use the same standard abbreviations and punctuation used in the included Streets file. For example, names must be capitalized, Street is abbreviated “ST,” and Avenue is “AVE.” You can display your regional street layer in a dataview to see the conventions that are used.
When you export your file it is better to create a regular CDF file rather than a Streets CDF, so that you can add and edit the fields. Unless the street layer is extremely large (e.g., more than one state), locating addresses with a regular CDF is as fast as with a Streets CDF.
Alternatively, you can use any point, line, or area geographic files without these required fields to locate addresses by creating a location index. For more information, see Creating Location Indexes.
Accepting Different Address Formats
There are several options for standardizing addresses, which recognize different ways to show street numbers and street names. These options are:
| Option | Example |
|---|---|
| US Addresses | 123 Main St |
| US Addresses (Hyphenated Numbers) | 123-45 Main St |
| Street Name followed by Number | Camino Real, 123 |
| Number followed by Street Name | 123 Rue des Bains |
| Street Name followed by Number | Via XXX Nazionale 123 |
The second choice handles addresses where the number has two parts, a block number and a house number, such as in Queens NY. The example would be read as house number 45 after the intersection with 123rd Street.
Checking Nearby Postal Codes for Possible Matches
Sometimes the postal codes in your data are different from those in the region street file. For example:
- A postal code has been renumbered or a portion has been split off into a new postal code
- Some postal codes are for businesses and post office boxes, and are enclosed by other postal codes
- A postal code has other postal code nearby which may have been used instead
Maptitude has lists that keep track of these relationships, to help locate an address when it is not found based on the specified postal code. If Maptitude cannot find a match for the specified postal code, you can use the option to check nearby postal codes instead. You should use this option only after using the normal setting, which uses the postal code in the postal code field.
Locating Records without Postal Codes
Maptitude indexes street names by postal code in the street geographic file, so a postal code is required to locate records by address. If your data do not have postal codes for each record, you may still be able to use the Locate by Address command.
When you choose None from the Postal Code drop-down list in the Locate by Address dialog box, you have the following options available when you click the Postal Codes tab:
- Use Postal Codes in this List – You can type a list of possible postal codes, and Maptitude will look for each address in all the postal codes in the list.
- Use Postal Codes for – You can type city and state names or choose fields from your database that contain the name of the city and state for each record. Maptitude will get the list of postal codes in the specified cities and use it to look for each address. This option may take a long time in large cities with many postal codes such as New York or Los Angeles.
- Use Postal Codes within the Current Map – You can have Maptitude look for each address in each of the postal codes visible on the current map.
When you choose one of these methods, you should use the Very Strict matching method for your first round of address matching. This will improve the quality of the matches. See Changing the Rating That Is Required for a Match below for more information.
If the address is not in your region, you can use a Location index. For more information, see Creating Location Indexes. Additional regions are also available from Caliper and are available for purchase for use with a single copy of Maptitude.
Changing the Rating That Is Required for a Match
You can choose from three different matching methods that affect the rating required for Maptitude to automatically match a record to a street feature:
| Method | What it does... | What you do... |
|---|---|---|
| Very Strict | Automatically matches a record only if the rating is very high | You make more decisions because Maptitude will be a bit more conservative |
| Normal | Accepts a good match for a record | Maptitude makes some decisions and you make the rest |
| Not Strict | Relaxes the normal method and accepts matches with lower ratings | You make fewer decisions because Maptitude accepts more matches automatically |
These methods affect the number of matches that Maptitude makes without your assistance and the number you have to consider yourself if you use the Ask If Uncertain setting. For more information, see Reviewing Uncertain Matches below.
 |
NOTE: You can set the default method for matching by choosing Edit-Preferences and choosing a method from the Method drop-down list on the Locating tab. |
Reviewing Uncertain Matches
The Ask If Uncertain option tells Maptitude to ask you what to do when it encounters several possible matches for an address. When this setting is chosen and Maptitude comes across a record with several possible matches, Maptitude displays the Choose a Matching Record dialog box.
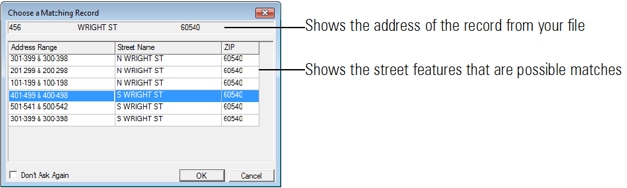
The listing of possible matches shows the name of each street segment and the ranges of addresses that appear on either side of each segment. You can browse through this list and pick the feature that you think is the best match, or indicate that none of the choices is acceptable.
You can choose from two basic strategies for address matching:
- Use Locate by Address with the Automatic option. Maptitude will locate as many features as it can automatically. When it finds several possible matches, it will choose the best one automatically.
- Use Locate by Address with the Ask If Uncertain option. Maptitude will locate all the features it can without your assistance, but from time to time will stop to ask you about an uncertain match.
If you are matching many hundreds of records, the first method will be faster, since you don’t need to sit by your computer to answer questions along the way. The second method is useful when you are dealing with unmatched records by using some of the other settings, and want to make sure that the best match is made.
Changing How Locations Are Offset from the Street
When a record in your data is matched to a street feature, Maptitude places the new point along the street based on the street number from your file and the range of address numbers on the matching street segment.

Maptitude figures out on which side of the street the point should be located, and lets you control how far to offset the location from the street. There are three options for the offset:
- Place all points the same distance to the left or right of the street. For example, all points could be located 25 feet from the center of the street. This is the normal method.
- Choose the distance based on information from your data. For example, you might have a data field that indicates how far each house is from the street.
- Determine the offset based on information in the street layer. For example, points could be located 25 feet from the center of local streets, but 40 feet from the center of major streets, based on a field that indicates a distance for each street type.
You could use a different offset for each class of street. Use the Dataview>Table>New command to create a new table with street classifications and offsets, and join it to the Streets file before you choose the Locate by Address command. For more information, see Adding a Record for Each Unique Value of a Field.
|
NOTE: You can set the default offset distance by choosing Edit>Preferences and typing a distance in the Offset from Street edit box and choosing units from the drop-down list on the Locating tab. |
Creating a Report File
The street file for your region has been standardized, or “cleaned up” so that streets are named in a consistent way. For example, “Ave” is always used as the abbreviation for “Avenue,” and “2nd Ave” is used instead of “Second Avenue.” When you locate features by address, Maptitude standardizes your addresses the same way and then attempts to match records in your data to features in the Streets file.
Maptitude can create a report file containing the standardized addresses and the results of the match. The report is organized as a table and contains the following information for each record:
| Field | Contents | Meaning |
|---|---|---|
| ID | ID of the record | The ID matches the one in your input file |
| STDNUMBER | Street Number | The standardized street number |
| POSTNUMBER | Extra Numbers | Apartment numbers and other miscellaneous information |
| STDNAME | Street Name | The standardized street name for an address |
| STDSTRT1 | Street Name | The first street name for an intersection location |
| STDSTRT2 | Street Name | The intersecting street name for an intersection location |
| ZIPCODE | ZIP Code | The standardized ZIP Code or postal code |
| STDPLACE | City/state name | The standardized city and state name |
| Street_ID | Street feature ID | The ID of the street segment in the Streets file that was matched to your record |
| Left_Right | Side of street | Zero means your record was placed on the right side ofthe street; one means it was placed on the left side of the street |
| Result | A special code | Indicates what happened when the match was attempted |
You can create a new report file each time you use the Locate by Address command. The report file may not include all of the fields shown:
- If none of the addresses in your file look like intersection locations, the STDSTRT1 and STDSTRT2 fields are not included.
- If all of the addresses in your file are intersections, the STDNUMBER, POSTNUMBER, and STDNAME fields will be omitted.
Also, records without a Result value are missing some of the information (such as street address or ZIP Code) required to use the Locate by Address command.
Each record in the file may have one or more match codes, all of which are next to one another in the Result field. Here is what each match code means:
| Code | What it means... |
|---|---|
| A | The record was located successfully, without asking you for help |
| R | The record was not located automatically |
| U | Maptitude offered you several possible matches, and you chose one |
| X | Maptitude offered you several possible matches, and you rejected them all |
| I | The input address was identified as an intersection |
| S | The street name or alternate name did not match exactly |
| N | The street number did not match exactly |
| Z | The input ZIP Code or postal code was not found in the Streets file |
Here are some examples of match results and what they mean:
| Match Result | What it means... |
|---|---|
| A | The record matched a street feature perfectly and was located automatically |
| AS | The record was located successfully, even though the street name did not match perfectly |
| US | The street name did not match perfectly, Maptitude offered you several choices, and you accepted one of them |
| RSN | The record was not located because neither the street name nor the street number matched |
| RSSN | The record was not located because the street name, the alternate street name, and the street number did not match |
| AI | The address was interpreted as an intersection, and was located automatically |
The report file will be displayed in a new dataview when the Locate by Address command has finished locating the records.
When you use a Location Index, the report file contains slightly different information for each record:
| Field | Contents | Meaning |
|---|---|---|
| ID | ID of the record | The ID matches the one in your input file |
| STDNUMBER | Address Number | The standardized address number |
| STDNAME | Address Name | The actual address name stored in the matching feature |
| ZIPCODE | ZIP or Postal Code | The actual ZIP Code or postal code stored in the matching feature |
| STREETID | Feature ID | The ID of the matching feature |
| LEFT_RIGHT | Side of street | 0 if the address number is in the range of addresses for the right side of the feature, or 1 if it is in the left range |
| RESULT | A special code | Indicates what happened when the match was attempted |
| STDLON | Longitude | The computed longitude, with six implied decimal digits |
| STDLAT | Latitude | The computed latitude, with six implied decimal digits |
Each record will have a match code in the Result field. Here is what the match codes mean:
©2026 Caliper Corporation