Maptitude Help / Surface Analysis Tools / Using Flight Paths
Using Flight Paths
You can move through your 3D view and visit particular viewpoints automatically using a flight path. You can create new flight paths and use existing flight paths. Each flight path is defined by a series of waypoints, each of which is a view of the 3D scene based on the current pan, zoom, and tilt settings. You can specify the desired point of view at each waypoint, how long the flight path should pause at that waypoint, and how long it should take to travel to it from the previous waypoint.
Once you have created one or more flight paths, you can save them in a flight path file so that you can load them again in the future. You can have one or more flight paths in a flight path file, and you can use multiple flight path files.
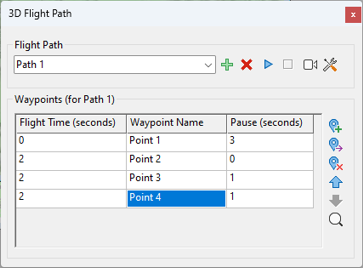
You create and manage flight paths with the 3D Flight Path toolbar:
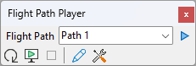
The Flight Path Player, opened from the 3D Flight Path toolbar, is a trimmed version of the 3D Flight Path toolbar. It occupies less space, is dockable, and is dedicated primarily to playing flight paths:
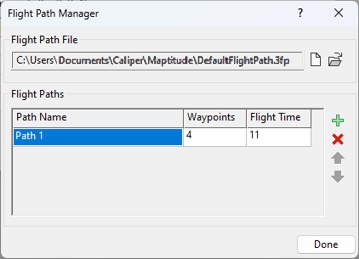
The Flight Path Manager is used for creating a new flight path file, opening an existing flight path file, and adding, deleting, and arranging flight paths within a flight path file.
- Choose Tools>3D>3D Flight Path Toolbar to display the 3D Flight Path toolbar.
- Click
 , enter a name for the path in the dialog box, and click OK.
 - Use the pan, zoom, and rotate tools to set the 3D View at the starting location for the flight path and click
 to add the waypoint.
 - Use the pan, zoom, and rotate tools to set additional waypoints and click for each waypoint you want to add to the flight path.
- Manage the waypoints as follows:
| To do this... | Do this... |
|---|---|
| Set the flight time | In the Flight Time (seconds) column, enter the amount of time to get to the waypoint. |
| Set a pause time | In the Pause (seconds) column, enter the amount of time to wait at a waypoint before flying to the next. |
| Rename a waypoint | In the Waypoint Name column, type a name for a waypoint. |
| Delete a waypoint | Highlight a cell in one or more rows of the grid and click  . . |
| Replace a waypoint | Set the 3D View to the position of the new waypoint, highlight a cell in the grid, and click  . . |
| Reorganize waypoints | Highlight a cell in one or more rows of the grid and click  to move the waypoints up or to move the waypoints up or  to move the waypoints down. to move the waypoints down. |
- Click
 to play the flight path. Stop the flight path by clicking
  .
. - Repeat steps 2-6 to create additional flight paths.
 To Use the Flight Path Player Toolbar
- Choose Tools>3D>3D Flight Path Toolbar to display the 3D Flight Path toolbar.
- Click
 to close the 3D Flight Path toolbar and open the Flight Path Player.
 - Choose the flight path to play and other options as follows:
| To do this... | Do this... |
|---|---|
| Choose a flight path | Make a choice from the Flight Path drop-down list. |
| Loop when playing the flight path | Click  . Maptitude depresses the button. As long as the button is pressed, Maptitude will continuously loop the flight path when you click . Click again to stop looping the playback. . Maptitude depresses the button. As long as the button is pressed, Maptitude will continuously loop the flight path when you click . Click again to stop looping the playback. |
| Play the flight path as a slide show | Click  . Maptitude depresses the button. As long as the button is pressed, Maptitude will show the flight path as a slide show of the waypoints when you click . Click V again to stop playing the flight path as a slide show. . Maptitude depresses the button. As long as the button is pressed, Maptitude will show the flight path as a slide show of the waypoints when you click . Click V again to stop playing the flight path as a slide show. |
| Start playing the flight path | Click . Maptitude plays the flight path with the current loop and slide show settings. |
| Stop playing the flight path | Click . |
| Switch back to the 3D Flight Path toolbar | Click  . . |
- When you are finished, click the Close box in the upper-right corner of the toolbar.
To Delete a Flight Path
 .
.— OR —
- In the 3D Flight Path toolbar, click
 to display the Flight Path Manager.
 - Highlight a flight path in the grid and click
 .
.
To Manage Flight Path Files
- Choose Tools>3D>3D Flight Path Toolbar to display the 3D Flight Path toolbar.
- Click . Maptitude displays the Flight Path Manager dialog box.
- Make choices as follows:
| To do this... | Do this... |
|---|---|
| Create a new flight path file | Click  to display the Save Flight Path File As dialog box. Choose a folder, type a file name, and click Save. Maptitude creates the new flight path file. to display the Save Flight Path File As dialog box. Choose a folder, type a file name, and click Save. Maptitude creates the new flight path file. |
| Open an existing flight path file | Click  to display the Load Flight Path File dialog box. Choose a file name and click Open. Maptitude opens the flight path file. to display the Load Flight Path File dialog box. Choose a file name and click Open. Maptitude opens the flight path file. |
- Manage flight paths within the flight path file as follows:
| To do this... | Do this... |
|---|---|
| Add a new flight path | Click . Maptitude adds a new row to the grid. |
| Change the flight path name | Enter a name in the Path Name column of the grid. |
| Delete one or more flight paths | Highlight a cell in one or more rows of the grid and click . Maptitude deletes the paths. |
| Reorganize the flight paths | Highlight a cell in one or more rows of the grid and click to move them up or to move them down. |
- When you are finished, click Done.
Maptitude closes the Flight Path Manager dialog box and returns to the 3D Flight Path toolbar.
©2026 Caliper Corporation