Maptitude Help / Changing and Customizing Maps / Using Legends
Using Legends
Maps use a legend to describe the symbols, colors, and styles used in a map. Legends have sections for the title, layers, selection sets (filters), themes, feature display settings, scale, and footnote.
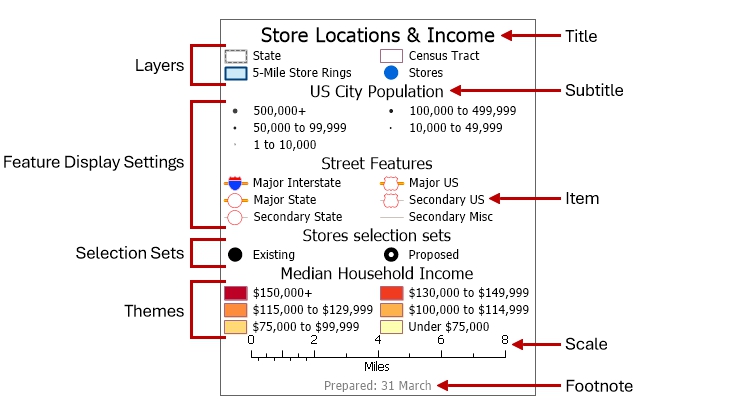
The layers, feature display settings, selection sets, and themes sections all contain a subtitle followed by items. You choose which sections to include in the legend, type the title and footnote, choose a border and background, and pick the fonts, styles, sizes, and colors you want. You also control which items in each section are displayed, in what order, and the number of columns in the legend. From then on, Maptitude creates and maintains the legend automatically.
Legends can be displayed either on the map or in a separate window. When a legend is on the map, it prints automatically when you print the map. If the legend is in a separate window, you must use a layout to print it.
Maptitude automatically displays a legend when you create a thematic map. For more information on legends and thematic maps, see Using Themes to Present Information.
- Choose Map>Legend or click
 on the Standard toolbar.
—OR—
- Right-click on the map window and choose Properties. Maptitude displays the Map Properties dialog box.
- Check or remove the check from the Legend Enabled box.
- Click OK.
 |
TIP: You can also get to the Map Properties dialog box by clicking |
 on the Standard toolbar and then clicking
  in the Properties column of the map you want to modify.
Customizing the Legend
The Legend Settings dialog box lets you customize the appearance of your legend. You can:
- Add a title and footnote
- Change the style and color of the scale of miles symbol
- Control the legend’s border and background, or even make the legend transparent and borderless so it fits seamlessly on your map
- Change the number of columns and the order of items within the columns
- Choose what will be displayed in your legend and in what order
- Change the names of subtitles and items
- Choose the font, size, style, and color
When you click Apply, Maptitude updates the legend so you can see the result. When you click OK, the new settings are saved. If you click Cancel, the legend returns to the original settings.
|
TIP: You can change the language used for the legend scale (e.g., Kilometer, Kilometre, Kilómetros) by choosing Edit>Preferences and choosing a language on the System tab. |
 |
For a video tutorial see: (Internet connection required) |
| If... | Do this... |
|---|---|
| The legend is enabled | Right-click on the legend and choose Properties |
| The legend is attached to the map | Choose the Pointer  tool on the Standard toolbar and double-click the legend tool on the Standard toolbar and double-click the legend |
| The legend is displayed in a separate window | Double-click on the legend with any tool |
| The map is the current window | Right-click on the map window and choose Properties to display the Map Properties dialog box, and click Legend Settings. |
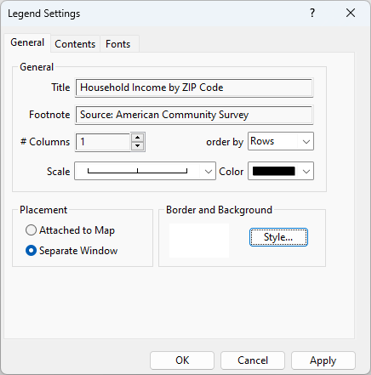
- On the General page, make changes to the appearance of the legend as follows:
| To do this... | Do this... |
|---|---|
| Add or change the title | Edit the text in the Title box |
| Add or change a footnote | Edit the text in the Footnote box |
| Change the number of columns | Type or use the up and down buttons in the # Columns box and choose whether to order the features by row or column |
| Add or change the scale bar | Choose a scale from the Scale drop-down and choose a color from the Color drop-down or choose None from the Scale drop-down to hide the scale |
| Attach the legend to the map | Choose Attached to Map from the radio list and click Style to change the legend border, fill color, style, and opacity |
| Display the legend in a separate window | Choose Separate Window from the radio list and click Style to change the fill color |
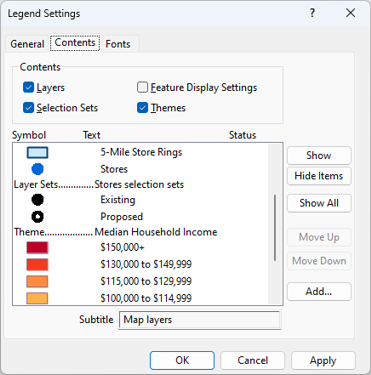
- Click the Contents tab to display the Contents page and make changes as follows:
| To do this... | Do this... |
|---|---|
| Choose which categories to include | Check or uncheck the boxes in the Contents section |
| Hide/show items or subtitles | Highlight an item or subtitle in the scroll list and click Hide or Show |
| Hide/show all of the items in a section | Highlight a subtitle in the scroll list and click Hide Items or Show Items |
| Rename or edit an item | Highlight an item or subtitle in the scroll list and edit the text in the Class Name box |
| Show all items in the legend | Click Show All |
| Change the order of an item | Highlight one or more items in the scroll list and click Move Up or Move Down |
| Add a space in the legend | Click Add, choose Space from the Item Type radio list, choose where to put the space, and click OK |
| Add a row of text to the legend | Click Add, choose Text from the Item Type radio list, enter some text, choose where to put the space, and click OK |
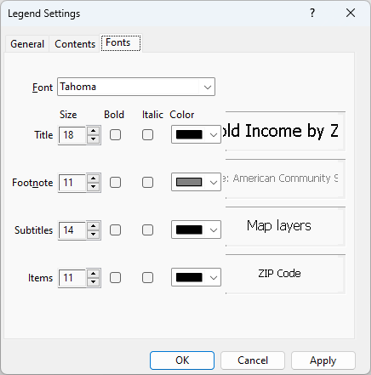
- Click the Fonts tab to display the Fonts page and make changes as follows:
| To do this... | Do this... |
|---|---|
| Change the font | Make a choice from the Font drop-down |
| Change the style of the title, footnote, subtitles, and items | Use the spinners, checkboxes, and drop-downs to set the size, style, and color |
- Click OK.
- If you reached the Legend Settings dialog box from the Map Properties dialog box, click OK to close the Map Properties dialog box.
Maptitude draws your legend based on the current settings.
 To Modify Legend Font Size Only
- If the legend is displayed in a separate window, right-click on the legend and choose Larger Font to increase the sizes by one point, or choose Smaller Font to decrease the sizes by one point.
To Save a Legend Displayed in a Separate Window as an Image
- If the legend is displayed in a separate window, right-click on the legend and choose Save Image to display the Save Legend as Image dialog box.
- Enter a name for the file and choose an image file format.
- Click Options to choose whether to include a border in the image file and, if you chose JPEG as the file format, to choose the quality of the image. Click OK when you are done.
- Click Save.
Try It Yourself: Modifying Legends
1. Choose File>Open Workspace or click  on the Standard toolbar, then open the Legend workspace in the Tutorial folder. The map has a legend with many items.
2. Click on the Standard toolbar to turn the legend off.
3. Click again to turn the legend on.
4. Double-click on the legend to display the Legend Settings dialog box.
5. Type “My Legend” in the Title text box and “Created by Me” in the Footnote text box.
6. Choose a scale from the Scale drop-down list and click the Attached to Map radio button.
7. Click Apply to see these changes.
8. Click the Contents tab. Click on the Place item in the scroll list and click the Hide button, then click on the 100,000 to 600,000 item and type “Over 100,000” in the Set Name text box.
9. Click the Fonts tab. Choose a different font from the Fonts drop-down list, change the Footnote size to 10, and change the Items size to 11.
10. Click OK. The legend is updated.
11. Click on the Standard toolbar to activate the Pointer tool. Click on the legend and drag it to the upper right of the map.
12. Choose File>Close Workspace and click Don't Save to close the workspace without saving any changes.
©2026 Caliper Corporation