Maptitude Help / Using Imagery: Advanced Topics / Using the Image Librarian
Using the Image Librarian
An Image Library is a list of images that have the same map projection, and can be added as a single layer in a map. The images can be of different types, such as GeoTIFF, ECW, or MrSID. Image libraries will often be for mosaics of images created as a group, such as imagery covering a city or state.
There are many reasons for using an Image Library:
- One map layer can represent dozens, even hundreds of images
- You can choose a descriptive layer name for the Image Library, rather than the often cryptic image file names
- It is much quicker to add one Image Library layer to a map than it is to add many image layers
- It is much quicker for Maptitude to use an Image Library to determine which images need to be used to display an area than it is to check a large number of image layers
You can have any number of Image Libraries as map layers, and you can have both Image Library layers and regular image layers in any order. If images overlap, images later in the list display over images earlier in the list, both within an Image Library and within the list of map layers.
You can add a group of images or all of the images in a folder to an Image Library, as long as they have the same map projection, for a new Image Library, or the same map projection as the current images, for an existing Image Library. Maptitude will detect images with different map projections and help you choose just the images with the correct map projection.

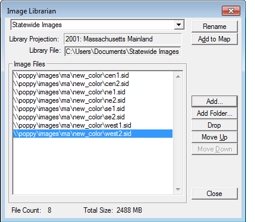
| To do this... | Do this... |
|---|---|
| Create a new Image Library | Choose Create New from the drop-down list, choose a folder, type a file name, and click Save. Maptitude creates the new Image Library. |
| Load an existing Image Library | Choose File Open from the drop-down list, browse for the Image Library, and click Open. Maptitude displays the images in the Image Library in the scroll list. |
| Change the Image Library layer name | Click Rename, change the layer name in the New Name text edit box, and click OK. Maptitude updates the layer name and shows it above the scroll list. |
| Add images to the Image Library | Click Add, browse to the folder with the images, highlight the image files to add, and click Open. Maptitude adds the images to the scroll list. |
| Add all images in a folder to the Image Library | Click Add Folder, browse to the folder with the images, and click OK. Maptitude adds the images in the folder to the scroll list. |
| Drop images from the Image Library | Highlight the images to drop in the scroll list and click Drop. Maptitude drops the images from the scroll list. |
| Change the order of images | Highlight the images to move and click Move Up or Move Down. |
If you are adding more than one image to a new Image Library and the images are not in the same projection, Maptitude displays the Choose the Library Projection dialog box. Highlight a projection in the Projection scroll list to see the images with that projection in the Files scroll list. Click OK to add just those images to the Image Library.
- If the Image Library is not already a layer in a map, and if the current window is a map, you can quickly add the Image Library as a layer in the current map by clicking Add to Map. You can also use the Map-Layers command to add the Image Library to any map; for more information, see To Add Layers to a Map.
- You can return to Step 2 to create another new Image Library or open another existing Image Library, and then continue making changes. When you are done, click Close.
Maptitude saves the changes to the Image Library.
©2026 Caliper Corporation