Maptitude Help / Creating Maps / Changing the Contents of a Map
Changing the Contents of a Map
For a map to be clear and easy to read, it must contain the right amount of information. When a map contains too much information, it is confusing and hard to read. When a map contains too little information, it is difficult to tell what the map is trying to show.
To help you manage the information in your maps, Maptitude organizes map features into layers. You control the amount of information that is shown on a map by choosing which layers to display. You can:
- Changing what layers are in a map
- Choose at what scales a layer should be visible using Autoscale
- Renaming a layer
Layers and Some Examples
A layer is a group of features of the same type. Every geographic file contains at least one layer of information, and every layer has a name that describes the features within it.
There are several types of layers. Vector layers contain map features that are points, lines, or areas which are stored in a geographic file. The table below contains some examples of the type of information that can be stored in a vector layer:
| Point Layers | Line Layers | Area Layers |
|---|---|---|
| Retail Stores | Highways | Countries |
| Healthcare Providers | City Streets | ZIP or Postal Codes |
| Airports | Power Lines | Tax Parcels |
| Telephone Poles | Rivers | Census Tracts |
| Subway Stations | Railroads | Congressional Districts |
| Warehouses | Pipelines | Sales Territories |
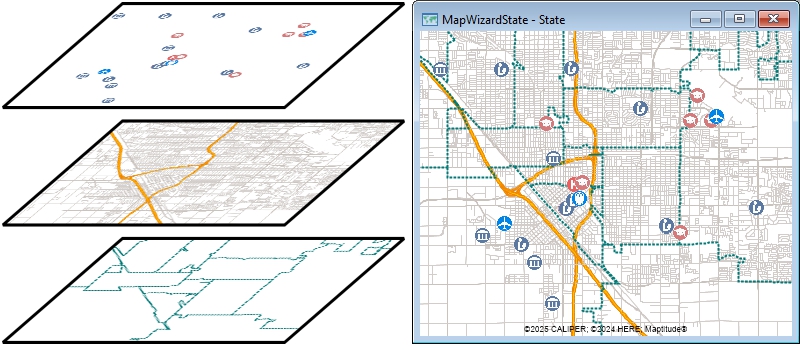
For example, the points in the following map are landmarks, the lines are street segments, and the areas are ZIP Codes, each in their own map layer.
Grid layers are a special type of vector layer where the cells in the grid can represent any values, such as elevation, zoning, vegetation, or slope. Maptitude uses grid layers to create density grid heat maps and to for elevation data to analyze surfaces and create three-dimensional maps.
Raster layers include images such as an orthophoto, a picture of a map, or another type of image. The images are stored in files with formats such as GeoTIFF, MrSID, or DOQ. For more information on image layers, see Using Images as Map Layers.
Maptitude can also display geographic data stored in other file formats as map layers. See Using Other Geographic File Formats for more information.
 |
NOTE: The geographic files included with Maptitude are nationwide and worldwide in scope. You can create your own subsets of these files by selecting features and exporting them to their own geographic files or by clipping them. See Creating New Files from Selection Sets or Clipping Geographic Files by Area. |
Using Layers in a Map
A map may contain many layers of information. The layers are drawn one at a time. This means that when a layer is drawn, features in that layer may hide or obscure features from an earlier layer. You choose the order in which layers are drawn to reflect the emphasis or focus that you want.
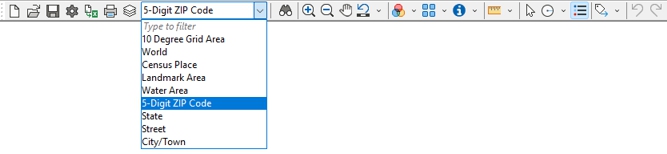
To help you out, the names of all the visible layers in a map appear in the order they will draw in a drop-down list on the Standard toolbar. You can change the order of these layers, and add or remove layers. When you make any changes, the layer list is automatically updated.
The Working Layer
The Maptitude commands that are used to set colors, styles, thematic map settings, and labels operate on one layer at a time. This layer is called the working layer. The name of the working layer is shown in the drop-down list on the Standard toolbar.
 To Change the Working Layer
- Choose one of the visible layers in a map from the drop-down list on the Standard toolbar.
—OR—
- Right-click on a layer in the Display Manager and choose Make Working Layer. If the layer is hidden, Maptitude makes the layer visible and sets it as the working layer. See To Use the Display Manager for more information.
Maptitude maintains a current layer. When a map window is active, the current layer is the working layer. When a dataview window is active, the current layer is the table or joined view in the dataview. For more information on dataviews, Working with Tables, Databases, & Charts.
Changing the Layers in a Map
Maptitude allows you to add layers to or remove layers from a map, change the order in which the layers are drawn, hide a layer temporarily without removing it from a map, make a hidden layer visible again, and rename a layer. You make all these changes using the Layers dialog box shown here:
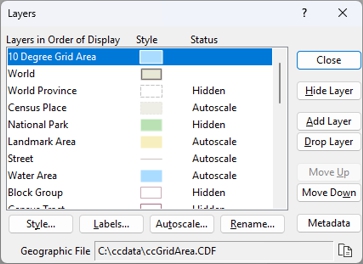
The Layers dialog box shows a list of layers in the order that they are drawn and lets you manage which layers are shown and when. You can add layers, hide visible layers and show hidden ones, reorder or drop layers, change the scale at which layers are drawn, and rename a layer.
You can also change the style of a layer and its labels from the Layers dialog box. For more information, see Using Styles and Using Labels. You can also view metadata for a geographic file from the Layers dialog box. For more information, see Viewing Metadata for a Geographic File.
 |
TIP: You can also use layers stored in other geographic file formats or image formats. See Using Other Geographic File Formats and Using Images as Map Layers for more information. |
- Choose Map>Layers or click
 on the Standard toolbar, or right-click on the map window and choose Layers. Maptitude displays the Layers dialog box.
 - Click Add Layer to display the File Open dialog box.
- Choose Geographic File as the file type, and choose one or more geographic files.
- Make choices as follows:
- To protect the data from accidental changes, check the Open as Read-Only box.
- To prevent others from opening the file at the same time, check the Open for Exclusive Access box.
- Click Open. Map layers in the geographic files are added to the list of layers in the map.
- Click Close.
Maptitude draws the map with the new layers. The layer list on the Standard toolbar is updated to include the added layers.
|
NOTE: If you add layers whose features are in a different geographic area from that visible in your map, you may need to change the scale or location to see features in those layers. |
- Choose Map>Layers or click on the Standard toolbar, or right-click on the map window and choose Layers. Maptitude displays the Layers dialog box.
- In the layer list, click on the layer or layers you want to change.
- Make changes as follows:
- To remove the layer(s) from the map click Drop Layer.
- To draw the layers earlier or later click Move Up or Move Down.
- To hide the layers click Hide Layer or to show the layers click Show Layer.
- Click Close.
Maptitude draws the map with the changes.
|
TIP: You can also drop, hide, and show layers with the Display Manager. See Using the Display Manager for more information. |
|
TIP: If you drop a layer that is embedded in a compressed workspace (.WRKZ) you can undo that drop by clicking |
 on the Standard toolbar.
Try It Yourself: Changing the Layers in a Map
1. Choose File>Open Workspace or click  on the Standard toolbar, then open the NELayers workspace in the Tutorial folder. Notice how the counties cover the highways and railroads.
2. Choose Map>Layers or click on the Standard toolbar, click on County in the layer list, and click Move Up until county is the first layer.
3. Click Close. The highways and railroads are now on top of the counties.
4. Choose Map>Layers or click on the Standard toolbar, click on Railroad in the layer list, and click Hide Layer. "Hidden" appears after Railroad in the layer list.
5. Click Close. The railroads are no longer drawn.
6. Choose File>Close Workspace to close the workspace without saving any changes.
Controlling Layers Automatically with Autoscale
While you can manually control the layers in a map, Maptitude also lets you set up each layer so that it displays automatically within a range of map scales. As a result, you can design a map that shows more detail as you zoom in, and less detail as you zoom out. This feature is called autoscale.
Autoscale makes maps more readable by preventing too many features from being drawn in too small a space. For example, suppose you have a map of the U.S. that includes the U.S. Streets layer. When the scale of your map is set to show the entire U.S., you don’t want to see all the streets. When you zoom in on a single city, however, you do want to see the streets. When autoscale is enabled, this happens automatically. Maptitude checks the scale each time a map is drawn and decides whether or not each layer should be drawn. If the scale is between the smallest and largest scales you have specified, the layer will be drawn.
The Autoscale dialog box displays map scales as ratios. A scale of 1:1,000 means that every feature on the map is shown at one thousandth of its actual size.
To Control Layers with Autoscale
- Choose Map>Layers or click on the Standard toolbar, or right-click on the map window and choose Layers. Maptitude displays the Layers dialog box.
- In the layer list, click on a layer you want to scale automatically.
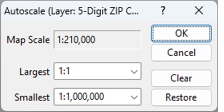
- Click Autoscale to display the Autoscale dialog box.
- Make choices as follows:
| To do this... | Do this... |
|---|---|
| Set the range of scales at which the layer will display | Type or choose the largest and smallest scales in the respective drop-downs |
| Set the layer to always be visible | Click Clear |
| Restore a cleared autoscale range | Click Restore |
- Click OK to return to the Layers dialog box. If you assigned autoscale values to the layer, the word Autoscale is displayed next to the name of the layer.
- Click Close to draw the map with autoscale settings you chose.
From now on, Maptitude will display the layer only within the specified range of map scales.
If you use autoscaling for all of the layers in your map, you might find yourself displaying a map at a scale at which none of the layers are displayed! If your map is empty, you may want to change the map scale or change the autoscale settings.
Try It Yourself: Controlling Layers Automatically
1. Choose File>Open Workspace or click on the Standard toolbar, then open the NYCAutoscale workspace in the Tutorial folder. Only the New York state boundary is shown in the map.
2. Click  on the Standard toolbar to activate the Zoom In tool and click several times on New York City. As you zoom further and further in, additional layers will appear: first County, then Tract, then Streets and School.
3. Choose Map>Zoom>Scale, choose the Ratio method, and choose 1:100,000 from the drop-down list.
4. Click OK. The streets are displayed, but the schools are not because the current scale does not fall between the minimum and maximum autoscale settings.
5. Click on the Standard toolbar, click on School in the layer list, and click Autoscale.
6. Change the smallest scale to 1:100,000, click OK, then click Close. The map is drawn showing the schools.
7. Click  on the Standard toolbar to activate the Zoom Out tool and click on the map to zoom out. The schools are no longer displayed and the status bar at the bottom of the screen shows that the scale is now smaller than the minimum value of 1:100,000 that you chose for the layer.
8. Choose File>Close Workspace and click Don't Save to close the workspace without saving any changes.
Renaming a Layer
You can change the name of a layer using the Layers dialog box. When you change the name of a layer, the layer list, map legend, and Layers dialog box all use the new name for the layer in all open maps. The layer name can be changed for this session only or permanently. When you change the layer name permanently, the geographic file is changed and the new name is stored in the file. If you change the layer name permanently, Maptitude will no longer be able to draw any maps, dataviews, or layouts you created earlier that include the original name of the layer you renamed. Layer names may be up to 20 characters long.
- Choose Map>Layers or click on the Standard toolbar, or right-click on the map window and choose Layers. Maptitude displays the Layers dialog box.
- In the layer list, click on the layer you want to rename.
- Click Rename to display the Rename Layer dialog box.
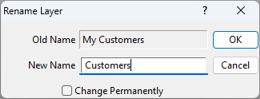
- Enter a name in the New Name box.
- Check the Change Permanently box to permanently associate the name with the layer.
- Click OK. Maptitude updates the layer list in the Layers dialog box.
- Close the Layers dialog box.
When you close the Layers dialog box, Maptitude updates the layer list on the Standard toolbar and the map legend. To learn more about legends, see Using Legends.
©2026 Caliper Corporation