Maptitude Help / Creating Maps / Using Other Geographic File Formats
Using Other Geographic File Formats
In addition to displaying Caliper geographic files as layers in a map, Maptitude can also display geographic data in other file formats as map layers. If you want to use one of these geographic file formats, you do not need to import the geographic data first, since you can use these geographic file formats directly. Maptitude provides direct support for these geographic file formats:
- Records with a coordinate for a point, in any ODBC database
- Points, lines, and areas stored in an Oracle Version 7 (Spatial Data Option) or Version 8i or later (Oracle Spatial) database
- Points, lines, and polygons stored in a Microsoft SQL Server Spatial layer
- Esri Shapefiles
- Esri ArcView 3.x Project Files
- Esri Personal Geodatabases
- Esri File Geodatabase
- Esri ArcSDE Geodatabase
- FlatGeobuf files
- GeoJSON files
- MapInfo TAB files
- PostgreSQL Server Spatial Layer
Maptitude also can import data from many other geographic file formats including AutoCAD, MapPoint, OpenStreetMap, and others. When imported, Maptitude creates a new Caliper format geographic file based on the imported file. For more information, see Importing Geographic Files.
 |
TIP: Maptitude also supports image layers. See Using Images as Map Layers for more information. |
Some Maptitude commands require area files to be topological to give the expected result. For example, Shapefiles store each area as a complete polygon so the Tools>Editing>Merge by Value command cannot remove the common borders inside the merged areas because the areas are not stored topologically.
 |
For a video tutorial see: (Internet connection required) • Using Other Geographic File Formats in Maptitude: Using files stored in other geographic file formats (e.g., Esri Shapefile, Google Earth KMZ file) in Maptitude |
Creating a Map Layer from an ODBC Table
If there are coordinate fields in a table in a database that can be accessed via Open Database Connectivity (ODBC), you can display that table as a point layer in a map. If the coordinates are in an XY coordinate system rather than in longitude and latitude, you can specify the coordinate system.
There must be a field that uniquely identifies each record with a number. Some database managers such as Microsoft Access make it easy to create and maintain a unique ID field. The field can be numeric or character, but the value must be a unique number.
 To Create a New Map from an ODBC Table
- Choose File>Open or click
 on the Standard toolbar, or right-click anywhere inside the Maptitude frame except on a window and choose Open. Maptitude displays the File Open dialog box.
 - Choose ODBC Table as the file type. Maptitude displays the Open ODBC Table dialog box.
- Choose a source from the Source drop-down list. (If the source is generic, such as MS Access, Maptitude will display the Select Database dialog box. Choose a database, and click OK.)
- Make choices as follows:
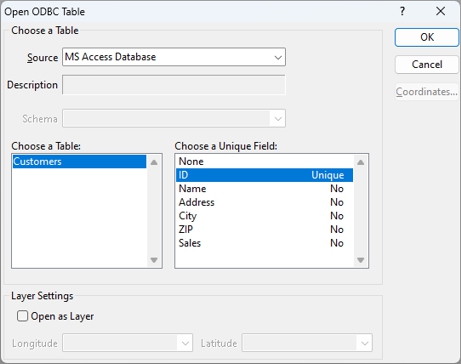
- Choose a table from the first scroll list
- Choose a field that uniquely identifies each record from the second scroll list
- Check Open as Layer to open the table as a map layer and specify the fields containing the X and Y values in the Longitude and Latitude drop-downs
- If the ODBC table has coordinates other than longitude and latitude, click Coordinates to display the Import Coordinates dialog box, choose the appropriate coordinate system, and click OK. For more information, see Using Data in Other Coordinate Systems.
- Click OK.
Maptitude opens the ODBC table and draws a new map with the layer.
To Add a Layer from an ODBC Table to an Existing Map
- Choose Map>Layers or click
 on the Standard toolbar, or right-click on the map window and choose Layers. Maptitude displays the Layers dialog box.
 - Click Add Layer to display the File Open dialog box.
- Choose ODBC Table as the file type. Maptitude displays the Open ODBC Table dialog box.
- Choose a source from the Source drop-down list. (If the source is generic, such as MS Access, Maptitude will display the Select Database dialog box. Choose a database, and click OK.)
- Make choices as follows:
- Choose a table from the first scroll list
- Choose a field that uniquely identifies each record from the second scroll list
- Check Open as Layer to open the table as a map layer and specify the fields containing the X and Y values in the Longitude and Latitude drop-downs
- If the ODBC table has coordinates other than longitude and latitude, click Coordinates to display the Import Coordinates dialog box, choose the appropriate coordinate system, and click OK. For more information, see Using Data in Other Coordinate Systems.
- Click OK. Maptitude opens the ODBC table and adds it as a new layer.
- Click Close to close the Layers dialog box.
Maptitude draws the map with the new layer.
Creating a Map Layer from an Oracle Database
Maptitude can directly read and display map features stored in an Oracle database. Oracle Version 7 stores map features using the Spatial Data Option (SDO), which uses a standard relational model. Oracle Version 8i and later (including 9i and 10g) store map features using Oracle Spatial, which uses an object relational model.
Oracle databases can contain a mixture of points, lines, and polygons. You must choose which type of map feature to display if there is a mixture. Maptitude supports multi-polygon records, which Oracle Spatial uses to store the boundaries of areas with islands and holes. Maptitude only displays the first point for multi-point records.
Maptitude supports records for arcs and circles in Version 8i and later. Arcs are converted to lines and circles are converted to polygons, with 60 points used to approximate a circle and a proportional number used to approximate an arc.
There must be a field that uniquely identifies each record with a number. The field can be numeric or character, but the value must be a unique number.
To Create a New Map from an Oracle Database
- Choose File>Open or click on the Standard toolbar, or right-click anywhere inside the Maptitude frame except on a window and choose Open. Maptitude displays the File Open dialog box.
- Choose Oracle Spatial Layer as the file type. Maptitude displays the Login Information dialog box.

- Enter your user name, password, and the Oracle service you want to use, and click OK. Maptitude connects to the Oracle service and displays the Open Oracle Layer dialog box.
- Make choices as follows:
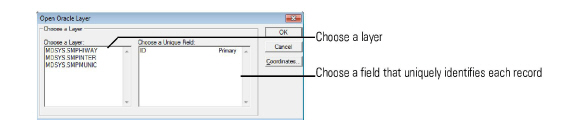
- If the Oracle database uses coordinates other than longitude and latitude, click Coordinates to display the Import Coordinates dialog box, choose the appropriate coordinate system, and click OK. For more information, see Using Data in Other Coordinate Systems.
- Click OK.
Maptitude opens the Oracle database as a point, line, or area layer and draws a new map with the layer.
To Add a Layer from an Oracle Spatial Layer to an Existing Map
- Choose Map>Layers or click on the Standard toolbar, or right-click on the map window and choose Layers. Maptitude displays the Layers dialog box.
- Click Add Layer to display the File Open dialog box.
- Choose Oracle Spatial Layer as the file type. Maptitude displays the Login Information dialog box.

- Enter your user name, password, and the Oracle service you want to use, and click OK. Maptitude connects to the Oracle service and displays the Open Oracle Layer dialog box.
- Make choices as follows:
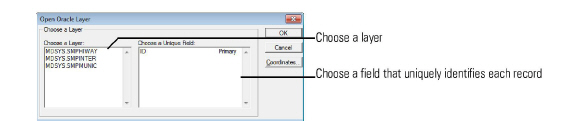
- If the Oracle database uses coordinates other than longitude and latitude, click Coordinates to display the Import Coordinates dialog box, choose the appropriate coordinate system, and click OK. For more information, see Using Data in Other Coordinate Systems.
- Click OK. Maptitude opens the Oracle database as a point, line, or area layer and adds it as a new layer.
- Click Close to close the Layers dialog box.
Maptitude draws the map with the new layer. The layer list on the Standard toolbar is updated to include the added layer.
Creating a Map Layer from a Microsoft SQL Server Spatial Layer
Maptitude can directly read and display map features stored in a Microsoft SQL Server Spatial layer. SQL Server 2008 and later store map features using the Spatial data types, “Flat Earth” (GEOMETRY or planar) and “Round Earth” (GEOGRAPHY or ellipsoidal).
SQL Server Spatial layers can contain points, lines, and polygons. You must choose which type of map feature to display if there is a mixture. Maptitude supports multi-polygon records, which SQL Server Spatial uses to store the boundaries of areas with islands and holes. Maptitude only displays the first point for multi-point records.
There must be a field that uniquely identifies each record with a number. The field can be numeric or character, but the value must be a unique number.
To Create a New Map from a Microsoft SQL Server Spatial Layer
- Choose File>Open or click on the Standard toolbar, or right-click anywhere inside the Maptitude frame except on a window and choose Open. Maptitude displays the File Open dialog box.
- Choose SQL Server Spatial Layer as the file type. Maptitude displays the Connect to SQL Server dialog box.
- Type the server name in the Server Name edit box and choose Windows or SQL Server authentication from the Authentication drop-down list.
For SQL Server authentication, type your user name in the Login edit box and, if necessary, type your password in the Password edit box
- Click OK. Maptitude connects to the SQL Server service and displays the Open SQL Server Spatial Layer dialog box.
- Choose a database from the Database drop-down list and choose a schema from the Schema drop-down list.
- Choose a layer from the Choose a Layer scroll list. Maptitude displays the fields that are in the layer.
- Choose a field that uniquely identifies each record from the Choose a Unique Field scroll list.
- If the SQL Server Spatial layer uses coordinates other than longitude and latitude, click Coordinates to display the Import Coordinates dialog box, choose the appropriate coordinate system, and click OK.
- Click OK.
Maptitude opens the SQL Server Spatial layer as a point, line, or area layer and draws a new map with the layer.
To Add a Layer from a Microsoft SQL Server Spatial Layer to an Existing Map
- Choose Map>Layers or click on the Standard toolbar, or right-click on the map window and choose Layers. Maptitude displays the Layers dialog box.
- Click Add Layer to display the File Open dialog box.
- Choose SQL Server Spatial Layer as the file type. Maptitude displays the Connect to SQL Server dialog box.
- Type the server name in the Server Name edit box and choose Windows or SQL Server authentication from the Authentication drop-down list.
For SQL Server authentication, type your user name in the Login edit box and, if necessary, type your password in the Password edit box
- Click OK. Maptitude connects to the SQL Server service and displays the Open SQL Server Spatial Layer dialog box.
- Choose a database from the Database drop-down list and choose a schema from the Schema drop-down list.
- Choose a layer from the Choose a Layer scroll list. Maptitude displays the fields that are in the layer.
- Choose a field that uniquely identifies each record from the Choose a Unique Field scroll list.
- If the SQL Server Spatial layer uses coordinates other than longitude and latitude, click Coordinates to display the Import Coordinates dialog box, choose the appropriate coordinate system, and click OK.
- Click OK. Maptitude opens the SQL Server Spatial layer as a point, line, or area layer and adds it as a new layer.
- Click Close to close the Layers dialog box.
Maptitude draws the map with the new layer. The layer list on the Standard toolbar is updated to include the added layer.
Using Esri Shapefiles as Map Layers
Maptitude can directly read and display map features stored in Esri Shapefiles. The Shapefile format is an open file specification from Esri and is the native geographic file format for ArcView 3.x. ArcGIS can also read and write Shapefiles.
Maptitude supports polygon records with multiple rings, which are used to store the boundaries of areas with islands and holes. Maptitude only displays the first point in a multipoint record. M (measure) values and Z (height) values are ignored in records where they appear.
If the Shapefile includes the spatial index files (.sbn and .sbx), which are not part of the open file specification, Maptitude can use them to speed display of the Shapefile. Otherwise, Maptitude will build a Caliper spatial index.
Maptitude can use an ArcView Legend (.avl) file that has the same file name as the Shapefile to apply display settings to the map layer that is based on the Shapefile. The settings can define a layer style or a theme. Most ArcView settings can be translated into Maptitude settings, but there are some ArcView settings that have to be approximated because of differences in the way maps, layers, and styles are created in Maptitude.
The ArcView methods for themes are very similar to the Maptitude methods for color and pattern themes, but they are stored as discrete classes and are normally treated as Manual themes. There is an option to use the Maptitude method when possible, so that the theme can be managed from the regular theme dialog box. Otherwise, the theme needs to be managed from the Manual Theme dialog box.
A Legend file can be thought of as a subset of an ArcView Project (.apr) file; see Opening an Esri ArcView 3.x Project File for more information.
|
TIP: You can also import Shapefiles into a Caliper geographic format file. Importing Esri Shapefiles for more information. |
To Create a New Map from an Esri Shapefile
- Choose File>Open or click on the Standard toolbar, or right-click anywhere inside the Maptitude frame except on a window and choose Open. Maptitude displays the File Open dialog box.
- Choose Esri Shapefile as the file type and choose a Shapefile.
- Check the Add to Map box if you want to add the Shapefile to the current working map, or if no maps are open, to open a default map for your Country Package with the Shapefile you chose. Uncheck the box to open a map that contains only the Shapefile you chose.
- Click Open. Maptitude displays the Esri Shapefile dialog box.
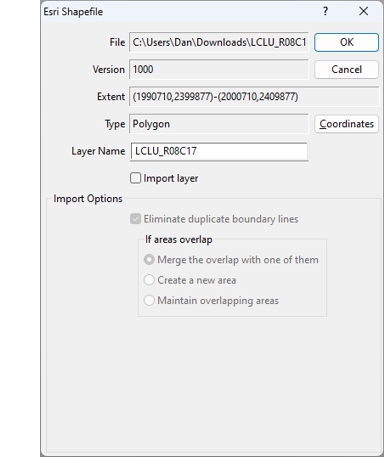
- If the Shapefile uses coordinates other than longitude and latitude, click Coordinates to display the Import Coordinates dialog box, choose the appropriate coordinate system, and click OK. For more information, see Using Data in Other Coordinate Systems.
- If there is an ArcView Legend (.avl) file associated with the Shapefile, Maptitude displays the Get ArcView Shapefile Legend Settings dialog box. Make one of the following choices:
| To do this... | Do this... |
|---|---|
| Use Maptitude theme methods | Check Use Maptitude theme method. This will use the equivalent Maptitude method when possible, so that the theme can be managed from the regular theme dialog box. |
| Use ArcView theme methods | Remove the check from Use Maptitude theme method. This will treat as Manual themes all of the methods that ArcView stores as discrete classes. |
Click OK to return to the Esri Shapefile dialog box.
- If there is a Caliper spatial index associated with the Shapefile and you want to rebuild it, such as when the index was built with the wrong coordinate system, check the Rebuild Spatial Index box.
- Click OK.
Maptitude opens the Shapefile and draws a new map with the layer. If there is an ArcView Legend (.avl) file associated with the Shapefile, Maptitude applies the display settings to the map layer.
To Add Layers from Esri Shapefiles to an Existing Map
- Choose Map>Layers or click on the Standard toolbar, or right-click on the map window and choose Layers. Maptitude displays the Layers dialog box.
- Click Add Layer to display the File Open dialog box.
- Choose Esri Shapefile as the file type.
- Choose one or more Shapefiles and click Open. Maptitude displays the Esri Shapefile dialog box for each Shapefile.
- If the Shapefile uses coordinates other than longitude and latitude, click Coordinates to display the Import Coordinates dialog box, choose the appropriate coordinate system, and click OK. For more information, see Using Data in Other Coordinate Systems.
- If there is an ArcView Legend (.avl) file associated with the Shapefile, Maptitude displays the Get ArcView Shapefile Legend Settings dialog box. Make one of the following choices:
| To do this... | Do this... |
|---|---|
| Use Maptitude theme methods | Check Use Maptitude theme method. This will use the equivalent Maptitude method when possible, so that the theme can be managed from the regular theme dialog box. |
| Use ArcView theme methods | Remove the check from Use Maptitude theme method. This will treat as Manual themes all of the methods that ArcView stores as discrete classes. |
Click OK to return to the Esri Shapefile dialog box.
- If there is a Caliper spatial index associated with the Shapefile and you want to rebuild it, such as when the index was built with the wrong coordinate system, check the Rebuild Spatial Index box.
- Click OK. Maptitude opens the Shapefile and adds it as a new layer.
If you are adding more than one layer, return to step 5 until all of the layers are added.
- Click Close to close the Layers dialog box.
Maptitude draws the map with the new layers. If there are ArcView Legend (.avl) files associated with the Shapefiles, Maptitude applies the display settings to the map layers. The layer list on the Standard toolbar is updated to include the added layers.
Opening an Esri ArcView 3.x Project File
You can open an Esri ArcView 3.x Project (.apr) file, and create ArcView-based map windows in Maptitude (called views in ArcView) with the appropriate size, shape, placement, and projection. Views that are not open become minimized map windows. The map layers (called themes in ArcView) will have appropriate settings such as show/hide, autoscale, layer style, and theme. The ArcView equivalents of color/pattern, dot-density, size, and chart themes are all handled by Maptitude. The Shapefiles referenced by a Project file need to either be in the location referenced by the Project file or in the same folder as the Project file.
You can use an ArcView Project (.apr) file to open one or more maps that have layers based on Esri Shapefiles. The command handles project files created by ArcView 2.x and 3.x; a totally different file format is used by the 8.x (ArcGIS) version of ArcView. You can open any number of project files, because each is turned into a set of maps, and Maptitude has no practical limit on the number of maps that can be open. Other document types in the project file, such as Tables and Scripts, are ignored.
The command reads a project file and finds the ArcView settings that can be translated into Maptitude settings. Because ArcView and Maptitude list themes (layers) in opposite orders, themes are read from last to first. Most, but not all, settings can be used. Here are some notes:
- ArcView can have only one theme per layer, but can add a layer more than once to add additional themes. Maptitude can have several different types of themes per layer, but can only add a layer once to a map. The last theme for a Shapefile is the one used, because it is the first one read.
- If the coordinates are longitude/latitude, then the projection is set to Equidistant Cylindrical. Otherwise, the projection can be one of the 20 projections handled by ArcView.
- ArcView has six types of themes. A single symbol theme is used as the layer settings. A graduated color theme becomes a color or pattern theme. Because a graduated symbol theme has discrete classes, it is not a true size theme, so it becomes a color or pattern theme. A unique value theme is treated as a color or pattern theme with a List of Values method. Dot density and chart themes are handled as expected.
- ArcView has five methods, which are very similar to Maptitude methods for color and pattern themes. Equal Area would be Equal Weight, Equal Interval would be Equal Steps, Equal Number of Features would be Quantiles, and Standard Deviation would be the same. Maptitude does not have a Natural Breaks method. However, all of these methods are stored as discrete classes and are normally treated as Manual themes. There is an option to use the Maptitude method when possible, so that the theme can be managed from the regular theme dialog box. Otherwise, the theme needs to be managed from the Manual Theme dialog box.
- The No Data class in ArcView is the Other class in Maptitude. Normalization can be done by field, but not by percent of total. The precision (number of decimal places) of values is handled.
- In ArcView, point symbols are called markers. Maptitude handles basic markers, and for a composite marker Maptitude uses the last basic marker. Font characters are used if the font is available; otherwise, Maptitude uses a solid circle from the Caliper Cartographic font.
- Markers can be created from stipples, which are color bitmaps stored with the settings. Maptitude writes each one to a .bmp file in the bmp folder in the Maptitude program folder, using a file name that is “AV” plus the name of project file plus the object number of the stipple. The default color bitmap is geo.bmp in the bmp folder. A special type of bitmap called an AVIcon is not handled.
- In ArcView, line symbols are called pens. Maptitude handles basic pens, vector pens such as arrow, diamond, dot, and hollow, and composite pens. Maptitude renders vector line markers by drawing M on top of a line at the marker positions.
- In ArcView, area symbols are called fills. Maptitude handles solid fills, and 8x8 patterns with white or transparent (null) as the background color of pattern. Maptitude renders vector fill with a V pattern and composite fill with a C pattern.
Maptitude does nothing with ArcView labels or label settings; it is better to use the automatic labeling capabilities of Maptitude.
To Open an Esri ArcView 3.x Project File
- Choose File>Open or click on the Standard toolbar, or right-click anywhere inside the Maptitude frame except on a window and choose Open. Maptitude displays the File Open dialog box.
- Choose Esri 3.x Project File as the file type.
- Choose a Project file and click Open. Maptitude displays the Get ArcView Project File dialog box.
- Make one of the following choices:
| To do this... | Do this... |
|---|---|
| Use Maptitude theme methods | Check Use Maptitude theme method. This will use the equivalent Maptitude method when possible, so that the theme can be managed from the regular theme dialog box. |
| Use ArcView theme methods | Remove the check from Use Maptitude theme method. This will treat as Manual themes all of the methods that ArcView stores as discrete classes. |
- Click OK.
Maptitude creates map windows from views with the appropriate size, shape, placement, and projection. Views that are not open become minimized map windows. The map layers (called themes in ArcView) will have appropriate settings such as show/hide, autoscale, layer style, and theme. The ArcView equivalents of color/pattern, dot-density, size, and chart themes are all handled by Maptitude.
Creating a Map Layer from an Esri Personal Geodatabase
Maptitude can directly read and display point, line, and area features stored in tables in an Esri personal geodatabase. Each table stores points, lines, or areas. Each record has a unique numeric ID, a shape field containing one or more coordinates, and attributes that describe the map feature. Maptitude only displays the first point for multipoint records, and only displays the first line for multi-line records.
An Esri personal geodatabase is stored in Microsoft Access (.mdb) database. Maptitude does not currently support multiuser personal geodatabases, which can be stored in a variety of database management systems and require ArcSDE as middleware.
Maptitude recognizes Microsoft Access files that contain Esri personal geodatabases, and opens a table as a map layer. For more information on opening a table as a dataview, see Creating a Dataview from a Microsoft Access Table.
To Create a New Map from an Esri Personal Geodatabase
- Choose File>Open or click on the Standard toolbar, or right-click anywhere inside the Maptitude frame except on a window and choose Open. Maptitude displays the File Open dialog box.
- Choose ESRI Personal Geodatabase as the file type and choose a personal geodatabase.
- Check the Add to Map box if you want to add the personal geodatabase to the current working map, or if no maps are open, to open a default map for your Country Package with the personal geodatabase you chose. Uncheck the box to open a map that contains only the personal geodatabase you chose.
- Click Open. Maptitude displays the Open Geodatabase Layer dialog box.
- Highlight one or more tables in the list.
- If the table uses coordinates other than longitude and latitude, click Coordinates to display the Import Coordinates dialog box, choose the appropriate coordinate system, and click OK. For more information, see Using Data in Other Coordinate Systems.
- Click OK.
Maptitude opens the personal geodatabase table as a point, line, or area layer and draws a new map with the layer.
To Add a Layer from an Esri Personal Geodatabase to an Existing Map
- Choose Map>Layers or click on the Standard toolbar, or right-click on the map window and choose Layers. Maptitude displays the Layers dialog box.
- Click Add Layer to display the File Open dialog box.
- Choose Esri Personal Geodatabase as the file type.
- Choose a personal geodatabase and click Open. Maptitude displays the Open Geodatabase Layer dialog box.
- Highlight one or more tables in the list.
- If the table uses coordinates other than longitude and latitude, click Coordinates to display the Import Coordinates dialog box, choose the appropriate coordinate system, and click OK. For more information, see Using Data in Other Coordinate Systems.
- Click OK. Maptitude opens the personal geodatabase table as a point, line, or area layer and adds it as a new layer.
- Click Close to close the Layers dialog box.
Maptitude draws the map with the new layer. The layer list on the Standard toolbar is updated to include the added layer.
Creating a Map Layer from an Esri File Geodatabase
Maptitude can directly read and display point, line, and area features stored in feature classes in an Esri file geodatabase. Feature classes can be grouped into feature datasets. Each feature class stores points, lines, or areas. Each record has a unique numeric ID, a shape field containing one or more coordinates, and attributes that describe the map feature.
An Esri file geodatabase is a collection of files stored in a folder with a name of the form FILENAME.GBD. Like an Esri personal geodatabase it is designed to have only one writer of the same data at a time, but can have many readers of the same data. There is no 2GB size limit as with an Esri personal geodatabase; each feature class can be up to 1TB, and many feature classes can be in one Esri file geodatabase.
To Create a New Map from an Esri File Geodatabase
- Choose File-Open or click on the Standard toolbar, or right-click anywhere inside the Maptitude frame except on a window and choose Open. Maptitude displays the File Open dialog box.
- Choose ESRI File Geodatabase as the file type and choose a file geodatabase.
- Check the Add to Map box if you want to add the file geodatabase to the current working map, or if no maps are open, to open a default map for your Country Package with the file geodatabase you chose. Uncheck the box to open a map that contains only the file geodatabase you chose.
- Click Open. Maptitude displays the File Geodatabase dialog box.
- Highlight one or more layers in the in the Layers to Open list.
- Click OK.
Maptitude opens one or more feature classes as point, line, or area layers and draws a new map with the layers.
To Add a Layer from an Esri File Geodatabase to an Existing Map
- Choose Map-Layers or click on the Standard toolbar, or right-click on the map window and choose Layers. Maptitude displays the Layers dialog box.
- Click Add Layer to display the File Open dialog box.
- Choose Esri File Geodatabase as the file type.
- Choose a file geodatabase and click Open. Maptitude displays the File Geodatabase dialog box.
- Highlight one or more layers in the in the Layers to Open list.
- Click OK. Maptitude opens the feature class(es) as a point, line, or area layer and adds it as a new layer.
- Click Close to close the Layers dialog box.
Maptitude draws the map with the new layer(s). The layer list on the Standard toolbar is updated to include the added layer(s).
Creating a Map Layer from an Esri ArcSDE Geodatabase
NOTE: To use an Esri ArcSDE geodatabase you must have a valid license for ArcGIS on your computer, and you must have access to the database management system used to store the Esri ArcSDE geodatabase.
Maptitude can directly read and display point, line, and area features stored in feature classes in an Esri ArcSDE geodatabase. Feature classes can be grouped into feature datasets. Each feature class stores points, lines, or areas. Each record has a unique numeric ID, a shape field containing one or more coordinates, and attributes that describe the map feature. Maptitude only displays the first point for multi-point records.
An Esri ArcSDE geodatabase is stored in a multiuser geodatabase, which can be hosted by a variety of database management systems, and requires ArcSDE as middleware. An Esri ArcSDE geodatabase is designed for many readers and writers, and size is only limited by the limits of the database management system.
To connect to an Esri ArcSDE geodatabase you need a Spatial Database Connection (sde) file. You can create one with ArcCatalog by opening Database Connections, double-clicking on Add Spatial Database Connection, filling out the entries in the Spatial Database Connection dialog box, and clicking OK. The SDE file will be saved on your hard drive in the folder Documents and Settings\[username]\Application Data\ESRI\ArcCatalog; you can copy it to another folder. In Windows 7 the folder is Documents and Settings\[username]\App Data\Roaming\ESRI\ArcCatalog, where App Data is a hidden folder.
To Create a New Map from an Esri ArcSDE Geodatabase
- Choose File-Open or click on the Standard toolbar, or right-click anywhere inside the Maptitude frame except on a window and choose Open. Maptitude displays the File Open dialog box.
- Choose ESRI ArcSDE Geodatabase as the file type and choose an ArcSDE geodatabase.
- Check the Add to Map box if you want to add the personal geodatabase to the current working map, or if no maps are open, to open a default map for your Country Package with the personal geodatabase you chose. Uncheck the box to open a map that contains only the personal geodatabase you chose.
- Click Open. Maptitude displays the Open ArcSDE Geodatabase Layers dialog box.
- Click Layers in the Type to Open radio list to display the feature classes and their feature datasets.
- Highlight one or more feature classes in the list.
- If the feature classes use coordinates other than longitude and latitude, click Coordinates to display the Import Coordinates dialog box, choose the appropriate coordinate system, and click OK. For more information, see Using Data in Other Coordinate Systems.
- Click OK.
Maptitude opens one or more feature classes as point, line, or area layers and draws a new map with the layers.
To Add a Layer from an Esri ArcSDE Geodatabase to an Existing Map
- Choose Map-Layers or click on the Standard toolbar, or right-click on the map window and choose Layers. Maptitude displays the Layers dialog box.
- Click Add Layer to display the File Open dialog box.
- Choose Esri ArcSDE Geodatabase as the file type.
- Choose an ArcSDE geodatabase and click Open. Maptitude displays the Open ArcSDE Geodatabase Layers dialog box.
- Highlight one or more feature classes in the list.
- If the feature classes use coordinates other than longitude and latitude, click Coordinates to display the Import Coordinates dialog box, choose the appropriate coordinate system, and click OK. For more information, see Using Data in Other Coordinate Systems.
- Click OK. Maptitude opens the feature class(es) as a point, line, or area layer and adds it as a new layer.
- Click Close to close the Layers dialog box.
Maptitude draws the map with the new layer(s). The layer list on the Standard toolbar is updated to include the added layer(s).
Using FlatGeobuf Files as Map Layers
Maptitude can directly read and display map features stored in a FlatGeobuf (.FGB) file.
 To Create a New Map from a FlatGeobuf File
- Choose File>Open or click on the Standard toolbar, or right-click anywhere inside the Maptitude frame except on a window and choose Open. Maptitude displays the File Open dialog box.
- Choose FlatGeobuf File as the file type and choose a file.
- Check the Add to Map box if you want to add the file to the current working map, or if no maps are open, to open a default map for your Country Package with the file you chose. Uncheck the box to open a map that contains only the GeoJSON file you chose.
- Click Open. Maptitude displays the FlatGeobuf dialog box.
- If necessary, choose a layer to open and click OK.
Maptitude opens the FlatGeobuf file as a point, line, or area layer and draws a new map with the layer.
To Add a Layer from a FlatGeobuf File to an Existing Map
- Choose Map>Layers or click on the Standard toolbar, or right-click on the map window and choose Layers. Maptitude displays the Layers dialog box.
- Click Add Layer to display the File Open dialog box.
- Choose FlatGeobuf File as the file type.
- Choose one or more files and click Open. Maptitude displays the FlatGeobuf dialog box for each file.
- Click OK. Maptitude opens the FlatGeobuf file and adds it as a new layer. If you are adding more than one layer, continue to click OK until all of the layers are added.
- Click Close to close the Layers dialog box.
Maptitude draws the map with the new layer(s).
Using GeoJSON Files as Map Layers
Maptitude can directly read and display map features stored in a GeoJSON .JSON or .GEOJSON file.
To Create a New Map from a GeoJSON File
- Choose File>Open or click on the Standard toolbar, or right-click anywhere inside the Maptitude frame except on a window and choose Open. Maptitude displays the File Open dialog box.
- Choose GeoJSON File as the file type and choose a file.
- Check the Add to Map box if you want to add the file to the current working map, or if no maps are open, to open a default map for your Country Package with the file you chose. Uncheck the box to open a map that contains only the GeoJSON file you chose.
- Click Open. Maptitude displays the JSON/GeoJSON File dialog box.
- If necessary, choose a layer to open and click OK.
Maptitude opens the GeoJSON file as a point, line, or area layer and draws a new map with the layer.
To Add a Layer from a GeoJSON File to an Existing Map
- Choose Map>Layers or click on the Standard toolbar, or right-click on the map window and choose Layers. Maptitude displays the Layers dialog box.
- Click Add Layer to display the File Open dialog box.
- Choose GeoJSON File as the file type.
- Choose one or more files and click Open. Maptitude displays the JSON/GeoJSON File dialog box for each file.
- Click OK. Maptitude opens the GeoJSON file and adds it as a new layer. If you are adding more than one layer, continue to click OK until all of the layers are added.
- Click Close to close the Layers dialog box.
Maptitude draws the map with the new layer(s).
Using MapInfo TAB Files as Map Layers
Maptitude can directly read and display map features stored in MapInfo TAB files. TAB files can contain a mixture of points, lines, and areas. If Maptitude detects more than one type of map feature, you can choose the layer type.
|
TIP: You can also import MIF files. See Importing MapInfo Interchange Format (MIF) Files. |
To Create a New Map from a MapInfo TAB File
- Choose File>Open or click on the Standard toolbar, or right-click anywhere inside the Maptitude frame except on a window and choose Open. Maptitude displays the File Open dialog box.
- Choose MapInfo TAB File as the file type.
- Choose a TAB file and click Open. Maptitude displays the MapInfo TAB File dialog box.
- Type a name for the layer in the Layer Name edit box.
- If the file contains a mixture of points, lines, and areas, choose a layer type from the radio list.
- If the TAB file uses coordinates other than longitude and latitude, click Coordinates to display the Import Coordinates dialog box, choose the appropriate coordinate system, and click OK. For more information, see Using Data in Other Coordinate Systems.
- Click OK.
Maptitude opens the TAB file and draws a new map with the layer.
To Add Layers from MapInfo TAB Files to an Existing Map
- Choose Map>Layers or click on the Standard toolbar, or right-click on the map window and choose Layers. Maptitude displays the Layers dialog box.
- Click Add Layer to display the File Open dialog box.
- Choose MapInfo TAB File as the file type.
- Choose one or more TAB files and click Open. Maptitude displays the MapInfo TAB File dialog box for each TAB file.
- Type a name for the layer in the Layer Name edit box.
- If the file contains a mixture of points, lines, and areas, choose a layer type from the radio list.
- If the TAB file uses coordinates other than longitude and latitude, click Coordinates to display the Import Coordinates dialog box, choose the appropriate coordinate system, and click OK. For more information, see Using Data in Other Coordinate Systems.
- Click OK. Maptitude opens the TAB file and adds it as a new layer.
If you are adding more than one layer, return to step 5 until all of the layers are added.
- Click Close to close the Layers dialog box.
Maptitude draws the map with the new layers. The layer list on the Standard toolbar is updated to include the added layers.
Creating a Map Layer from a PostgreSQL Layer
Maptitude can directly read and display map features stored in a PostgreSQL Spatial layer using PostGIS. PostGIS stores map features in PostgreSQL using the Spatial data types, “Flat Earth” (GEOMETRY or planar) and “Round Earth” (GEOGRAPHY or ellipsoidal).
PostgreSQL Spatial layers can contain points, lines, and polygons. You must choose which type of map feature to display if there is a mixture. Maptitude supports multi-polygon records, which PostgreSQL Spatial uses to store the boundaries of areas with islands and holes. Maptitude only displays the first point for multi-point records.
There must be a field that uniquely identifies each record with a number. The field can be numeric or character, but the value must be a unique number.
To Create a New Map from a PostgreSQL Spatial Layer
- Choose File>Open or click on the Standard toolbar, or right-click anywhere inside the Maptitude frame except on a window and choose Open. Maptitude displays the File Open dialog box.
- Choose PostgreSQL Spatial Layer as the file type. Maptitude displays the Connect to PostgreSQL dialog box.
- Type the server name in the Server Name edit box, your user name in the Login edit box and, if necessary, type your password in the Password edit box.
- Click OK. Maptitude connects to the PostgreSQL service and displays the Open PostgreSQL Spatial Layer dialog box.
- Choose a database from the Database drop-down list and choose a schema from the Schema drop-down list.
- Choose a layer from the Choose a Layer scroll list. Maptitude displays the fields that are in the layer.
- Choose a field that uniquely identifies each record from the Choose a Unique Field scroll list.
- If the PostgreSQL Spatial layer uses coordinates other than longitude and latitude, click Coordinates to display the Import Coordinates dialog box, choose the appropriate coordinate system, and click OK.
- Click OK.
Maptitude opens the PostgreSQL Spatial layer as a point, line, or area layer and draws a new map with the layer.
To Add a Layer from a PostgreSQL Spatial Layer to an Existing Map
- Choose Map>Layers or click on the Standard toolbar, or right-click on the map window and choose Layers. Maptitude displays the Layers dialog box.
- Click Add Layer to display the File Open dialog box.
- Choose PostgreSQL Spatial Layer as the file type. Maptitude displays the Connect to PostgreSQL dialog box.
- Type the server name in the Server Name edit box, type your user name in the Login edit box and, if necessary, type your password in the Password edit box.
- Click OK. Maptitude connects to the PostgreSQL service and displays the Open PostgreSQL Spatial Layer dialog box.
- Choose a database from the Database drop-down list and choose a schema from the Schema drop-down list.
- Choose a layer from the Choose a Layer scroll list. Maptitude displays the fields that are in the layer.
- Choose a field that uniquely identifies each record from the Choose a Unique Field scroll list.
- If the PostgreSQL layer uses coordinates other than longitude and latitude, click Coordinates to display the Import Coordinates dialog box, choose the appropriate coordinate system, and click OK.
- Click OK. Maptitude opens the PostgreSQL Spatial layer as a point, line, or area layer and adds it as a new layer.
- Click Close to close the Layers dialog box.
Maptitude draws the map with the new layer. The layer list on the Standard toolbar is updated to include the added layer.
©2026 Caliper Corporation