Maptitude Help / Creating Maps / Using the Display Manager
Using the Display Manager
The Display Manager is a tool for viewing and controlling the style, visibility, and label settings for the layers in a map.
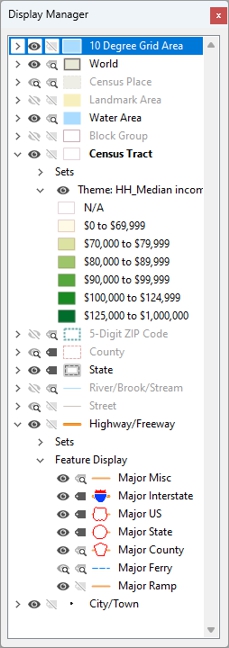
With the Display Manager you can see the style of every layer in your map, whether or not labels are active for the layer, and whether or not the layer is currently visible. In addition, you can expand the layer sections by clicking  to see visibility, style, and label status of any selection sets, themes, or feature display settings that are present for the layer.
For each item in the Display Manager, there is a sample of its style as well as symbols indicating the display and label status:
| Symbol | Definition |
|---|---|
 |
Indicates a layer is visible, a selection set is active, or a feature display setting is active |
 |
Indicates a layer, selection set, or feature display is active, but is currently autoscaled off |
 |
Indicates a layer or selection set is hidden |
 |
Indicates a selection set or feature display setting is inactive |
 |
Indicates a layer, selection set, or feature display setting has labels |
 |
Indicates a layer, selection set, or feature display setting has labels, but currently they are autoscaled off |
 |
Indicates a layer, selection set, or feature display setting has no labels |
The working layer is also indicated in the Display Manager with bold type.
You can also use the Display Manager to quickly change the visibility status of items and as a shortcut to the dialog boxes necessary for changing other display settings. The Display Manager does not replace dialog boxes such as Layers, Style, Labels, Selection Settings, Feature Display Settings, Autoscale, or the various theme dialog boxes. Instead, it provides you with another way to control your map design.
 |
For a video tutorial see: (Internet connection required) |

- Choose Map>Display Manager Toolbar.
- Make changes to the Display Manager contents as follows:
 to expand an item or click
  to collapse an expanded item
- Make changes to the map as follows:
| To do this... | Do this... |
|---|---|
| Hide an item | Click on the symbol next to a layer or selection set item to change it to . |
| Show an item | Click on the symbol next to a layer, selection set, or feature display item to change it to . |
| Make an item inactive | Click on the symbol next to a selection set or feature display item to change it to . |
| Change the style of an item | Click on the style sample next to a layer, selection set, theme, or feature display item to display the Style dialog box. Make changes to the style and click OK. See Using Styles for more information. |
| Change the label of an item | Click on the label symbol next to a layer, selection set, or feature display item to display the Labels dialog box. Make changes to the label and click OK. See Creating Labels for more information. |
| Rename an item | Right-click on a layer, theme, selection set, or feature display item and choose Rename, type a new name for the item and click OK. |
| Show autoscaled off labels | Right-click on a layer, feature display, or selection set whose labels are autoscaled off and choose Show Labels (Clear Autoscale). |
| Show selected features only | Right-click on a layer and choose Show Selected Only. |
| Drop an item from the map | Right-click on a layer, selection set, or feature display item and choose Remove. |
| Zoom to an item | Right-click on a layer or a selection set item and choose Zoom. |
- Make other choices as follows:
| To do this... | Do this... |
|---|---|
| Change the working layer | Right-click on a layer and chooseMake Working Layer. |
| Create a dataview | Right-click on a layer or a selection set item and chooseNew Dataview. |
Try It Yourself: Using the Display Manager
1. Choose File>Open Workspace or click  on the Standard toolbar, then open the Display workspace in the Tutorial folder.
2. If the Display Manager is not visible, choose Map>Display Manager Toolbar.
3. Right-click on any item in the Display Manager and choose Expand All to see all elements of the map.
4. Click next to Railroad. Maptitude displays the railroads in the map and changes the symbol to .
5. Click next to County to hide the county layer.
6. Right-click on the Highway layer and choose Zoom. Maptitude changes the map scale so that all of the highway features in the layer are visible.
7. Click the black star next to the State Capital selection set to display the Style dialog box. Change the color to dark red, the size to 11, and click OK.
8. Click the label symbol next to the State Capital selection set to display the Labels dialog box. Change the color to the same dark red and click OK.
9. Choose File>Close Workspace and click Don't Save to close the workspace without saving any changes.
©2026 Caliper Corporation