Maptitude Help / Filters, Queries, and Selection Sets / Creating New Files from Selection Sets
Creating New Files from Selection Sets
You select records from a geographic file because you want to highlight them in a map or produce a tabular report showing records that meet some condition. Maptitude also lets you take the records in a selection set and create new tables or new geographic files that contain only those records.
From a selection set, you can save a:
- Dataview to a new file on disk that stores information only for the records in a selection set. When you create a table from a selection set, you can store the table in any of the file formats supported by Maptitude.
- Geographic file that contains only the selected map features. The new geographic file is smaller than the original, of course, and contains fewer features.
- Geographic file that contains areas that are merged from areas in selection sets
You cannot create new files from the HERE geographic layers included with Maptitude.
 To Create a New Table from a Selection Set
- In the dataview, choose the selection set you want from the drop-down list on the Standard toolbar.
- Use the dataview tools and commands to arrange the columns the way you want.
- Choose File>Export>Table to display the Save As dialog box.
- Choose the file type you want to create from the Save as Type drop-down list.
- Type a file name.
- Click Save.
Maptitude saves the data for the selected records in a new table. To open the new table and display it in a dataview, use the File>Open command.
To Create a New Geographic File from a Selection Set
- Choose the map layer whose features you want to extract from the drop-down list on the Standard toolbar.
- Choose File>Export>Geography to display the Export Geography dialog box.
- Choose the selection set that contains the features to export from the Export drop-down list.
- Choose the export file type from the To drop-down list.
- If you are exporting to a Maptitude format file, choose the field containing the feature IDs from the Data Field drop-down list. If you are exporting a line file, also choose the field containing the node IDs from the Node ID Field drop-down list.
- Enter a name for the new layer in the Layer Name edit box. If the layer is a line layer, also enter a name for the associated node layer.
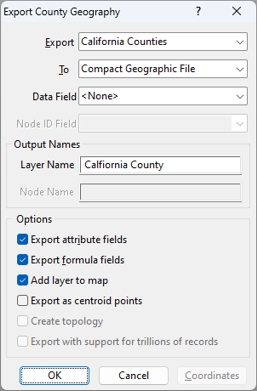
- Choose any additional options as follows:
| Option | What it does |
|---|---|
| Export attribute fields | Check to include tabular data with the layer or uncheck to export just the geography with no data attributes |
| Export formula fields | Check to export any formula fields with the layer or uncheck to export just the attribute data |
| Add layer to map | Check to add the exported layer to the current map or uncheck to export the layer without adding it to the current map |
| Export as centroid points | Check to export areas as centroid points or uncheck to export area layers as they are |
| Create topology | Check to export non-topological areas with topology or uncheck to export non-topological areas as they are |
| Export with support for billions of records | Check if you need a database that supports billions of records. Note, the resulting Standard Geographic File (.DBD) will not be compatible with Maptitude 2024 and earlier. |
- To export geographic data using a coordinate system other than longitude and latitude, click Coordinates to display the Export Coordinates dialog box, choose the appropriate coordinate system, and click OK. For more information, see Using Data in Other Coordinate Systems.
- Click OK. Maptitude displays the Save As dialog box.
- Type the file name and click Save.
 |
TIP: You can also export portions of one or more layers by clipping. For more information see Clipping Geographic Files by Area |
Maptitude creates a new geographic file containing the features you want. For more information on geographic file formats, see Geographic File Formats.
Use the File>Open command or the Map>Layers command to open the new file or add it to a map.
Try It Yourself: Creating Geographic Files from a Selection
1. Choose File>Open Workspace or click  on the Standard toolbar, then open the Locator workspace in the Tutorial folder. You want to make a new geographic file of just the counties in Rhode Island.
2. Right-click on County in the Display Manager and choose Make Working Layer.
3. Choose Selection>Select by Condition or click  in the Selection Tools drop-down on the Standard toolbar to display the Select by Condition dialog box.
4. In the Condition Builder, choose State from the Field List drop-down list, choose = from the Operator drop-down list, choose 44 from the Values of State drop-down list, and click OK (44 is the code for Rhode Island). Maptitude selects the counties in Rhode Island.
5. Choose File>Export>Geography to display the Export Geography dialog box, and verify that Selection is chosen in the Export drop-down list. The other settings are correct.
6. Click OK to display the Save As dialog box.
7. Choose a folder on your computer in which to save the new files (you will need to remember this folder for step 8), then type “my counties” as the file name, and click Save. Maptitude exports the selected counties to the new geographic file.
8. Choose File>Open or click on the Standard toolbar, choose the folder to which you just saved the counties, choose Geographic File as the file type, click on the file my counties.cdf, remove the check from the Add to map box, and click Open. Maptitude creates a map with the new file.
9. Choose File>Close Workspace and click Don't Save to close the maps without saving any changes.
Creating Areas by Merging Sets
If you have created selection sets on an area layer then you can create a new area geographic file of areas that merge features in the same sets using the Tools>Editing>Merge by Selection Sets command. The resulting areas will be named based on the selection set names.
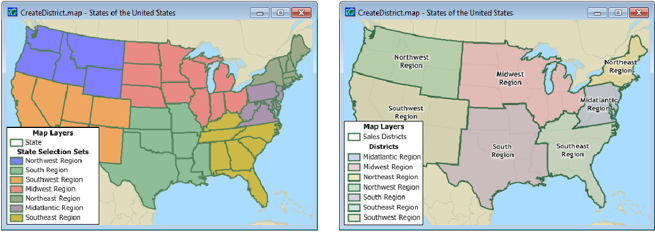
The map on the left has selection sets on the state layer. By merging selection sets you can create a new area layer that would look like the one in the map on the right.
Features can be in more than one selection set. This will create overlapping areas, and they will be stored in a non-topological area geographic file. If no territories overlap, they will be stored in a regular area geographic file, which does not allow overlaps. For more information on non-topological area geographic files, see Creating New Geographic Files. For more information editing non-topological area geographic files, see Editing Area Features.
Once you have created areas from the selection sets you can then create a Territory Layer with the Territory Wizard; for more information, see Creating Territories.
To Create a New Area Layer Using Selection Sets on an Area Layer
- Choose the area layer, create a selection set for each territory and, if necessary, rename each selection set to the name or number of the territory.
- Choose Tools>Editing>Merge by Selection Sets to display the Merge by Selection Sets dialog box.
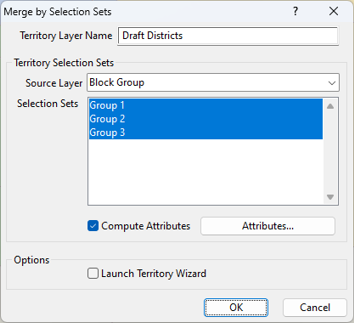
- Enter a name for the new layer in the Territory Layer Name box.
- Choose the layer with the selection sets from the Source Layer drop-down list.
- Highlight one or more selection sets in the scroll list.
- Check the Compute Attributes box to compute attributes for new areas based on the attributes in the base layer.
- If you want to create a new territory layer from the areas, check the Launch Territory Wizard box or leave it unchecked to just create a new area layer.
- Click OK.
 |
NOTE: To learn about using the Attributes button, see To Change the Aggregation Method when Calculating Demographics. |
Maptitude creates an area layer of the territories, adds it to the map, and optionally launches the Territory Manager. For more information see, Using the Territory Wizard and Creating Territories from My Area Layer.
Regardless of whether you chose to calculate demographics, you can export demographic overlay data and other information to Excel by making the resulting area layer the working layer and clicking  on the Standard toolbar.
©2026 Caliper Corporation