Maptitude Help / Geographic Analysis Tools / Creating Territories
Creating Territories
A territory is an area that is made up of several smaller areas, all joined together. For example, sales territories or market areas might be made up of groups of ZIP Code areas, counties, or states. Maptitude also supports hierarchical territories with any number of levels, such as territories, districts, and regions. Maptitude can build the territories for you and compute the attributes of each one.
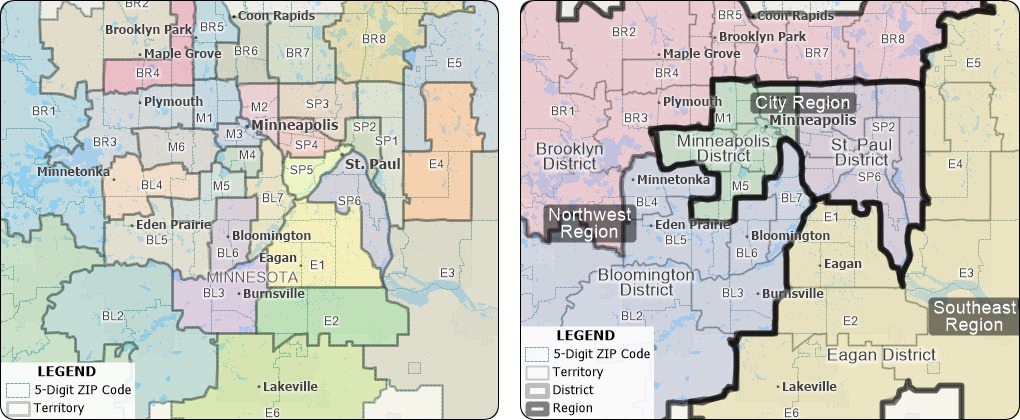
Left: A territory layer created from groups of ZIP Codes. Right: A hierarchical territory layer with districts created from groups of territories and regions created from groups of districts.
The primary way to create territories is with the Territory Wizard. The Territory Wizard lets you construct territories in several ways:
- Interactively by clicking on areas in a map that make up the individual territories
- From a table that contains a field that identifies areas (such as postal code or state abbreviation) and the territories to which they belong
- From a point layer that contains a field identifying the territory to which each point belongs
- From an area layer
You can then manage the territories with the Territory Manager. The Territory Manager has tools that let you:
- Create a new territory
- Choose or modify an existing territory
- Assign territories to different levels of a hierarchy or to different territories within the same level
- Fill holes within territories and find non-touching areas in a territory
- Check territories and export them to Excel
- Print layouts and create workload reports
Maptitude also has two other commands that create new areas: Tools>Routing & Directions>Drive-Time Influence Areas (see Partitioning a Network) and Tools>Analysis>Straight Line Influence Areas (see Creating Areas of Influence).
Using the Territory Wizard
With the Territory Wizard you can create territories either interactively from areas in a map, or by using your territory table, a point layer, or an area layer. The territories are stored in a territory layer in the map, and are created from the chosen geographic layer, such as postal codes, ZIP Codes, or Census Tracts. It is best to start with the smallest geographical areas that will be represented within your territories. For instance, if some of your territories are built from ZIP Codes and some are built from counties, then choose ZIP Codes as the geographic layer.
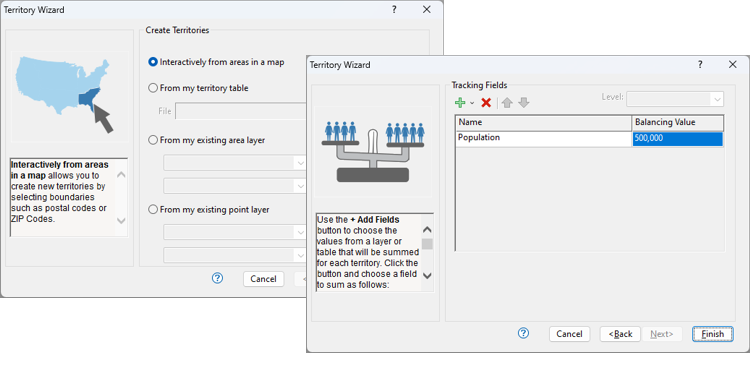
You can choose one or more fields to track if you want to balance the sizes of the territories. Maptitude will sum these fields for each territory and show you the numerical and percent deviations from the balancing values, so you can adjust your territories to be more balanced. Tracking fields can come from:
- The base geographic layer used to build the territories. For example, if you were building territories from the ZIP Code geographic layer and you wanted to know the population of each territory, you would choose the Population field from the ZIP Code layer.
- Your territory table. For example, if you were using a table showing sales by ZIP Code, and you wanted to know the sales of each territory, you would choose your sales field from your table.
- Any table that contains the name or identifier of the geographic layer used to build the territories. For example, if you had a table showing previous year sales by ZIP Code, and you wanted to know the previous year sales of each territory, you would choose your sales field from your table.
 |
For a video tutorial see: (Internet connection required) • Creating Territories Interactively with Maptitude • Creating Territories from Tables or Spreadsheets with Maptitude |
Creating Territories Interactively from Areas in a Map
With this option you can create an empty territory layer and then click on the areas to add to the territories. Afterwards, you can use the Territory Manager to make changes to the territories.
 To Create Territories Interactively from Areas in a Map
- If you have a workspace open, choose Map>New Territory Layer or click
 Territory Manager in the analysis tools drop-down on the Standard toolbar to display the Territory Wizard. Otherwise, choose File>New Workspace or click
  on the Standard toolbar to display the Home dialog box, choose New map of my territory data/table and click OK or choose Map>New Territory Layer.
 - Choose Interactively from Areas in a Map in the radio list and click Next>. Maptitude displays the Map Settings page of the Territory Wizard.
- Make map settings choices as follows:
| To do this... | Do this... |
|---|---|
| Use an open map | Choose the map from the Map drop-down list, the layer in that map that will be used to build the territories from the Geography Layer drop-down list, and the name or code field from the Geography Field drop-down list. |
| Create a new map | Choose "New Default Map" from the Map drop-down list, the layer in that map that will be used to build the territories from the Geography Layer drop-down list, and the name or code field from the Geography Field drop-down list. |
 |
TIP: Choose the smallest geographic areas that will be represented in your territories for the Geography Layer. |
- Click Next>. Maptitude displays the Hierarchy Settings page of the Territory Wizard dialog box.
- If you want to change the name of the territory layer, click on the "Territory" cell in the Layer Name column and enter a different name.
- If you need just a single level territory layer, skip to step 7. If your territory hierarchy has more than one level, make choices as follows:
| To do this... | Do this... |
|---|---|
| Add a level to the hierarchy | Click Add Row and optionally rename the layer in the Layer Name column. |
| Rename a layer in the hierarchy | Click in the Layer Name column and enter a new name. |
| Delete a level from the hierarchy | Click Delete Last Row. |
| Rename the hierarchy | Enter a name in the Hierarchy Name box. (e.g., "Company Sales Territories" or "School Districts") |
- Click Next>. Maptitude displays the Tracking Fields page of the Territory Wizard dialog box.
- Make tracking fields choices as follows:
| To do this... | Do this... |
|---|---|
| Add tracking fields from the geographic layer | Click  and choose Add Geographic Layer Fields. Choose one or more fields from the dialog box and click OK. Maptitude adds the fields in the Name column. and choose Add Geographic Layer Fields. Choose one or more fields from the dialog box and click OK. Maptitude adds the fields in the Name column. |
| Import tracking fields from a file | Click and choose Import Fields from File. Choose the file to open from the dialog box and click Open. If opening an Excel workbook, choose the sheet to use and click OK. Choose the geography field from the next dialog box and click OK, then choose one or more tracking fields from the next dialog box and click OK. Maptitude adds the fields in the Name column. |
| Drop tracking fields | Highlight one or more tracking field names, and click  . . |
| Rearrange tracking fields | Highlight one or more tracking field names, and click  or or  . . |
| Set a balancing value | Click in a cell in the Balancing Value column, and type a value. |
- Click Finish.
Maptitude adds an empty territory layer to the open map or creates a new map with an empty territory layer, and opens the Territory Manager. You can now use the tools in the Territory Manager to interactively select the features to put in each territory. For more information, see Using the Territory Manager.
Creating Territories from My Table
With this option you can create a Territory Layer from territories that you have defined in a table or spreadsheet. This option requires a field of names or identifiers for the areas (e.g., postal code, state name/abbreviation) and a field of names or identifiers for the territories to which the areas belong (e.g., sales representative name, territory name/code). You can choose the map layer to use for creating the territories and the field that identifies features in that layer. Then you can use the Territory Manager to make changes to the territories.
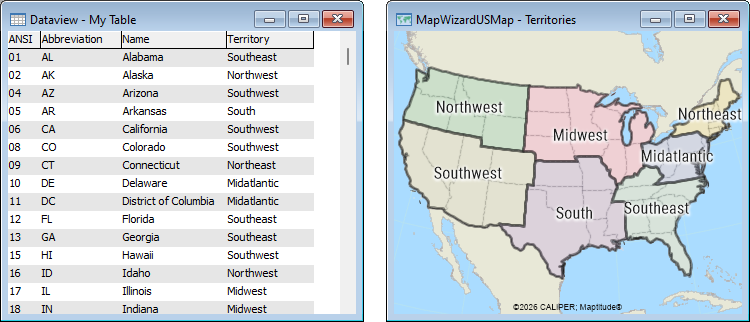
Create territories defined in the Territory field in this table out of states by using the ANSI, Abbreviation, or Name fields and matching them to the state layer
To Create Territories from My Table
- If you have a workspace open, choose Map>New Territory Layer to display the Territory Wizard. Otherwise, choose File>New Workspace or click on the Standard toolbar to display the Home dialog box, choose New map of my territory data/table and click OK.
- Click From My Territory Table in the radio list. Maptitude displays the Choose File to Import dialog box.
- Chose the file type and the file that contains the territory assignments, and click Open. If you are opening an Excel workbook, choose the sheet to use and click OK.
- Click Next>. Maptitude displays the Map Settings page of the Territory Wizard dialog box.
- Make map settings choices as follows:
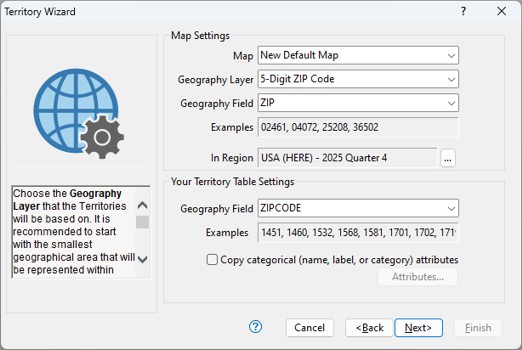
In the Map Settings frame:
- Choose whether to use an open map or a new map from the Map drop-down list
- Choose a layer in the map to use to build the territories from the Geography Layer drop-down list
- Choose the field with the names or codes of the layer features to be used if you export your territories from the Geography Field drop-down list
In the Your Territory Table Settings frame:
- Choose the field in your table that has the names or codes that correspond to the values in the chosen geography layer from the Geography Field drop-down list
- Optionally, to include other attribute fields from your table, check the Copy categorical attributes box, choose from the available attribute fields, click Add>>, and click OK
- Click Next>. Maptitude displays the Import or Link Data page of the Territory Wizard dialog box.
- Use the radio list to choose whether to import your data into the territory layer or to link your data to the territory layer.
| Option... | What it does... |
|---|---|
| Import data to territories | Maptitude imports the data without maintaining any ties to your data source. If your source data changes, you will need to recreate the territories to see those changes on the map. You should choose this option if your data are relatively static. |
| Link data to territories | Maptitude associates the map with the data source and you can update your territories with changes to your source data. You should choose this option if you want to manage your data from your original table, rather than from within Maptitude. For more information on updating your linked territory data, see To Update Linked Territories below. |
- Click Next>. Maptitude displays the Hierarchy Settings page of the Territory Wizard dialog box.
- If you want to change the name of the territory layer, click on the "Territory" cell in the Layer Name column and enter a different name.
- If you need just a single level territory layer, skip to the next step. If your territory hierarchy has more than one level, make choices as follows:
| To do this... | Do this... |
|---|---|
| Add a level to the hierarchy | Click Add Row and optionally rename the layer in the Layer Name column. |
| Rename a layer in the hierarchy | Click in the Layer Name column and enter a new name. |
| Delete a level from the hierarchy | Click Delete Last Row. |
| Rename the hierarchy | Enter a name in the Hierarchy Name box. (e.g., "Company Sales Territories" or "School Districts") |
- Click Next>. Maptitude displays the Tracking Fields page of the Territory Wizard dialog box.
- Make tracking fields choices as follows:
| To do this... | Do this... |
|---|---|
| Add tracking fields from the geographic layer | Click and choose Add Geographic Layer Fields. Choose one or more fields from the dialog box and click OK. Maptitude adds the fields in the Name column. |
| Add tracking fields from the territory table | Click and choose Import Territory Table Fields. Choose one or more tracking fields from the dialog box and click OK. Maptitude adds the fields in the Name column. |
| Import tracking fields from a file | Click and choose Import Fields from File. Choose the file to open from the dialog box and click Open. If opening an Excel workbook, choose the sheet to use and click OK. Choose the geography field from the next dialog box and click OK, then choose one or more tracking fields from the next dialog box and click OK. Maptitude adds the fields in the Name column. |
| Drop tracking fields | Highlight one or more tracking field names, and click . |
| Rearrange tracking fields | Highlight one or more tracking field names, and click or . |
| Set a balancing value | Click in a cell in the Balancing Value column, and type a value. |
- Click Finish.
Maptitude creates the territories from the table, adds the territory layer to the open map or creates a new map with the territory layer, and opens the Territory Manager. For more information, see Using the Territory Manager.
- Choose Map>Update Linked Records.
Maptitude updates the territories, adding and removing features and/or updating attribute data based on the current state of the source file.
 |
NOTE: You must have created territories from a table with the Link data to territories option chosen to update linked records. |
To See the Location of the Source Linked Territory File
- Choose Map>Linked Records Settings. Maptitude displays a dialog box containing the file path of the linked file.
- Click Close to close the dialog box.
Creating Territories from My Area Layer
With this option you can create a territory layer from a standard (.DBD) area layer in an open map. This is a good choice if you have an area layer that you want to use with the Territory Manager. Maptitude overlays your area layer on a map layer of your choice, and transfers the territories. Typically, you will want to use areas of the same type, such as states, counties, or ZIP Codes, that were used to create your original area layer.
To Create Territories from My Area Layer
- Make sure you have a map open that has your own area layer.
- Choose Map>New Territory Layer or click Territory Manager in the analysis tools drop-down on the Standard toolbar to display the Territory Wizard.
- Click From My Existing Area Layer in the radio list, choose an area layer from the drop-down list, and choose whether to use all features or a selection set. Layers that are HERE map layers will not be listed.
- Click Next>. Maptitude displays the Map Settings page of the Territory Wizard dialog box.
- Make map settings choices as follows:
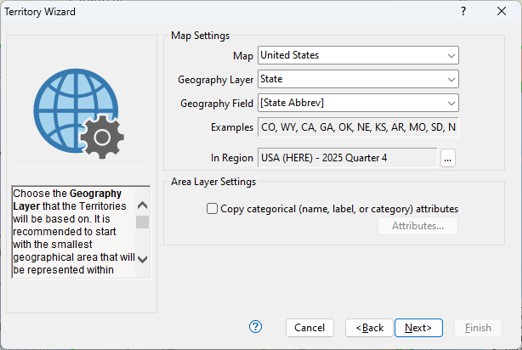
- Choose whether to use an open map or a new map from the Map drop-down list
- Choose a layer in the map to use to build the territories from the Geography Layer drop-down list
- Choose the field with the names or codes of the layer features to be used if you export your territories from the Geography Field drop-down list
- Optionally, to include other attribute fields from your table, check the Copy categorical attributes box, choose from the available attribute fields, click Add>>, and click OK
- Click Next>. Maptitude displays the Hierarchy Settings page of the Territory Wizard dialog box.
- If you want to change the name of the territory layer, click on the "Territory" cell in the Layer Name column and enter a different name.
- If you need just a single level territory layer, skip to the next step. If your territory hierarchy has more than one level, make choices as follows:
| To do this... | Do this... |
|---|---|
| Add a level to the hierarchy | Click Add Row and optionally rename the layer in the Layer Name column. |
| Rename a layer in the hierarchy | Click in the Layer Name column and enter a new name. |
| Delete a level from the hierarchy | Click Delete Last Row. |
| Rename the hierarchy | Enter a name in the Hierarchy Name box. (e.g., "Company Sales Territories" or "School Districts") |
- Click Next>. Maptitude displays the Tracking Fields page of the Territory Wizard dialog box.
- Make tracking fields choices as follows:
| To do this... | Do this... |
|---|---|
| Add tracking fields from the geographic layer | Click and choose Add Geographic Layer Fields. Choose one or more fields from the dialog box and click OK. Maptitude adds the fields in the Name column. |
| Import tracking fields from a file | Click and choose Import Fields from File. Choose the file to open from the dialog box and click Open. If opening an Excel workbook, choose the sheet to use and click OK. Choose the geography field from the next dialog box and click OK, then choose one or more tracking fields from the next dialog box and click OK. Maptitude adds the fields in the Name column. |
| Drop tracking fields | Highlight one or more tracking field names, and click . |
| Rearrange tracking fields | Highlight one or more tracking field names, and click or . |
| Set a balancing value | Click in a cell in the Balancing Value column, and type a value. |
- Click Finish.
Maptitude creates the territories from the area layer, adds the territory layer to the open map or creates a new map with the territory layer, and opens the Territory Manager. For more information, see Using the Territory Manager.
Creating Territories from My Point Layer
With this option you can create a Territory Layer from a point layer such as your customer locations. This option requires that your point layer has a field that identifies the territories to which the features belong (e.g., a field with sales representative name or territory name/code). Maptitude builds the territories from an area layer of your choosing while accounting for the point feature locations and their territory identifiers.
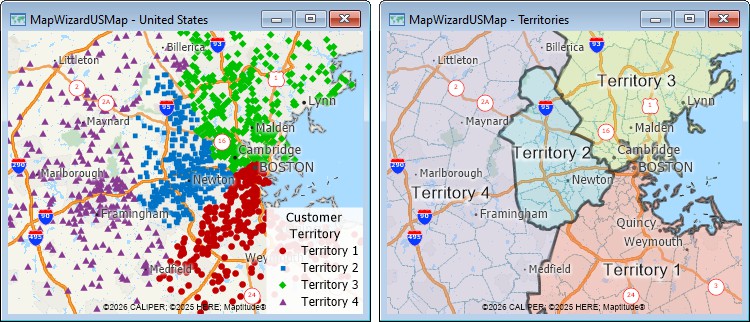
Use the territory field in the customer point layer (left) to create a territory layer from ZIP Codes (right)
To Create Territories from My Point Layer
- Make sure you have a map open that has your own point layer.
- Choose Map>New Territory Layer to display the Territory Wizard.
- Click From My Existing Point Layer in the radio list, choose a point layer from the drop-down list, and choose whether to use all features or a selection set. Layers that are HERE map layers will not be listed.
- Click Next>. Maptitude displays the Map Settings page of the Territory Wizard dialog box.
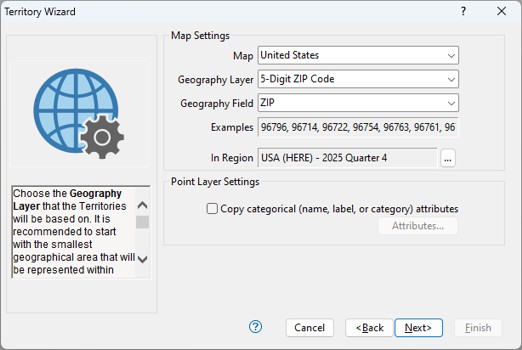
- Choose whether to use an open map or a new map from the Map drop-down list
- Choose a layer in the map to use to build the territories from the Geography Layer drop-down list
- Choose the field with the names or codes of the layer features to be used if you export your territories from the Geography Field drop-down list
- Optionally, to include other attribute fields from your table, check the Copy categorical attributes box, choose from the available attribute fields, click Add>>, and click OK
- Click Next>. Maptitude displays the Hierarchy Settings page of the Territory Wizard dialog box.
- If you want to change the name of the territory layer, click on the "Territory" cell in the Layer Name column and enter a different name.
- If you need just a single level territory layer, skip to the next step. If your territory hierarchy has more than one level, make choices as follows:
| To do this... | Do this... |
|---|---|
| Add a level to the hierarchy | Click Add Row and optionally rename the layer in the Layer Name column. |
| Rename a layer in the hierarchy | Click in the Layer Name column and enter a new name. |
| Delete a level from the hierarchy | Click Delete Last Row. |
| Rename the hierarchy | Enter a name in the Hierarchy Name box. (e.g., "Company Sales Territories" or "School Districts") |
- Click Next>. Maptitude displays the Tracking Fields page of the Territory Wizard dialog box.
- Make tracking fields choices as follows:
| To do this... | Do this... |
|---|---|
| Add tracking fields from the geographic layer | Click and choose Add Geographic Layer Fields. Choose one or more fields from the dialog box and click OK. Maptitude adds the fields in the Name column. |
| Import tracking fields from a file | Click and choose Import Fields from File. Choose the file to open from the dialog box and click Open. If opening an Excel workbook, choose the sheet to use and click OK. Choose the geography field from the next dialog box and click OK, then choose one or more tracking fields from the next dialog box and click OK. Maptitude adds the fields in the Name column. |
| Drop tracking fields | Highlight one or more tracking field names, and click . |
| Rearrange tracking fields | Highlight one or more tracking field names, and click or . |
| Set a balancing value | Click in a cell in the Balancing Value column, and type a value. |
- Click Finish.
Maptitude uses the point layer to build areas of influence, creates territories from the area layer you chose based on those areas of influence, adds the territory layer to the open map or creates a new map with the territory layer, and opens the Territory Manager. For more information, see Using the Territory Manager.
Using the Territory Manager
Once your map has a territory layer, Maptitude will display the Territory Manager that you use to create, modify, and edit territories.
You can close and open the Territory Manager by clicking Territory Manager in the analysis tools drop-down on the Standard toolbar or by choosing Map>Territory Manager Toolbar. If there is more than one territory layer in your map, Maptitude will prompt you to choose which territory layer to use with the Territory Manager.
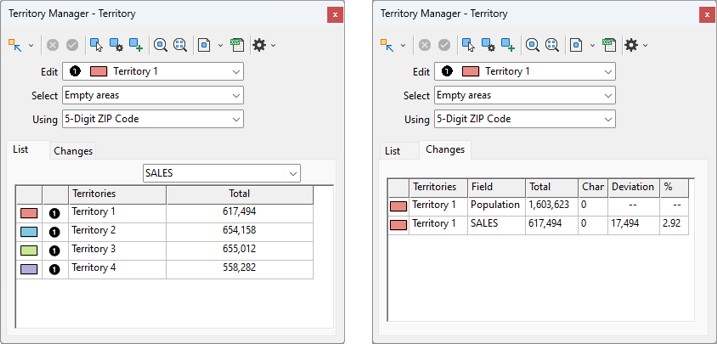
The List tab (left) lists the territories in the layer, the hierarchical level of the territories, and the totals for the tracking fields that you chose. The Changes tab (right) shows you how close the tracking fields are to your target balancing values
If you chose to create territories interactively on a map, the Territory Manager will be empty and you start by creating a new territory. If you chose one of the other methods for creating territories in the Territory Wizard, the Territory Manager will list the territories that were created and information based on any tracking fields that you chose. You can create additional new territories or modify the territories.
In addition there are several territory tools that let you change the settings, check for differences, find non-contiguous areas, export to Excel, print, and create workload reports.
|
For a video tutorial see: (Internet connection required) • Modifying Territories in Maptitude: Using the Maptitude Territory Manager to modify territories in a territory layer |
- Click
 . Maptitude displays the New Territory Settings dialog box.
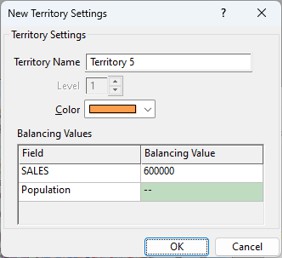
- Enter a name for the territory.
- If there is a hierarchy, choose the level to which it belongs.
- Choose a color to use to display the territory.
- Click OK.
- Select the map features to include in the new territory as described below in To Change the Map Features of a Territory.
Modifying Territories
Once you have one or more territories created, you can modify the territories using tools in the Territory Manager. Interactive tools allow you to choose which features to add to or remove from a territory. You also have control over whether features should be allowed to be in more than one territory (overlap) or prevent features from overlapping. To modify territories you:
- Choose the territory you want to modify
- Make modifications to the territory
- Change the map features in a territory
- Assign territories to different levels of a hierarchy or to different territories within the same level
- Change the name, color, or balancing value
- Automatically fill holes within territories
To Choose a Territory with which to Work
- Choose a territory from the Edit drop-down list.
— OR —
- Click
 and click on the territory on the map. If you click where two or more territories overlap, Maptitude displays the Choose Territory dialog box. Choose a territory from the scroll list and click OK.
— OR —
- Right-click on a territory on the List tab and choose Edit Territory.
To Find a Territory on the Map
- Choose the territory you want to find as described above.
- Click
 .
.
— OR —
- Right-click on a territory on the List tab and choose Zoom to Territory.
To Show All of the Territories on the Map
- Click
 .
.
To Change the Map Features in a Territory
- Create a new territory or choose the territory you want to modify as described above.
- Choose how to select the map features from the Select drop-down list as follows:
| Choose... | To do this... |
|---|---|
| Empty areas | To choose from map features that are unassigned to any territories |
| Any area & prevent overlaps | To choose from any map feature, and if already assigned to a territory, remove it from the other territory |
| Any area & allow overlaps | To choose from any map feature, and if already assigned to a territory, assign it to an additional territory |
| Areas to remove | To choose from map features that are in the chosen territory and unassign them from the territory |
- Choose the layer to use for choosing features from the Using drop-down list. In most cases you will use the geography layer you originally chose to build the territory layer. You can, however, choose a larger area so that you can select multiple features at once. For example, if you built the territory layer from the county layer, you could choose the State layer so that you can highlight all of the counties in a state at once as you choose features to add to the territory.
- Choose a selection tool from the drop-down list and use it to select features as described below:
| Tool... | How to use it... |
|---|---|
 |
Click on a single map feature to select it or click and drag a rectangle to select multiple features. Click on a single selected feature to deselect it. If you single-click at a location with several overlapping features, you will be prompted to choose which of the features to use and click Select. |
 |
Drag a rectangle to select all map features inside or touching the rectangle. |
 |
Drag a circle, or click at the center of the circle and type the radius in the Enter Selection Radius dialog box, to select all map features inside or touching the circle. |
 |
Draw an area to select all map features located inside or touching the area. Click on each corner of the area, and double-click to close the area. |
 |
Click a line through one or more map features, and double-click to end the line to select all features that the line intersects. |
You can also select map features with a condition by clicking  and entering a condition, or using the Condition Builder to create a condition by picking fields, operators, functions, and values you want from the Condition Builder drop-down lists.
|
TIP: You can view the tracking fields and their deviation from the balancing values on the Changes tab of the Territory Manager. |
If you want to clear the highlights and start this step over again, click  .
.
- Click
 .
.
Maptitude adds the new territory or modifies the existing territory and updates the map. To undo the changes, click  on the Standard toolbar.
Try It Yourself: Creating Territories
1. Choose File>New Workspace or click  on the Standard toolbar to display the Home dialog box, choose New map of my territory data/table and click OK.
2. Choose Interactively from areas in a map from the radio list and click Next.
3. Choose New Default Map from the Map drop-down list, 5-Digit ZIP Code (or a similar postal area layer if you are using a Country Package other than the United States) from the Geography Layer drop-down list, and click Next.
4. Click Next to create a single-level territory layer.
5. Click and choose Add Geography Layer Fields to display the Choose Tracking Fields dialog box. Choose Population from the scroll list and click OK.
6. Enter a Balancing Value of “250000”, and click Finish. Maptitude opens a map that includes the ZIP-Code area layer.
7. Use the Zoom In  tool to zoom to any city.
8. Click in the Territory Manager, enter "1" in the Territory Name edit box, and click OK.
9. Click the Changes tab in the Territory Manager.
10. Click in the Territory Manager to activate the Select by Pointing tool.
11. Click on a ZIP Code to highlight it. Continue to click on adjacent ZIP Codes and notice the population values in the Changes tab in the Territory Manager. Continue to add ZIP Codes until the total population is close to 250,000.
12. When you are satisfied with the territory, click .
13. Click in the Territory Manager, enter "2" in the Territory Name edit box, and click OK.
14. Use the tool to select more ZIP Codes with a population close to 250,000 and click .
15. Choose 1 from the Territory drop-down list to modify the first territory you made.
16. Choose Areas to remove from the Select drop-down list, click on a ZIP Code in the first territory, and click . Maptitude removes the ZIP Code from the territory.
17. Choose File>Close Workspace and click Don't Save to close the workspace without saving any changes.
To Assign or Reassign Territories in a Hierarchy
- If you are moving all of the map features from one territory to another within the same level of the hierarchy, skip to step 2, otherwise create the higher-level features that you want to assign territories to. For example, if you are assigning territories to districts, create new districts first as described in To Create a New Territory above.
- Click the List tab.
The List tab shows the territories in the hierarchy. Territories that have already been assigned through all levels of the hierarchy are listed above territories that still need to be assigned. Territories that have not been assigned to a higher level are listed under Unassigned.
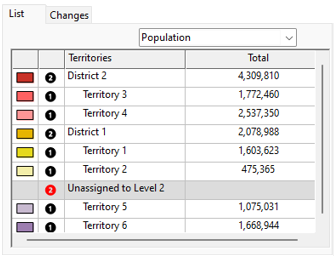
- Make changes as follows:
| To do this... | Do this... |
|---|---|
| Assign an unassigned territory, district, or other lower-level feature to a higher level | Right-click on the unassigned item and choose Assign to different (Hierarchy level), choose the higher-level feature from the drop-down list, and click OK. |
| Reassign a territory, district, or other lower-level feature that is already assigned to a higher level | Right-click on the item and choose Assign to different (Hierarchy level), choose the new higher-level feature from the drop-down list, and click OK. |
| Move all of the map features from one territory to another territory at the same level of hierarchy | Right-click on the territory whose features you want to move and choose Assign to different (Hierarchy level). Choose one or more destination territories from the scroll-list and click OK. If you chose more than one destination territory, click OK again to confirm that you want the features to be assigned to overlapping territories. |
Maptitude updates the territory hierarchy or reassigns the selected territory features based on the option you chose.
|
TIP: The second column of the List tab shows the hierarchy level for each territory. Use this column to confirm whether a territory is assigned to the correct level. Territories that have not been assigned to a higher level are listed under Unassigned on the List tab of the Territory Manager. |
To Change Settings for a Territory
- Choose a territory from the drop-down list and click
 or right click on a territory on the List tab and choose Edit Settings. Maptitude displays the Change Territory Settings dialog box.
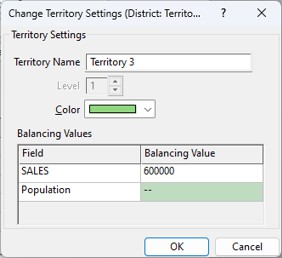
- Edit the name of the territory in the Territory Name box.
- Use the Color drop-down list to change the color.
- Edit the balancing values for any fields.
- Click OK.
Maptitude saves the changes to the territory.
To Automatically Assign Unassigned Holes
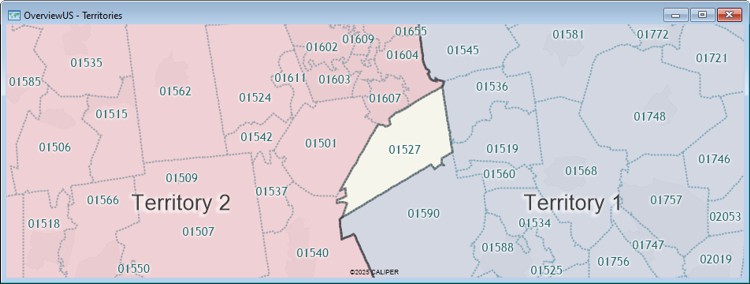
When you build territories from a table there may be holes in territories because the underlying area feature was not in the table. Similarly, you may inadvertently omit some areas when creating territories interactively with the territory selection tools. You can have Maptitude examine unassigned features and automatically assign them to territories provided that they are completely surrounded by a single territory.
For example, five ZIP Codes are unassigned in this territory map:
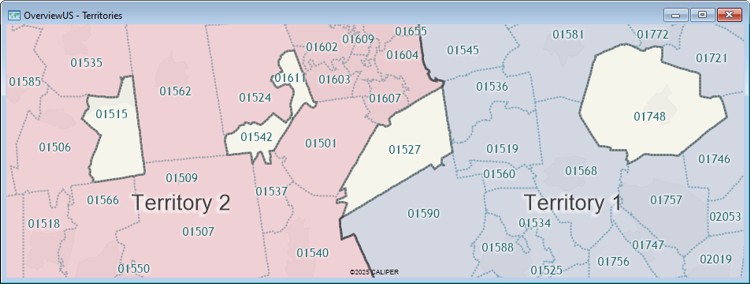
After automatically assigning these holes to territories, ZIP Codes 01515, 01542, and 01611 are assigned to Territory 2, ZIP Code 01748 is assigned to Territory 1. and ZIP Code 01527 remains unassigned:
- Click
 and choose Auto-Assign Unassigned Holes. Maptitude reports the number of features that it was able to automatically assign to territories.
 - Click OK.
Managing Territories with the Territory Tools
The territory manager has several other tools to help you manage your territory layers. You can:
- Update the territory settings and modify the tracking fields, layer styles, hierarchy by choosing Territory Settings from the Options menu
- Run error checks by choosing Check for Differences from the Options menu
- Verify that territories that are contiguous by choosing Find Non-Touching Areas from the Options menu
- Export a list of features and their territories to Excel
- Export territory data to Excel
- Print layouts of individual territories
- Create a report of the territory workload that allows you to see whether each territory in your map has too little or too much workload.
To Change the Territory Layer Settings
- Click and choose Territory Settings to display the Territory Settings dialog box.
- To change the tracking fields, click the Fields tab and make changes as follows:
| To do this... | Do this... |
|---|---|
| Add tracking fields from the geographic layer | Click and choose Add Geographic Layer Fields. Choose one or more fields from the dialog box and click OK. Maptitude adds the fields in the Name column. |
| Import tracking fields from a file | Click and choose Import Fields from File. Choose the file to open from the dialog box and click Open. If opening an Excel workbook, choose the sheet to use and click OK. Choose the geographic field from the next dialog box and click OK, then choose one or more tracking fields from the next dialog box and click OK. Maptitude adds the fields in the Name column. |
| Drop tracking fields | Highlight one or more tracking field names, and click . |
| Rearrange tracking fields | Highlight one or more tracking field names, and click or . |
| Set a balancing value | Click in a cell in the Balancing Value column, and type a value. |
- To change the display styles for the territories, click the Map tab and make changes as follows:
| To change... | Do this... |
|---|---|
| The way territories are displayed | Choose Fill Styles, Border Styles, or None from the drop-down list. |
| The fill coloring style | Click the Territories sample to display the Territory Style dialog box. Choose a fill style and a fill opacity. If the fill style is not solid, you can check Transparent to make the fill style transparent. Click OK when you are done. |
| The border coloring style | Click the Territories sample to display the Territory Style dialog box. Choose a border style, a border width, and a border opacity. Click OK when you are done. |
| The selected area style | Click the Selected Area sample to display the Selected Area Style dialog box. Choose border and fill styles. Click OK when you are done. |
- To change the hierarchy settings for the territories, click the Hierarchy tab and make changes as follows:
| To do this... | Do this... |
|---|---|
| Add a level to the hierarchy | Click Add Row and optionally rename the layer in the Layer Name column. |
| Rename a layer in the hierarchy | Click in the Layer Name column and enter a new name. |
| Delete a level from the hierarchy | Click Delete Last Row. |
| Rename the hierarchy | Enter a name in the Hierarchy Name box. (e.g., "Company Sales Territories" or "School Districts") |
- Click OK.
Maptitude saves the changes to the territory layer settings.
To Check for Errors in the Territory Layer
You can check for errors and updates that affect your territory layers. For example, if your underlying layer or table has changes to the values in the tracking fields, you can run an error check and choose whether to update the calculated tracking values. Similarly, if the underlying area layer’s boundaries have changed you can choose whether to update the territory boundaries. For example, if you created territories from ZIP Codes using a previous vintage of the ZIP Code layer, you may want to update the territories using the new ZIP Code layer provided with the latest version of Maptitude.
- Click and choose Check for Differences to display the Confirm dialog box.
- Click Yes. Maptitude checks the territory layer for any errors. More complicated geographic files, such as ZIP Codes, will take more time to check.
- Make choices as follows:
- If no errors are found, Maptitude displays a Note dialog box. Click OK.
- If attribute totals are inconsistent, Maptitude displays a Confirm dialog box. Choose whether or not to correct them.
- If boundaries are inconsistent, Maptitude displays the Rebuild Territories dialog box. To update the territory boundaries to agree with the territory definitions, click the first radio button. To keep the territory boundaries and update the area assignments, choose the second radio button. Otherwise, choose the third radio button to make no changes. Click OK. These changes cannot be undone so it is recommended that you save your territory layer to a backup archive when prompted.
Maptitude makes any changes you requested, fixing any errors.
To Find Non-Touching Areas in a Territory
Maptitude can locate discontiguous portions of territories.
- Click and choose Find Non-Touching Areas to display the Non-Touching Areas toolbar.
- The toolbar displays a list of any territories that contain multiple, non-touching areas.
By default, areas that are touching at a single point are considered non-touching. Check the Treat areas that touch at a single point as touching box and click to refresh the list if you want to exclude those areas from the list.
By default, islands that are separated by a body of water from a territory are considered to be touching. Uncheck the Ignore islands separated by a body of water box and click to refresh the list if you want to include island areas in the list.
- Highlight one or more areas in the list.
- Click
 to zoom to the chosen area(s).
 - Use the Territory Manager tools to modify the territories and connect any non-touching areas.
- Click once you have connected one or more non-touching areas to eliminate them from the list.
To Export a List of Map Features and the Territories to Which They Belong
You can create an Excel file that contains a list of all of the base geography layer features and the territory to which each belongs. For example, if your territories are created from postal codes, the sheet will list every postal code that is assigned to a territory and its respective territory.
- Click
 on the Standard toolbar or choose Tools>Reports>Export to Excel.
 - Choose a folder and enter a name for the Excel file in the Save As dialog box.
- Click Save.
Maptitude exports the territory layer into an Excel file that contains columns for the name or code field from the geographic layer and the territory name for every territory in the territory layer. If you have Microsoft Excel on your computer, the spreadsheet will be opened in Excel.
To Export Territory Data to Excel
You can create an Excel file with detailed information about one or more territories. The resulting file will contain multiple sheets that contain a list of the chosen territories and their tracking field values, a list of base layer geography features that the territories comprise, and demographic overlay data for the chosen territories.
- Click
 in the Territory Manager to display the Choose Territories dialog box.
 - Highlight the territories that you would like to export in the Available Territories scroll list and click Add>> to add them to the Selected Territories scroll list.
- By default, the resulting Excel file will have separate sheets containing overlay demographics, a list of the features for every point layer (excluding those protected by the HERE license such as landmarks), and any area layer for which a theme is present. To exclude any of these sheets, click Pick Layers, remove the check from any layer you do not need to include in the Excel file, and click OK.
|
TIP: If you do not require overlay demographic statistics for each territory, you can speed up the export by unchecking the "Overlay" row in the Pick Layers dialog box. |
- Click OK.
- Choose a folder and enter a name for the Excel file in the Save As dialog box.
- Click Save.
Maptitude exports the territory data into an Excel file. If you have Microsoft Excel on your computer, the spreadsheet will be opened in Excel.
Note, the computed demographic data will vary depending upon what Country Package you have installed. For example, if you are using the U.S. Country Package, the demographics will include income, population, gender, age, race, households, and housing units for the territory.
- Choose the territory you want to print from the Territory drop-down list.
- Choose the type of layout you want by clicking the Layout drop-down arrow and choose the type of layout you want:
 Territory Layout will create a layout of just the territory and everything around it masked
 Territory and Touching Territory Layout will create a layout of the territory and its immediate neighboring territories
 Highlighted Territory and Touching Territory Layout will create a layout of the territory and its immediate neighbors with cross-hatching on the neighbors
- Click , , or . Maptitude creates a layout for the chosen territory using your default Windows printer. To change the printer choose File>Properties or click
 on the Standard toolbar, choose a different printer, and click OK.
 - Click
 on the Standard toolbar to print the layout.
To Create a Territory Workload Report
- Click the Layout drop-down arrow and choose
 Territory Workload Report to display the Workload Report dialog box.
 - If your territory layer contains more than one level, choose a level from the Hierarchy Level drop-down.
- Choose the field you want to compare from the Workload Field drop-down.
- Make choices from the Benchmark Value drop-down as follows:
| Choose this... | To do this... |
|---|---|
| Average Workload | Maptitude calculates the mean workload across all territories and compares each territory to the average workload. |
| Balancing Value | Maptitude compares each territory to the balancing value set for the territory layer. |
- Click OK.
Maptitude displays a chart showing the workloads compared to the chosen benchmark values. The chart also shows +/-15% lines around the ideal workload making it easy to spot which territories fall outside the acceptable range.
©2026 Caliper Corporation