Maptitude Help / Managing Geographic Files / Advanced Coordinate Conversion
Advanced Coordinate Conversion
Geographic data can be stored in many different ways, including some that don’t fit neatly into a defined coordinate system. Maptitude includes two advanced features that help you use geographic data from almost any source:
Datums
The shape of the earth is irregular. To make a map, the earth’s shape needs to be “smoothed out” and shown on a regular surface, called a spheroid. A datum defines a particular spheroid that fits the whole earth, or part of the earth. For some mapping purposes it may be necessary to convert the positions of features in geographic files from one datum to another, so that they align properly. If you reference coordinates to the wrong datum, features on your map may not appear in the right locations.
For many years the standard datum for the United States and North America was the North American Datum of 1927 (NAD27). Since that time technological advances have improved the accuracy of measurements allowing for a much more accurate geocentric datum to be developed, the North American Datum of 1983 (NAD83). From NAD83, an even more precise datum was developed using GPS, called NAD83hp (high precision geodetic networks.) Maptitude supports conversions of U.S. data between all three datums, NAD27, NAD83, and NAD83hp using NADCON, the U.S. federal standard from the National Geodetic Survey (http://www.ngs. noaa.gov/TOOLS/Nadcon/Nadcon.html). NADCON also supports conversions from the old pacific island datums used on Hawaii, American Samoa, Guam and the Northern Marianas to NAD83 and NAD83hp.
Both the NAD27 and NAD83 datums are also used in Canada. Maptitude converts Canadian data between these datums as well as the regional ATS77 and MAY76 datums using NTv2, the Canadian standard conversion software and grid shift files developed by Geodetic Survey Division, Geomatics Canada (http://www.geod.nrcan.gc.ca/tools-outils/ntv2_e.php). Grid files are included with Maptitude to convert between NAD27 and NAD83 for Canada, MAY76 and NAD83 for Ontario and ATS77 and NAD83 or New Brunswick.
For Australia, Maptitude converts between the AGD66, AGD84 and GDA94 datums using the Canadian NTv2 software. The included A66 National (13.09.01).gsb, National 84 (02.07.01).gsb grid shift files for converting between AGD66, AGD84 and GDA94 were produced by Australia’s Intergovernmental Committee on Surveying and Mapping and are available on their website: http://www.icsm.gov.au.
For Austria, Maptitude converts between the MGI and ETRS89 datums using the Canadian NTv2 Software. The conversion requires the AT_GIS_GRID.GSB grid shift file, available from the Bundesamt für Eich- und Vermessungswesen website: http://www.bev.gv.at. It needs to be installed in the Datum folder in the Maptitude program folder.
For Brazil, Maptitude converts between the CA61, CA7072, SAD69 and SAD69(96) datums and the SIRGAS2000 datum using the Canadian NTv2 Software. The included CA61_003.GSB, CA7072_003.GSB, CA69_003.GSB SAD96_003.GSB grid shift files were produced by the Instituto Brasileiro de Geografia e Estatística and available on their website: http://www.ibge.gov.br.
For France, Maptitude converts between the NTF and RGF93 datums using the Canadian NTv2 Software. The included Ntf_r93.gsb grid shift file was produced by IGN (Institut Géographique National) and available on their website: http://lambert93.ign.fr.
For Germany, Maptitude converts between the DHDN and ETRS89 RGF93 datums using the Canadian NTv2 Software. The included BETA2007.GSB grid shift file was produced by Bundesamt für Kartographie und Geodäsie and available on their website: http://crs.bkg.bund.de.
For New Zealand, Maptitude converts between the NZGD49 and NZGD2000 datums using the Canadian NTv2 software. The included nzgd2kgrid00005.gsb grid shift file was produced by the Office of the Surveyor-General, Land Information New Zealand and available on their website: http://www.linz.govt.nz.
For Portugal, Maptitude converts between the Datum73, DLx, DLx (Bessel), and ED50 datums and the ETRS89 datum using the Canadian NTv2 software. The included Pt73_e89.gsb, ptLX_e89.gsb, ptLB_e89.gsb, ptED_e89.gsb were produced by Faculdade de Ciências da Universidade do Porto: http://www.fc.up.pt/pessoas/jagoncal/coordenadas/index_en.htm
For Spain, Maptitude converts between the ED50 and ETRS89 datums using the Canadian NTv2 software. Separate conversions are provided for the Iberian Peninsula and the Balearic Islands. The included R2009V9.gsb and BALR2009.gsb grid shift files were produced by the Instituto Geografico Nacional - Ministerio de Fomento and available on their website: http://www.01.ign.es.
For Switzerland, Maptitude converts between the CH1903, CH1903+, and ETRS89 datums using the Canadian NTv2 Software.
For Great Britain, Maptitude converts between the OSGB36 and ETRS89 datums, using Ordnance Survey’s OSTN02 transformation method.
For the Republic of Ireland and the province of Northern Ireland, Maptitude converts between the Irish datum (1975 adjustment) and ETRS89 using the Ordnance Survey of Ireland (OSi)/Ordnance Survey of Northern Ireland (OSNI) polynomial transformation method.
Other datum translation methods are required when you work with datums used in other countries not mentioned above. These methods are not currently supported by Maptitude.
Maptitude helps make sure your location information is correct by providing options for converting between datums. Suppose you have two or more geographic files that you want to use together in a map, but their coordinates are not based on the same datum. You need to pick one datum, and convert the other geographic files to that datum. The conversion is done by specifying the new datum when you export the geographic file. When you convert from one datum to another, Maptitude shifts the coordinates from one datum to the coordinates of another datum.
 To Import Data from Another Datum
- Begin the import procedure for the particular file type you are importing. Specific import procedures for each file type are presented in Importing Geographic Files.
- When Maptitude displays the Import Geography dialog box, click Coordinates. Maptitude displays the Import Coordinates dialog box.
- Choose the datum conversion you want from the Method drop-down list. For datum conversions involving NAD83hp, choose a region from the Region drop-down list.
- Click OK to return to the Import Geography dialog box.
- Return to and complete the import procedure for the particular file type you are importing.
To Export Data to Another Datum
- Begin the export procedure as described in Exporting Geographic Files.
- When Maptitude displays the Export Geography dialog box, click Coordinates. Maptitude displays the Export Coordinates dialog box.
- Choose the datum conversion you want from the Method drop-down list. For datum conversions involving NAD83hp, choose a region from the Region drop-down list.
- Click OK to return to the Export Geography dialog box.
- Return to and complete the export procedure.
Linear Transformations
Maptitude stores the data in its geographic files in degrees of longitude and latitude. Some standard coordinate systems, such as State Plane, Gauss-Krüger, Universal Transverse Mercator (UTM), and others, have well-defined conversions to and from coordinates in longitude and latitude. Maptitude has these conversions built in. For other coordinate systems, you need to provide the conversion information. These other coordinate systems are referred to here as arbitrary coordinate systems.
Linear transformations let you convert data that are in an arbitrary coordinate system so that they can be used in Maptitude. For example, suppose the positions of parcels in your arbitrary coordinate system do not match up with the positions of streets in the Caliper U.S. Streets file. If you are combining Maptitude data with data that uses an arbitrary coordinate system, you need to transform the coordinates of the latter so that the two sets of data match up.
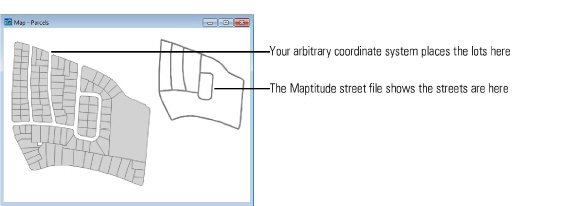
Maptitude lets you shift and scale the coordinates in an arbitrary coordinate system so that they match up with coordinates in a standard coordinate system. This way, Maptitude can correctly convert the data and store it in degrees of latitude and longitude. You can also convert Maptitude data so it can be used in your arbitrary coordinate system.
To transform coordinates from an arbitrary coordinate system, you import the data. To transform coordinates from a Maptitude geographic file to match coordinates in an arbitrary coordinate system, you export the data.
Maptitude provides three ways to make data from an arbitrary coordinate system fit correctly into Maptitude geographic files, and vice versa. They are:
All three linear transformation methods allow you to shrink or expand the scale of coordinates and to shift those coordinates by a certain distance. The N-Point Transformation method gives you the added option of adjusting the orientation of (rotating) coordinates.
Scale and Offset
When you use the Scale and Offset method to import coordinates from an arbitrary coordinate system, Maptitude:
- Reads the coordinates in their original form
- Multiplies each coordinate by fixed-scale values (an x-value and a y-value)
- Adds fixed-offset values (an x-value and a y-value) to each coordinate
- Converts the coordinates to longitude and latitude and stores them in the geographic file
When you use the Scale and Offset method to export coordinates to an arbitrary coordinate system, Maptitude:
- Reads the coordinates from the geographic file and converts them from longitude and latitude
- Subtracts fixed-offset values (an x-value and a y-value) from each coordinate
- Divides each coordinate by fixed-scale values (an x-value and a y-value)
- Stores the modified coordinates in the export file
To use the scale and offset method, you must supply four values: the x- and y-offset values, and the x- and y-scale values. For example, suppose you are working with a map of tax parcels that comes from a CAD system. In this particular data set, the coordinates are measured in tenths of a foot, and the lower left corner of the CAD drawing has a coordinate of (0,0) and point “A” has a coordinate of (2000,10100).
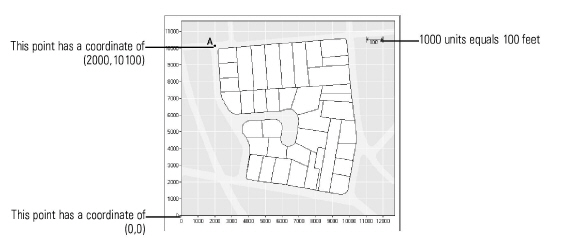
From an existing Maptitude map, you may know that the intersection where point “A” is located has a particular coordinate. Let’s say, for example, that in the Rhode Island 1983 State Plane coordinate system, point “A” has a coordinate in feet of (11438.0, 24601.0).
To import the CAD data and convert it to the Rhode Island State Plane coordinate system, you would use the following four values:
| Parameter | Value | How it works |
|---|---|---|
| X-scale | 0.1 | The original coordinate of 2000 is multiplied by 0.1 to get the value of 200 feet. |
| X-offset | 11238 | This offset is added to 200 feet to get 11438 feet. |
| Y-scale | 0.1 | The original coordinate of 10100 is multiplied by 0.1 to get the value of 1010 feet. |
| Y-offset | 23591 | This offset is added to 1010 feet to get 24601 feet. |
To export Maptitude data so that the coordinates match the CAD drawing, you would use the following four values:
| Parameter | Value | How it works |
|---|---|---|
| X-offset | 11238 | This offset is subtracted from 11438 to get 200 feet. |
| X-scale | 0.1 | 200 feet is divided by 0.1 to get the value of 2000 CAD units. |
| Y-offset | 23591 | This offset is subtracted from 24601 to get 1010 feet. |
| Y-scale | 0.1 | 1010 feet is divided by 0.1 to get the value of 10100 CAD units. |
To Import Data Using Scale and Offset
- Begin the import procedure for the particular file type you are importing. Specific import procedures for each file type are presented in importing Geographic Files.
- Click the Coordinates button to display the Import Coordinates dialog box.
- Choose Scale and Offset from the Linear Transformation Type drop-down list.
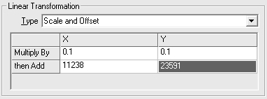
- If you want to scale coordinates, type the x-scale value and the y-scale value in the respective Multiply By cells.
- If you want to shift coordinates, type the x-offset value and the y-offset value in the respective Then Add cells.
- Click OK to return to the Import Geography dialog box.
- Return to and complete the import procedure for the particular file type you are importing.
Maptitude adjusts the coordinates accordingly.
To Export Data Using Scale and Offset
- Begin the export procedure as described in To Export a Map Layer.
- Click the Coordinates button to display the Export Coordinates dialog box.
- Choose Scale and Offset from the Linear Transformation Type drop-down list.
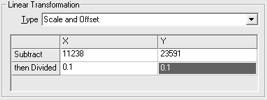
- If you want to shift coordinates, type the x-offset value and the y-offset value in the respective Subtract cells.
- If you want to scale coordinates, type the x-scale value and the y-scale value in the respective Then Divide By cells.
- Click OK to return to the Export Geography dialog box.
- Return to and complete the export procedure as described here.
Maptitude adjusts the coordinates accordingly.
Center and Extent
The Center and Extent method for transforming coordinates is similar to the Scale and Offset method, but you enter the data that are needed for the transformation in a slightly different way.
To use this method, you provide two types of information:
- The coordinates of a single, known location in both the arbitrary coordinate system and the standard coordinate system. These values are used to determine the x- and y-offset values between the two coordinate systems.
- The size of a particular map feature or map measurement in both the arbitrary coordinate system and the standard coordinate system. These values are used to determine a scaling factor between the two coordinate systems.
Note that the Center and Extent method applies a uniform scale factor to both the x- and y-coordinates. The Scale and Offset method, on the other hand, can use different scale factors for the x- and y-coordinates. This makes the Scale and Offset method slightly more flexible.
When you use the Center and Extent method to import coordinates from an arbitrary coordinate system, the following steps take place:
- The coordinates are read in their original form
- The coordinates are adjusted by a scaling factor so they are of the correct magnitude
- The coordinates are shifted so that the known point lines up correctly
- The coordinates are converted into longitude and latitude and stored in the geographic file
When you use the Center and Extent method to export coordinates to an arbitrary coordinate system, the following steps take place:
- The coordinates are read from the geographic file and converted from longitude and latitude
- The coordinates are shifted so that the known point lines up correctly
- The coordinates are adjusted by a scaling factor so they are of the correct magnitude
- The modified coordinates are stored in the export file
As an illustration, let’s return to the CAD map example shown above. To convert the CAD data to the Rhode Island State Plane coordinate system, or vice versa, you would enter the following parameters:
| Parameter | Value |
|---|---|
| Local X-value | 2000 |
| Local Y-value | 10100 |
| World X-value | 11438.0 |
| World Y-value | 14601.0 |
| Local width | 10 |
| World width | 1 |
To Import Data Using Center and Extent
- Begin the import procedure for the particular file type you are importing. Specific import procedures for each file type are presented in Importing Geographic Files.
- Click the Coordinates button to display the Import Coordinates dialog box.
- Choose Center and Extent from the Linear Transformation Type drop-down list.
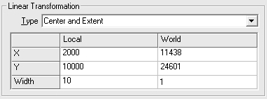
- If you want to shift coordinates, type local X and Y coordinates in the Local column and the corresponding standard coordinates in the World column.
- If you want to scale coordinates, type a value for the width of a feature in the local coordinate system in the Local Width cell and the corresponding standard width in the World Width cell.
- Click OK to return to the Import Geography dialog box.
- Return to and complete the import procedure for the particular file type you are importing.
Maptitude adjusts the coordinates accordingly.
To Export Data Using Center and Extent
- Begin the export procedure as described in To Export a Map Layer.
- Click the Coordinates button to display the Export Coordinates dialog box.
- Choose Center and Extent from the Linear Transformation Type drop-down list.
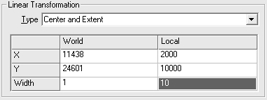
- If you want to shift coordinates, type standard X and Y coordinates in the World column and the corresponding local coordinates in the Local column.
- If you want to scale coordinates, type a value for the width of a feature in the standard coordinate system in the World Width cell and the corresponding local width in the Local Width cell.
- Click OK to return to the Export Geography dialog box.
- Return to and complete the export procedure as described here.
Maptitude adjusts the coordinates accordingly.
N-Point Transformation
When the orientation of features in an arbitrary coordinate system differs from the orientation of features in a standard coordinate system, you must use N-Point Transformation to convert the coordinates. With the N-Point Transformation method, not only can you shift and scale coordinates, you can rotate them as well.
To use the N-Point Transformation method, you enter the coordinates of one or more known points in both the arbitrary coordinate system and the standard coordinate system. Maptitude uses this information to compute the scale, offset, and rotation that are required to convert the coordinates.
In general, you can enter one, two, or three pairs of points when using the N-point Transformation:
- If you enter one control point for both the local and world X and Y coordinates, Maptitude shifts the coordinates accordingly.
- If you enter two control points for both the local and world X and Y coordinates, Maptitude can both shift the coordinates and change the scale of the coordinates.
- If you enter three control points for both the local and world X and Y coordinates, Maptitude can shift the coordinates, change the scale of the coordinates, and rotate the coordinates.
To Import Data Using N-Point Transformation
- Begin the import procedure for the particular file type you are importing. Specific import procedures for each file type are presented in Importing Geographic Files.
- Click the Coordinates button to display the Import Coordinates dialog box.
- Choose N Point Transform from the Linear Transformation Type drop-down list.
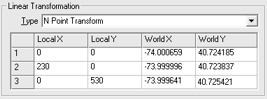
- Type one, two, or three sets of local X and Y coordinates in the Local X and Local Y columns and the corresponding standard coordinates in the World X and World Y columns.
- Click OK to return to the Import Geography dialog box.
- Return to and complete the import procedure for the particular file type you are importing.
Maptitude adjusts the coordinates accordingly.
To Export Data Using N-Point Transformation
- Begin the export procedure as described in To Export a Map Layer.
- Click the Coordinates button to display the Export Coordinates dialog box.
- Choose N Point Transform from the Linear Transformation Type drop-down list.
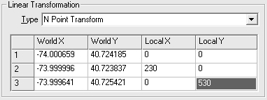
- Type one, two, or three sets of standard X and Y coordinates in the World X and World Y columns and the corresponding local coordinates in the Local X and Local Y columns.
- Click OK to return to the Export Geography dialog box.
- Return to and complete the export procedure as described here.
Maptitude adjusts the coordinates accordingly.
©2026 Caliper Corporation