Maptitude Help / Geographic Analysis Tools / Market Share
Calculating Market Share (Huff Model)
The Market Share Wizard uses a Huff Gravity Model to calculate your market share for an area by examining how attractive your stores are compared to all competing stores. The Market Share Wizard requires a point layer with your store locations and a separate point layer with your competitor locations. Both layers require a name field to identify the stores. They can optionally include a weighting field (e.g., size of store, number of seats in restaurant, or a rank of how competitive the pricing is).
There are two options for viewing the results of the market share analysis:
- You can calculate the market share in an existing area layer, such as postal codes. This option will output a table joined to that layer with the market share each store has for each area, as well as the total market share for the your stores. When you use this option, you can choose to base calculations on either straight-line distances or driving distance/time. You can also choose to apply a theme that illustrates the market share results on that area layer.
- You can create bands of equal market share that spread out from around the stores. For example the first band could be the areas of the map where you have over 90% market share. Then a second band for 80% to 90% market share etc. You can choose the number of bands to create, the market share interval, and whether to calculate demographics and create a report of the bands.
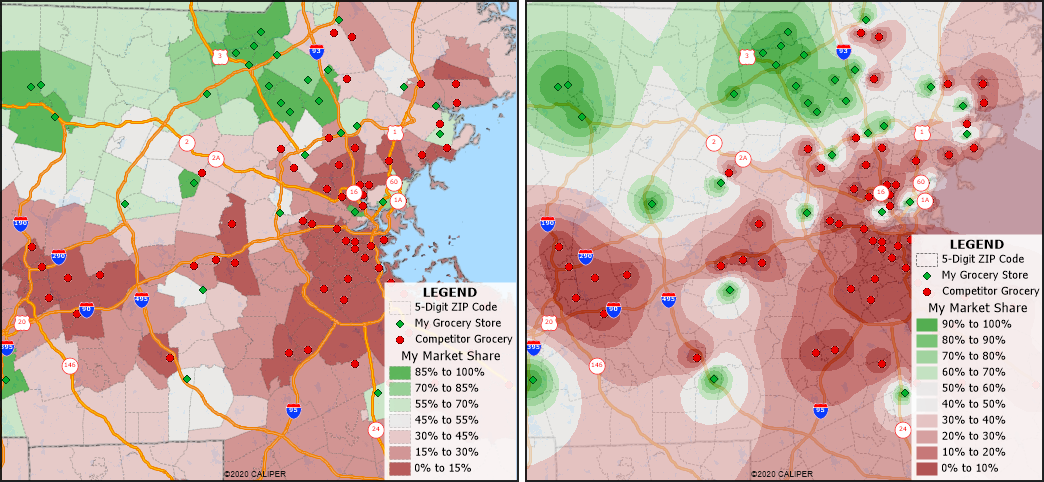
Market share by ZIP Code for a grocery store chain (left) and 10% interval market share bands for the same stores (right)
The Huff Model parameters can be customized for different analyses:
- The Attractiveness Enhancement parameter dictates how store attractiveness influences the perceived utility of each store. The default value is 1, which indicates that perceived utility grows linearly with store attractiveness.
- The Distance Decay parameter dictates how distance influences the perceived utility of each store. Distance decay is a term that describes the effect that distance has on shopping or other spatial interactions and essentially says that the interaction declines as the distance increases. In other words, a potential customer is more likely to shop at a location close to home than at one far away. The distance decay parameter can be used to amplify the distance to destinations. For example, activities such as a vehicle purchase can have a smaller exponent because people may be willing to travel farther to purchase a vehicle, whereas activities such as choosing a bank may have a larger exponent because people prefer to travel a short distance for such things. The default value is -2, which indicates that perceived utility decays quadratically with distance.
 To Calculate Market Share for Areas
- Open or create a map that contains a point of your locations and a separate point layer of your competitor locations.
- Choose Tools>Analysis>Market Share (Huff Model) or click
 Market Share (Huff Model) in the analysis tools drop-down on the Standard toolbar to display the Market Share Wizard.
 - Specify your store and your competitor stores as follows:
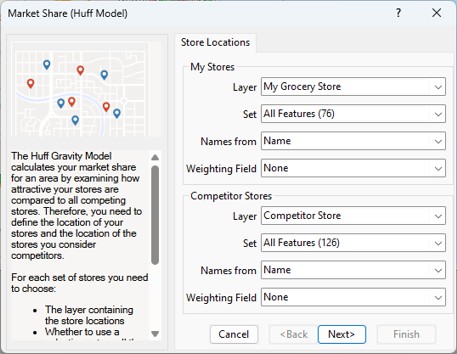
- In the My Stores frame, choose the layer that contains your stores from the Layer drop-down list, choose whether to use all features or a selection set from the Set drop-down list, choose a field that contains the store names from the Names from drop-down list, and optionally choose a weighting field.
- In the Competitor Stores frame, choose the layer that contains your competitors' stores from the Layer drop-down list, choose whether to use all features or a selection set from the Set drop-down list, choose a field that contains the store names from the Names from drop-down list, and optionally choose a weighting field.
- Click Next> to choose the output options.
- Choose Calculate Market Share for Areas in an Existing Layer from the radio list and make choices as follows:
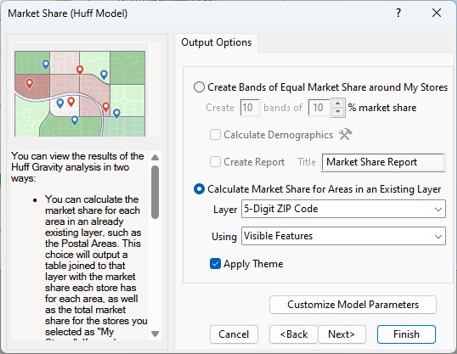
- Choose and area layer to use from the Layer drop-down list and choose whether to use all features or a selection set from the Using drop-down list.
- Check the Apply Theme box to add a theme of the market share results to the area layer.
- To change the Attractiveness Enhancement or Distance Decay parameter, click Customize Model Parameters and enter new values or click Defaults to restore the default parameters, and click OK.
- Click Next> and choose the method options as follows:
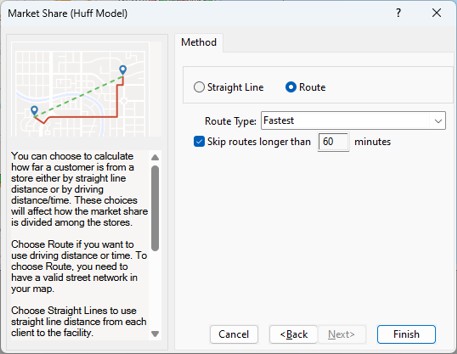
- Choose whether to base the market share analysis on straight-line distance or driving routes from the radio list
- If you chose the Route method, choose whether to base the routes on drive-time (fastest) or by distance (shortest) from the Route type drop-down list. T
- If you chose the Route method, choose whether to skip routes that exceed a threshold distance or time from the analysis. Check Skip routes longer than and enter a maximum value in the edit box.
- Click Finish.
Maptitude calculates the market shares for the areas and displays a dataview that contains the market share for each store and the total store and competitor shares in each area. If you chose to apply a theme, Maptitude adds a theme to the map showing the market share in each area.
- Open or create a map that contains a point of your locations and a separate point layer of your competitor locations.
- Choose Tools>Analysis>Market Share (Huff Model) or click Market Share (Huff Model) in the analysis tools drop-down on the Standard toolbar to display the Market Share Wizard.
- On the Store Locations tab make choices as follows:
- In the My Stores frame, choose the layer that contains your stores from the Layer drop-down list, choose whether to use all features or a selection set from the Set drop-down list, choose a field that contains the store names from the Names from drop-down list, and optionally choose a weighting field.
- In the Competitor Stores frame, choose the layer that contains your competitors' stores from the Layer drop-down list, choose whether to use all features or a selection set from the Set drop-down list, choose a field that contains the store names from the Names from drop-down list, and optionally choose a weighting field.
- Click Next> to choose the output options.
- Choose Create Bands of Equal Market Share around My Stores from the radio list and make choices as follows:
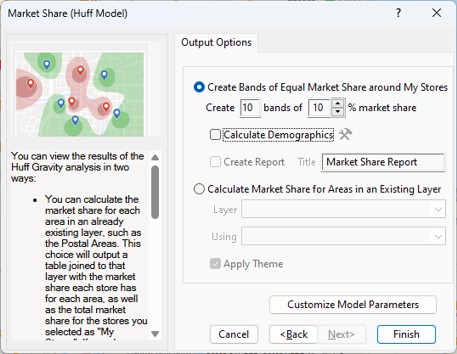
- Enter the number of bands in the Create box and enter the interval or use the up and down arrows in the bands of % market share box.
- To calculate demographics for the bands, check the Calculate Demographics box. Optionally, check the box to create a report of the demographics.
- To change the Attractiveness Enhancement or Distance Decay parameter, click Customize Model Parameters and enter new values or click Defaults to restore the default parameters, and click OK.
- If you checked the Calculate Demographics box, you can specify the attributes to calculate and/or count features in the bands. Click
 to display the Demographic Settings dialog box and make choices as follows:
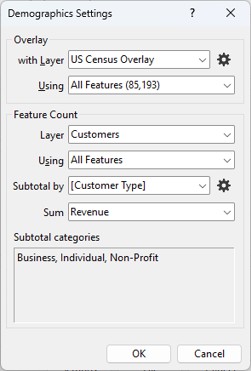
- Choose a reference layer with demographics and the features to use from the with Layer and Using drop-downs list. Typically Maptitude will choose an appropriate layer and demographic fields to use. See To Change the Aggregation Method when Calculating Demographics for information on changing these fields.
- To count the features in each band, choose the layer whose features you want to count and the features to use from the Layer and Using drop-down lists.
- To subtotal the counted features, choose a field to use for grouping and the category types to group or choose None to get the total count of features without subtotaling. For example, you could use the "Type" field in the landmark layer and choose to find the number of restaurants and schools within the bands.
- Choose a field from the feature count layer to aggregate from the Sum drop-down list. For example, you could calculate the total revenue of customers within the bands.
- Click OK to return to the Market Share dialog box.
- Click Finish.
Maptitude displays bands for the chosen market share intervals on the map.
Try It Yourself: Creating Market Share Bands
1. Choose File>New Workspace, choose New map of my data/table/spreadsheet from the first scroll list, and click OK.
2. In the Tutorial folder, open the Excel spreadsheet with logistics data for your country (e.g., Logistics Australia.xlsx, Logistics United States.xlsx, etc.).
3. Choose the Sites sheet and click OK. Maptitude displays Create-a-Map Wizard.
4. Click Next>, choose the first "Locate" option in the scroll list, and click Next>. Then click Next> again to import the data.
5. Check the Display Labels box, verify that the Site Name field in the spreadsheet is chosen in the drop-down list, and click Finish. Maptitude locates five sites and displays the Results dialog box.
6. Click OK to display a map of the sites.
7. Click  on the Standard toolbar, enter My Stores as the set name, and click OK.
8. Click  in the Selection Tools drop-down on the Standard toolbar and click on two of the sites to add them to the "My Stores" selection set.
9. Click on the Standard toolbar, enter Competitors as the set name, and click OK.
10. Click in the Selection Tools drop-down on the Standard toolbar and click on the other three sites to add them to the "Competitors" selection set.
11. Choose Tools>Analysis>Market Share (Huff Model) or click Market Share (Huff Model) in the analysis tools drop-down on the Standard toolbar to display the Market Share Wizard.
12. In the My Stores frame, verify that Sites Layer is chosen in the Layer drop-down list, My Stores is chosen in the Set drop-down list, and [Site Name] is chosen in the Names From drop-down list.
13. In the Competitor Stores frame, verify that Sites Layer is chosen in the Layer drop-down list, Competitors is chosen in the Set drop-down list, and [Site Name] is chosen in the Names From drop-down list.
14. Click Next>.
15. Choose the Create Bands of Equal Market Share around My Stores option and choose 10 for the number of bands and 10 for the % market share..
16. Click Finish. Maptitude calculates the market share and adds the bands to the map.
17. Choose File>Close Workspace and click Don't Save to close the workspace without saving any changes.
©2026 Caliper Corporation