Maptitude Help / Working with Tables, Databases, & Charts / Displaying Data for a Map Layer or a Table
Displaying Data for a Map Layer or a Table
A dataview is a window that displays data as a table, with information presented in rows and columns. Each row is called a record and represents one person, place, or thing. Each column is called a field and contains one piece of information about each record. At the top of each column is a heading that contains the name of the field.
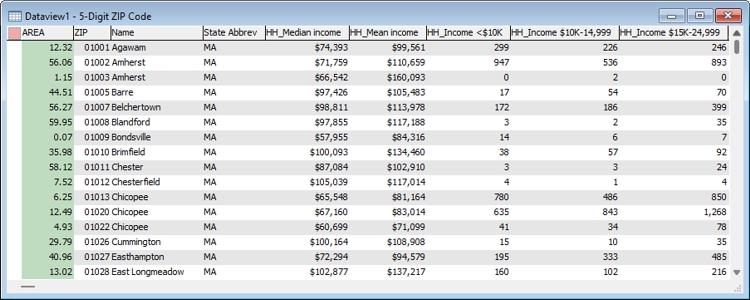
A dataview is only a window onto an underlying database or spreadsheet. When you save a dataview, you save the fonts, column order, and other aspects of how the data are presented, but not the actual data values. When you edit a value in a dataview, the value is stored immediately in the underlying database, not as part of the dataview.
Some fields in a dataview may include additional information, such as data source information. If there is additional information about a field in a dataview, positioning the cursor over the field heading displays a pop-up window that displays the information.
You can create and display any number of dataviews.
Creating a Dataview
You can create a dataview showing the data associated with any map layer. In addition, Maptitude directly supports Access, dBASE, Oracle, and SQL Server database formats, Excel spreadsheets, fixed-format text files, fixed-format binary files, and comma- and tab-separated text files.
Maptitude can also create dataviews from any ODBC source, ODBC SQL Query, Oracle Tables, Microsoft Access Tables, and Microsoft SQL Server Tables or you can create a new table in dBASE, comma-separated, fixed-format, and fixed-format binary files. For more information, see Opening Dataviews from Other Sources and Creating a New Table from Scratch.
 |
For a video tutorial see: (Internet connection required) • Working with Data in Maptitude: Using the Info tool, displaying data in a dataview, and working with dataviews (locking columns, sorting, formula fields, and formatting) |
 To Display Data for any Map Layer
- Right-click on a layer or selection set in the Display Manager and choose New Dataview.
—OR—
- Choose the layer whose data you want to see from the drop-down list on the Standard toolbar and choose Dataview>New Dataview.
To Display Data for a Map Layer from a Dataview
- Click
 on the Standard toolbar to display the New Dataview dialog box.
 - Choose one or more layers from the scroll list and click OK.
Maptitude opens a dataview displaying data for the layers you chose.
To Display Data from an Excel Worksheet
- Choose File>Open or click
 on the Standard toolbar, or right-click anywhere inside the Maptitude frame except on a window and choose Open. Maptitude displays the File Open dialog box.
 - Choose Excel Worksheet as the file type.
- If you want to scan the entire Excel file for field sizes before opening the file, click Options, check the Scan all records when importing box and click OK.
- Choose the file you want to open, and click Open. Maptitude displays the Choose an Excel Sheet or Range dialog box.
- Highlight a worksheet or named range in the scroll list and click OK.
Maptitude opens the whole worksheet or the named range within a worksheet in a read-only dataview.
Since Excel has no concept of data fields when reading a sheet as a data table, the Jet engine has to infer a data type for each column. It does this by scanning the values first few rows and making a guess from the values it finds. If all the cells for a particular column in those first few rows are empty then the Jet engine gives the column the character type, even though there might only be numeric values in any of the later rows. The only way to change this behavior is to modify a setting in the registry which tells Jet how many rows to scan. The setting is:
HKEY_LOCAL_MACHINE\Software\Microsoft\Jet\4.0\Engines\Excel\TypeGuessRows
You can set the value either to a number or to 0 to scan all the rows.
To Display Data from a Database or Data File
- Choose File>Open or click on the Standard toolbar, or right-click anywhere inside the Maptitude frame except on a window and choose Open. Maptitude displays the File Open dialog box.
- Choose the file type and file you want to open.
- Check Open as read-only if you want to protect the data from accidental changes. Some file formats, such as comma- and tab-delimited text files, can only be opened as read-only.
- Check Open for exclusive access if you want to prevent others from opening the file at the same time.
- Click Open.
Maptitude opens a new dataview and displays data from the file. For more information on read-only and exclusive access, see Sharing Maptitude Data Files.
Try It Yourself: Displaying Data in a Dataview
1. Choose File>New Workspace or click  on the Standard toolbar, choose New map of {country name}, then use Create-a-Map Wizard to create a map of your country.
2. Right-click on the State (or Province, County, or similar depending on your country package) layer in the Display Manager and choose New Dataview to open a dataview for the State layer.
3. Click on the Standard toolbar, choose another layer from the scroll list, and click OK to open a dataview for that layer.
4. Choose File>Open or click on the Standard toolbar, choose Excel Worksheet as the file type and open the sample customer file in the Tutorial folder. Maptitude displays the Choose Excel Sheet dialog box.
5. Uncheck the Import box and click OK. Maptitude opens a dataview with the contents of the Excel file.
6. Choose File>Close Workspace and click Don't Save to close the workspace without saving any changes.
©2026 Caliper Corporation