Maptitude Help / Working with Tables, Databases, & Charts / Doing Calculations with Data
Doing Calculations with Data
To compute new data based on data you already have, you can add, subtract, multiply, or divide the existing data. You can have Maptitude do these calculations for you by creating a formula.
| Data you have... | Data you want... |
|---|---|
| Quarterly sales | Annual sales |
| 2025 home values and 2020 home values | Change in home values |
| Total population and population over age 65 | Percent of population over age 65 |
| Sales and operating expenses | Profit |
In all of these cases, you want to create a new piece of information by adding, subtracting, multiplying, or dividing other data you already have available. Formulas can contain field names; arithmetic operators like +, -, *, and /; relational operators like <, >, <=, >=, and <>; and many different types of numeric and string functions. For more details on the exact syntax of formulas, see Formulas, Conditions, and Functions.
You use formulas in one of two ways:
- Store the formula itself, so Maptitude can compute the result on the fly. To do so, you use the Dataview>Formula Fields command.
- Store the result of the formula in an existing column of a dataview. To do so, you use the Edit>Fill command, and choose Formula as the method. (For more information, see Filling a Range of Cells or Groups of Columns with Data.)
If you use the Dataview>Formula Fields command, Maptitude remembers the formula. Every time it needs a value from the formula field (say, to make a thematic map, or to display a dataview), it computes the value the moment it is needed. This means that if someone updates any of the fields used in the formula, the formula field will always be correct and up-to-the-minute.
If you use the Edit>Fill command, Maptitude computes formula for every record in the dataview, and stores the result in the geographic file or database. From then on, Maptitude can access and display the change the formula results very quickly. However, if you or someone else updates any of the fields that were used in the formula, the values you computed will no longer be correct and will also need to be updated.
Whichever method you choose, you enter a formula using the Formula dialog box. Here are some sample formulas:
| To answer this question... | Use this formula... |
|---|---|
| What is the aggregate income of a population? |
Population * PerCapitaIncome |
| What is the total number of commuters? |
Drive + Carpool + [Public Transportation] + Walk + [Other Means] |
| What is the one year percent change in sales? |
([Sales This Year] - [Sales Last Year]) / [Sales Last Year] * 100 |
| What is the percentage of senior citizens in a population? |
[Age 65+] / Population * 100 |
There is a Statistics option that lets you quickly create a formula field that is the sum, mean, median, standard deviation, maximum, or minimum of two or more fields. This is particularly useful when working with some of the demographic data provided with Maptitude. For example, the Brazil Country Package includes age fields in 1-year increments (e.g., [Age 0], [Age 1], [Age 2], etc.). If you want to create a formula field that has the total population under age 20, you can use the Statistics option to sum the 20 fields to the formula all at once rather than entering the 20 fields individually in the Formula dialog box. You also have the option to add a scaling factor to any of the fields you use.
Creating a Formula Field
Maptitude stores a formula in a formula field which you create using the Dataview>Formula Fields command. Once you create a formula field, you can use it like any other field. For example, you can sort a dataview based on a formula field, create additional formula fields based on a formula field, or, if the dataview contains data that are linked to a map layer, you can use the formula field to make thematic maps or to label map features.
 |
For a video tutorial see: (Internet connection required) • Working with Data in Maptitude: Using the Info tool, displaying data in a dataview, and working with dataviews (locking columns, sorting, formula fields, and formatting) |
- Choose Dataview>Formula Fields or, if a dataview is the current window, click
 on the Standard toolbar to display the Formula dialog box.
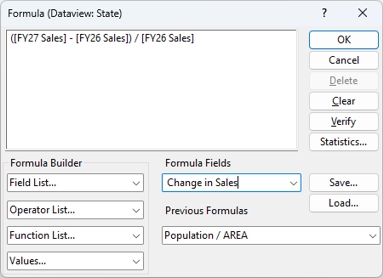
- Create a formula using any of the following methods:
- Type a formula in the Formula box. Note, if a field name contains spaces or other special characters or starts with a digit, you must put square brackets around it. For example a field called Age <5 will need to be [Age <5] in your formula. Fields that require brackets will automatically display with them in the Formula Builder Field List.
- Use the Formula Builder drop-down lists to create a formula by picking the fields, operators, and functions you want from the drop-down lists.
 |
TIP: You can filter the field list in the Formula Builder by clicking on the drop-down list and typing several letters. Only fields containing the text you enter will be shown in the drop-down list. |
- Choose a formula from the Previous Formulas drop-down list and type any edits to the formula.
- Click Statistics to display the Statistics dialog box. Choose the statistic to calculate from the drop-down list and click Choose Fields to add the fields to include in the statistic from the scroll list of available fields. Click OK once you have chosen the fields to return to the Statistics dialog box. To scale any of the fields, enter a value in the Multiply By column of the grid view. Click OK when you are done to return to the Formula dialog box.
- Click Verify if you want to check the formula. Maptitude indicates whether the formula is correct. Return to step 2 if you need to correct the formula.
- Type a name for the formula field in the Formula Fields editable drop-down list.
- Click OK.
Maptitude creates the formula field. If you are looking at a dataview, Maptitude displays the formula field as the last column in the dataview. If you are looking at a map, Maptitude adds the formula field to the list of fields you can use in labeling and thematic mapping.
- Choose Dataview>Formula Fields or, if a dataview is the current window, click on the Standard toolbar to display the Formula dialog box.
- Choose an existing formula field from the Formula Fields drop-down list. Maptitude displays the formula in the formula box.
- Click Delete. Maptitude asks you to confirm the operation.
- Click Yes.
— OR —
- Open a dataview and highlight one or more formula field columns.
- Right-click on a highlighted column and choose Delete Formula Field(s). Maptitude asks you to confirm the operation.
- Click Yes.
Maptitude deletes the formula field and removes the formula field from any dataviews in which it is displayed.
 To Save Formulas to a File
- Choose Dataview>Formula Fields or, if a dataview is the current window, click on the Standard toolbar to display the Formula dialog box.
- Click Save to display the Save Formulas As dialog box.
- Type a file name and click Save.
To Load Formulas from a File
- Choose Dataview>Formula Fields or, if a dataview is the current window, click on the Standard toolbar to display the Formula dialog box.
- Click Load to display the File Open dialog box.
- Choose the file containing the formulas and click Open.
Maptitude reads the formulas from the file and updates the Previous Formulas drop-down list.
Try It Yourself: Doing Calculations with Data
1. Choose File>Open Workspace or click  on the Standard toolbar, then open the RhodeIsland workspace in the Tutorial folder.
2. Right-click on County in the Display Manager and choose New Dataview.
3. Choose Dataview>Formula Fields or click on the Standard toolbar to display the Formula dialog box.
4. Choose [HU Occupied] from the Field List drop-down list, choose / from the Operator List drop-down list, choose [Housing Units (HU)] from the Field List drop-down list, choose * from the Operator List drop-down list, and finally type 100 to create the formula "[HU Occupied] / [Housing Units (HU)] * 100."
5. Type “Percent Occupied” as the new formula field name in the Formula Fields editable drop-down list.
6. Click OK. Maptitude puts the new formula field on the right side of the dataview.
7. Choose File>Close Workspace and click Don't Save to close the workspace without saving any changes.
©2026 Caliper Corporation