Maptitude Help / Geocoding / Locating Records with the Locate Wizard
Locating Records with the Locate Wizard
Frequently when you are locating your data by address, there will be records that cannot be found and require you to use alternate methods. For example if an address is a Post Office box or building name, it may be necessary for you to locate the unmatched records by postal code or city and state. The Locate Wizard simplifies this task by running several passes through your data and finding the best possible location method. Once the data are located, your point layer will include a field indicating the method used to locate each record.
The methods that the Locate Wizard uses will vary based on the Country Package you are using. For example, the Locate Wizard for the United States will first locate records using the address and ZIP Code, then locate records by address and city, then by ZIP Code, and finally by city.
 |
TIP: You can also use Create-a-Map Wizard to locate your records. For more information see Locating Records in Your File as Points on a Map in Mapping my Own Data. |
 To Locate Records with the Locate Wizard
- Open a dataview of the records that you want to locate.
- Choose Tools>Locate>Locate Wizard or click
 Locate Wizard on the Standard toolbar to display the Locate Wizard dialog box.
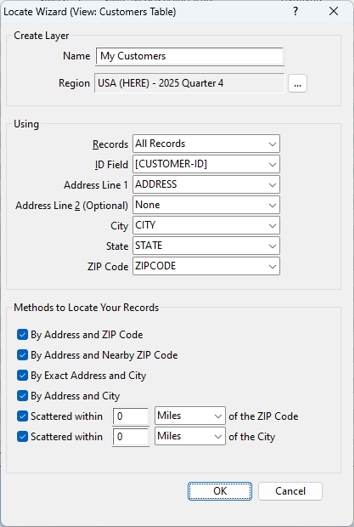
- Enter a name for the new geocoded point layer in the Name box.
- If your data are in a different region than the one shown, click
 to choose another installed region.
 - Choose whether to locate all records or a selection set from the Records drop-down list.
- Choose the field that contains unique IDs or choose to create new ID fields from the ID Field drop-down list.
- Choose the fields that contain address information from the Address Line, City, State, and ZIP Code drop-down lists.
- Check the boxes next to the methods you want to use. Note, the methods will vary depending on the Country Package that you are using.
- Click OK. Maptitude locates the records using the chosen methods and displays a report with the number of records located for each method.
- Click OK to close the report.
Maptitude locates the records in your data using the chosen methods. If you open a dataview of the new layer you can see the [Geocoding Precision] field that indicates how each record was located.
Try It Yourself: Using the Locate Wizard
1. Choose File>Open or click  on the Standard toolbar, choose Excel Worksheet as the file type, and open the sample customer file for your region in the Tutorial folder.
2. Check the Import box and click OK. Maptitude displays a dataview with the imported customer data from the Excel file
3. Click Locate Wizard on the Standard toolbar to display the Locate Wizard.
4. Choose [Customer ID] from the ID Field drop-down list. The address, city, and postal fields should be automatically filled in.
5. Click OK. Maptitude locates the records and displays the match statistics where you can see how many records were located with each method.
6. Click OK to continue.
7. Click  Color Theme in the thematic mapping drop-down on the Standard toolbar, choose [Geocoding Precision] from the Field drop-down list and click OK. Maptitude adds a color theme to the map showing how each record was located. Notice that the vast majority were located with the highest precision.
8. Click  on the Standard toolbar, then click on any of the located customers to see their information.
9. Choose File>Close Workspace and click Don't Save to close the workspace without saving any changes.
©2026 Caliper Corporation